
Getting Started
This page will help you get started with AppNavi. You'll be up and running in a jiffy!
Getting Started
Welcome to AppNavi! This guide provides the starting point for setting up AppNavi and helps you understand the main steps required to get AppNavi running in your application.
AppNavi is a user adoption platform that helps organizations guide users through business applications, provide contextual assistance, and understand how applications and their features are being used.
If you want to test AppNavi you are welcome to visit our website and request a free trial.
Who should start here?
Start with this guide if you are:
- Setting up AppNavi for the first time.
- An administrator responsible for configuring an AppNavi tenant.
- Responsible for connecting AppNavi to a business application.
- Setting up an AppNavi proof of concept or production environment.
- Looking for the correct documentation to continue with your AppNavi setup.
If AppNavi has already been configured for your organization and you only need information about a specific feature, use the relevant guide from the documentation instead.
Before you begin
Before starting the setup, make sure you have:
- Access to the AppNavi Portal with the required permissions.
- An application where AppNavi will be used.
- The URL of the target application.
- Access to the application configuration or source code if you plan to use Direct Integration.
- The required browser permissions if you plan to use the AppNavi Chrome Extension.
- A clear understanding of whether you are setting up AppNavi for a proof of concept, testing, or production use.
The exact requirements depend on the integration method and application environment you choose.
The AppNavi setup at a glance
A typical AppNavi setup consists of three main steps:
- Set up and understand the AppNavi Portal
- Create your first Application
- Integrate AppNavi into your Application
Once these steps are complete, you can continue with creating and managing AppNavi content, configuring access, and analyzing usage.
The AppNavi Portal is the central place where you configure and manage AppNavi.
From the Portal, administrators can manage applications, create and manage AppNavi content, configure access and authentication, and review usage and analytics.
The Portal is also where you define how AppNavi should behave for each application.
Learn more: The AppNavi Portal
An Application connects AppNavi to the business application where you want AppNavi to appear.
The URL and URL pattern are particularly important because they determine where AppNavi should be available.
After creating the application, save the configuration and verify that AppNavi loads correctly on the target application.
Learn more: Create your first Application
- Integrate AppNavi into your Application
After creating your AppNavi Application, you need to integrate AppNavi into the target application.
AppNavi provides different integration options depending on your environment and requirements.
After AppNavi is integrated
Once AppNavi is integrated successfully, open the target application and verify that:
- The AppNavi Avatar appears where expected.
- The configured URL pattern matches the target pages.
- The Avatar visibility settings work as expected.
- AppNavi content can be displayed correctly.
- The target application continues to work normally.
If AppNavi does not appear, check the application URL and pattern first. For Direct Integration, also verify that the integration script has been added correctly and that the application's security or CSP configuration does not block AppNavi resources.
Recommended setup path
For a new AppNavi implementation, we recommend following this order:
AppNavi Portal → Create Application → Integrate AppNavi → Verify Integration → Create Content
AppNavi structure
To make it as easy as possible for you to get started with AppNavi, we would like to familiarize you with the basic structure of AppNavi and explain various terms.
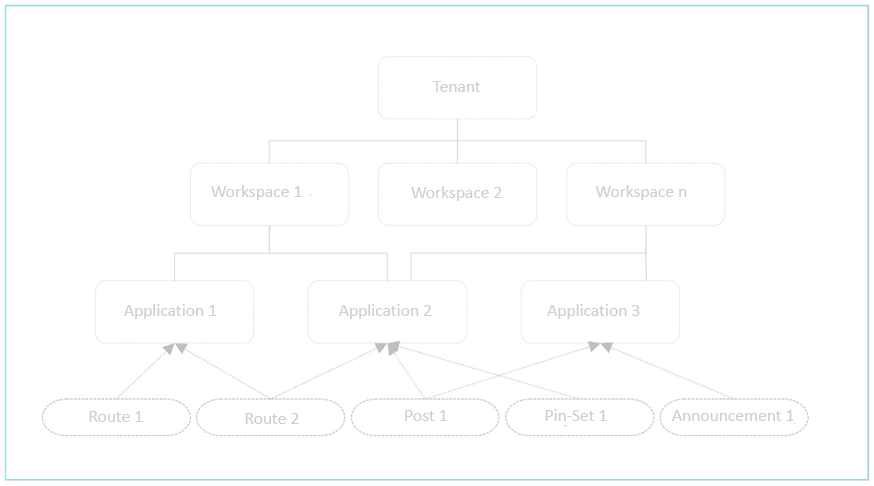
AppNavi Structure
AppNavi is designed as a multi-tenant solution: each customer gets his own tenant accordingly. The tenant represents the highest technical instance in which all content is stored. At the tenant level, settings can be made that apply to all workspaces, applications, content and users. Only so-called tenant owners can make these settings - and even delete the tenant.
Within a tenant there can be 1-n workspace. Workspaces are used to clearly separate responsibilities. For example, Workspace 1 can be used for organizational area A, Workspace 2 for organizational area B. This ensures that one area cannot change the content of the other area. However, it is also possible to use content across workspaces to enable cooperation and avoid duplicate content creation. Workspace management is the responsibility of the 1-n workspace owners.
Within a workspace there can be 1-n applications. An application can be assigned to one or more workspaces. Each application must be assigned to exactly one contract.
Numerous features are available within AppNavi: Routes & Route Collections, Posts, Announcements and Pins. All these contents can be assigned to 1-n applications. All content can be translated manually or automatically (DeepL integration).
Updated 19 days ago