
Ways to integrate AppNavi into your Application
AppNavi can be integrated into your application using either
These variants offer advantages and disadvantages. However, it doesn't matter which variant you use to integrate AppNavi into your site, the delivered version of our software is always identical.
AppNavi Chrome Extension
With this variant it is necessary to install the AppNavi Chrome Extension from the official Chrome Store. After the installation you need to enter the ID of your tenant and press the start button.
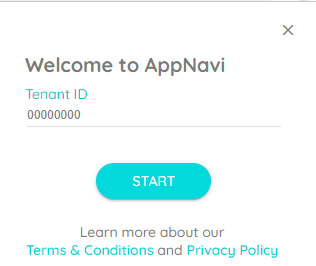
After that, the AppNavi will be displayed on pages that you have configured in the portal. However, this way of setting up AppNavi is really only suitable for PoCs. To learn how to set up the AppNavi Chrome Extension for your company click here. In order to display the AppNavi avatar in your application, we load our CSS as a resource into the target application. In parallel, the AppNavi Javascript code as well as the content scripts which contains the routes, news, etc. are evaluated and loaded into the target application.
When to use the Chrome Extension
The Chrome Extension is suitable for:
- Proofs of concept
- Testing AppNavi before a production integration
- Applications where you cannot modify the application source code
- Organizations that centrally manage browser extensions
- Enterprise deployments using browser policies
For a quick PoC, install the AppNavi Chrome Extension and enter your AppNavi tenant ID.
Once configured, AppNavi is displayed on the application pages that are configured in the AppNavi portal.
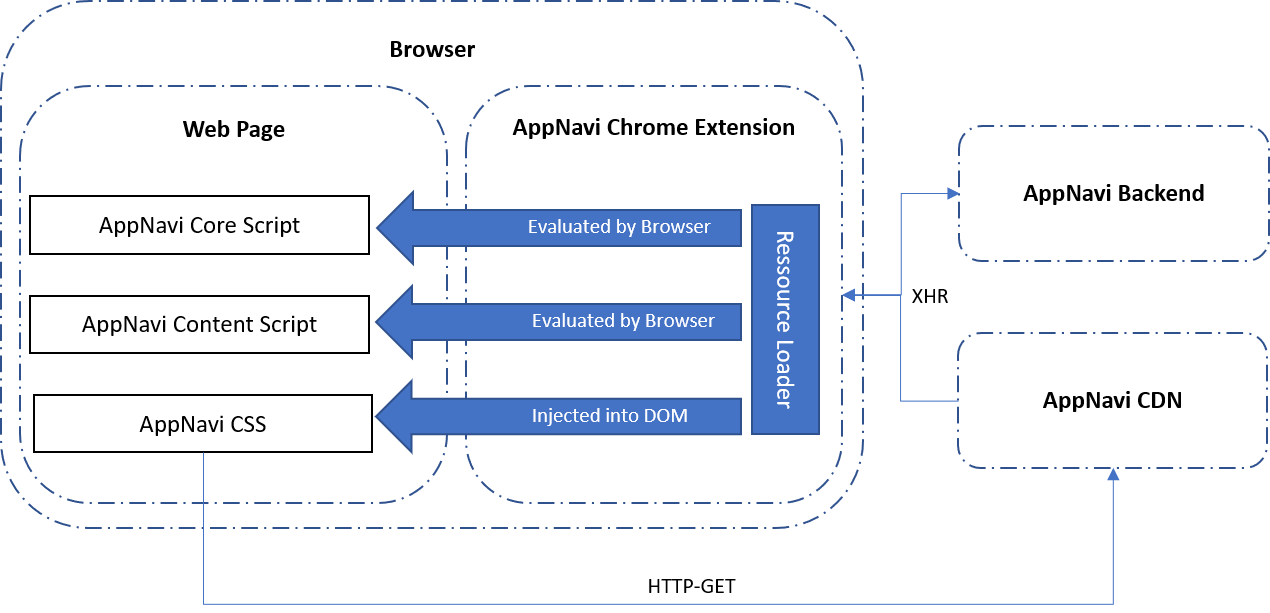
How the Chrome Extension works
If AppNavi is integrated into a system via the Chrome Extension, the AppNavi API calls are no longer transmitted directly to the AppNavi backend, but first to the Chrome Extension. The AppNavi Chrome Extension then submits the request to the AppNavi backend and returns the response. In this way, communication to the AppNavi backend can be prevented from being restricted by website features such as CORS. This only affects communication to the AppNavi backend. Other functions of the page remain unrestricted and we do not modify other XHR requests. Our AppNavi Chrome Extension is only able to communicate with our AppNavi backend system due to the security settings in the manifest
Required Chrome Extension permissions
The AppNavi Chrome Extension uses the following permissions:
- webRequest
- webRequestBlocking
- browsingData
- tabs
- storage
Issues with Content Security Policy
In some applications with very strict CSP settings, the AppNavi avatar may not be displayed correctly as shown in the following picture.
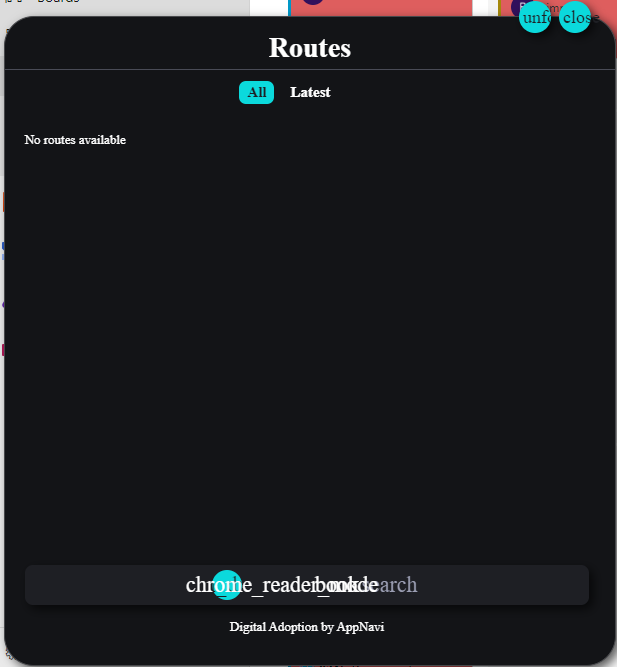
CSP issues
In this case you have to whitelist the content sources. You will find more details here.
PoC vs. Enterprise Deployment
For a quick PoC, users can install and configure the extension manually.
For enterprise deployment, AppNavi supports centralized installation and configuration through browser management policies. Administrators can configure the extension so that it is automatically installed and the target tenant is configured for users.
See Distribute AppNavi Chrome Extension in Enterprises for enterprise deployment options.
Direct Integration
If AppNavi is only to be integrated into a specific application, this can also be done via a direct script link integration as an alternative to the Chrome Extension. As with the Chrome Extension, the an-loader component functions purely as a resource loader. Depending on the application, the an-loader integration must take place in the page header or at the end of the body.
Basic Integration
The AppNavi loader can be added to the application's or before the closing tag.
For new integrations, generate the integration script from the application's Edit Application page instead of manually constructing the URL. This ensures that the required secure parameters are included.
The generated script has the following general structure:
<script type="text/javascript" src="https://data-prod.inappnavi.com/client/an-loader.js?tenant=18140616&delay=250"></script>Replace the values with those generated for your AppNavi application.
Integration Parameters
The following settings must be configured as request parameters:
| Parameter | Description |
|---|---|
| tenant / tenantId | Identifies the AppNavi target tenant from which the configuration and data are loaded. |
| appId | Identifies the AppNavi application. Required for the secure integration when Tenant Encryption is enabled. |
| delay | Some applications require the application to be fully loaded before AppNavi can be integrated. In this case, the time delay until AppNavi is loaded can be configured via this parameter in milliseconds. |
| sh | Secure Hash used to verify that the integration request is authorized. |
The current secure integration mechanism protects application metadata and uses signed integration parameters to help prevent unauthorized access to AppNavi resources.
When to use Direct Integration
Use Direct Integration when:
- AppNavi should be available only in a specific application.
- User can modify the application's HTML or application code.
- User need more control over when AppNavi loads.
- User are deploying AppNavi in a production environment.
- User's application has specific security or CSP requirements.
- User want to use the secure integration mechanism provided by AppNavi.
Script Link Integration in SAP Success Factors
If AppNavi is integrated into SAP Success Factors via an-loader, the mechanism can be used in SF to configure the userAssistSettings. For this, the following variables must be set.
| Variable name | Description |
|---|---|
| anDelay | The time offset with which AppNavi is loaded into the page in milliseconds. |
| anTenantId | The ID of the tenant from which the information for AppNavi is to be loaded. |
| anAppId | The ID of the Application for which the AppNavi is to be loaded. Required when Tenant Encryption is enabled. |
| anSh | The secure key for secure communication. Required when Tenant Encryption is enabled. |
The following code snippet can be used to check whether the information can be read by the an-loader.
window.pageHeaderJsonData.settings.userAssistSettingsAsJSStrThe code should return the configuration as follows:
'{"anDelay":"250","anTenantId":"123456"}'In case Tenant Encryption is enabled for the Tenant, the code should return the configuration as follows:
'{"anDelay":"250","anTenantId":"123456", "anAppId": "123456", "anSh": "af4743b7285d4378adf8f424e1136dbbe1c995845d4e4c55b908dc041979cd4c"}'Note: In the scenario of Tenant Encryption turned off, "anAppId" and "anSh" should not be specified.
Content Security Policy (CSP)
Some applications use strict Content Security Policies that can prevent AppNavi resources from loading.
If AppNavi does not appear correctly, check the browser developer console for CSP errors.
Typical errors include:
- Refused to load the AppNavi script.
- Refused to execute a script.
- Refused to apply AppNavi styles.
- Refused to load an AppNavi image or other resource.
Your CSP configuration may need to allow the AppNavi resources used by your application.
For example, a standard configuration may include:
connect-src api-prod-eu-central-1.inappnavi.com data-prod.inappnavi.com;
script-src data-prod.inappnavi.com;
img-src data: data-prod.inappnavi.com;
font-src data: data-prod.inappnavi.com;
style-src 'unsafe-inline' data-prod.inappnavi.com;
The exact configuration depends on your application and whether you use features such as Custom Code or embedded YouTube videos.
For detailed configuration options, including nonce-based CSP for Direct Integration, see the Content Security Policy (CSP) Configuration Guide.
Nonce-based CSP
For Direct Integration, AppNavi also supports a nonce-based CSP configuration.
A nonce allows the application to authorize specific scripts and styles without relying on unsafe-inline. However, network and resource directives such as connect-src, img-src, and font-src still need to allow the required AppNavi resources.
For More details, check Content Security Policy (CSP) Configuration Guide
Running AppNavi an-loader and AppNavi Chrome Extension simultaneously
While it's technically possible to run AppNavi's an-loader and the Chrome Extension simultaneously, it isn't recommended. Both the an-loader and the Chrome Extension check for the presence of any other integrations. If they detect an existing one, they halt their loading process. However, if no other integration is detected, they continue loading.
Here's an illustrative scenario, if both integrations are run simultaneously: The AppNavi Chrome Extension might initiate first, thereby preventing the an-loader from executing and loading the Avatar.
To avoid such situations, it's advisable to use either the an-loader or the Chrome Extension at any given time, but not both concurrently.
Does AppNavi affect the performance of my application?
AppNavi runs in the browser and uses browser resources to load. The speed at which AppNavi loads depends on the user's network connection. A faster network connection will load AppNavi faster overall. In addition, AppNavi uses technologies to divide the resources into smaller components so that they can be delivered faster to the user's browser. The AppNavi engine is based on static resources that are cached in different layers (browser & CDN). The CDN delivers the static resources closest to the end user's physical location.
AppNavi is designed so that all resources are only loaded after the main application has been fully loaded. This ensures that AppNavi has no influence on the loading performance of the main application. In addition, the AppNavi code is designed in such a way that only the components configured for the application are executed. AppNavi also offers the option of executing certain sets of rules as well as custom code written by the user. Depending on the complexity of the custom code, the execution performance of the page may be impaired.
Enhance Security - Direct Integration
AppNavi now offers enhanced protection for the metadata file used in direct integration. With this update, application metadata is no longer publicly accessible, even if the application is hosted on a public website. This protection is automatically enabled when tenant encryption is active for your account.
This guide walks you through generating secure integration scripts, understanding the security improvements, and verifying your setup works correctly after deployment.
Overview
What Changed: Enhanced Security for Direct Integration
AppNavi has upgraded its direct integration security model to protect your application metadata from unauthorized access. Previously, metadata files could be accessed if your application was hosted publicly. Now, with encryption enabled, these files are protected and accessible only to authorized requests.Key Security Improvements
Key Security Improvements
• Application metadata is no longer publicly accessible, even on public websites
• Each integration script is uniquely signed and cryptographically verified
• All resources (data files, images, videos) are securely served with encryption
• Protection is automatically enabled when tenant encryption is active
• Backward compatibility maintained for older integrations without encryption
Prerequisites
Before implementing secure direct integration, ensure you have:
• Active AppNavi account with admin or integration permissions
• Access to the application edit settings page in AppNavi
• Web server or hosting environment where AppNavi will be integrated
• Tenant encryption enabled for your account (or ability to enable it)
• Basic understanding of HTML script tags and web integration
• Website or application where you will embed the integration script
How to Implement Secure Direct Integration
Step 1: Access the Edit Application Page
- Sign in to your AppNavi account with admin or integration permissions
- Go to the Applications or Integrations section
- Choose the application you want to integrate
- Click the Edit button or gear icon to open application settings
- Confirm you are on the Edit Application page
Step 2: Generate Secure Integration Script
- On the Edit Application page, find the "Generate Integration Script" button or icon
- Click the button to open the integration script generator
- A popup will appear showing your secure integration script
- The script includes pre-filled secure parameters specific to your application
- Confirm the appId and encryption token are populated correctly
- Ensure you're using the latest secure script format
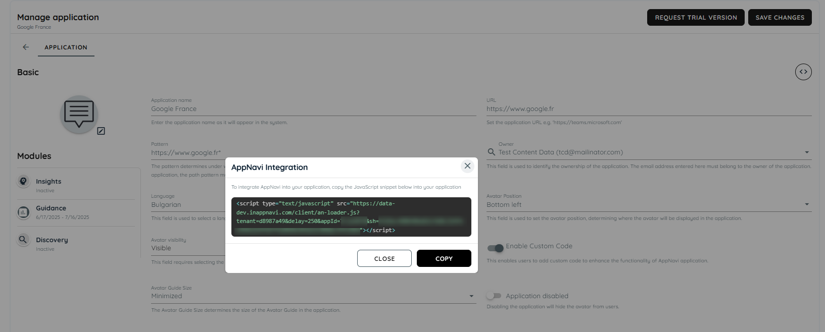
Click the "Generate Integration Script" button on the Edit Application page to display the script popup.
Step 3: Copy the Integration Script
- In the popup, find the "Copy to Clipboard" button
- Click the button to copy the entire integration script to your clipboard
- Confirm the copy operation was successful (browser may show a confirmation)
- The copied script is in HTML
- Treat the script content as sensitive; do not share publicly
Step 4: Embed Script in Your Website
- Open the HTML file of your website or application
- Decide whether to place the script in or section
- Paste the copied integration script into your HTML
- Do not modify or split the script code
- Save your HTML file with the embedded script
- Upload the updated HTML file to your web server
Understanding the Integration Script
Script Components
The generated integration script contains several key components:
| Component | Purpose |
|---|---|
| Script Tag | HTML <script> tag that loads the AppNavi integration library |
| appId Parameter | Unique identifier for your application, generated by AppNavi |
| Encryption Token | Cryptographic token that verifies the script is authentic and unmodified |
| Callback Function | Optional function that executes after AppNavi initializes |
Example Integration Script
Here is an example of what your integration script may look like:
<script src="https://cdn.appnavi.com/secure/loader.js" data-appid="abc123def456" data-token="eyJhbGciOiJIUzI1NiIs..." async></script>Important: Do not modify any of these parameters. Each is cryptographically verified to ensure security and proper functionality.
Frequently Asked Questions
- Is the integration script secure to share with my team?
The script itself is cryptographically signed and secure. However, treat it like sensitive configuration data and share only with authorized team members. Regenerate scripts periodically for security. - Can I modify the integration script?
No. Modifying any part of the script will cause the cryptographic verification to fail and the script will not load. If you need to change parameters, regenerate a new script from AppNavi. - What happens if encryption is disabled?
If you disable encryption, metadata protection is removed and the security benefits are lost. Re-enable encryption to restore protection. - Do I need to update all my integrations if I enable encryption?
Existing integrations without encryption will continue to work. You can gradually migrate to secure integration. New integrations should use secure integration by default. - How often should I regenerate integration scripts?
Regenerate scripts annually or whenever AppNavi notifies you of security updates. You can also regenerate on-demand if you suspect compromise. - Can I use one script on multiple websites?
Each script is tied to a specific application appId. For each application you want to integrate, generate a unique script.
Related Features
The following features work in conjunction with Enhance Security - Direct Integration:
• Direct Integration Methods - Overview of all direct integration options
• Application Settings - Configure application-wide settings including security options
• UserActivityTracking - Monitor user interactions with securely integrated content
• Tenant Encryption - Enable and manage encryption for your account
• Integration Troubleshooting - Solve common integration issues
Integration Example
Copy and paste the following snippet into your application’s <head> or before the closing </body> tag:
<script
  type="text/javascript"
  src="https://data-prod.inappnavi.com/client/an-loader.js?tenant=18140616&delay=250&appId=265de151&sh=44e415cbe3cbef28717641844d20f33b4cd7e9bab31196d0d7b0c2d9ba10f436">
</script>
Advanced Parameters
When using the secure integration, the following additional parameters are required:
| Parameter | Description |
|---|---|
tenantId | The ID of the tenant from which the information for AppNavi is to be loaded. |
appId | The unique AppNavi Application ID. |
delay | The time offset with which AppNavi is loaded into the page in milliseconds. |
sh | Secure Hash: A unique cryptographic signature used to verify the integrity of the request and ensure it originates from an authorized source. |
Updated about 11 hours ago