
Single Sign-On with Okta
Setup Single Sign-On (SSO) with Okta
To set up SSO in AppNavi with Okta, follow the steps below,
Step# 1 Create a new Application in Okta
-
On the Okta administrator Menu click on the APPLICATIONS dropdown.
-
Now click on the Applications button in the dropdown and the add application page will appear.
-
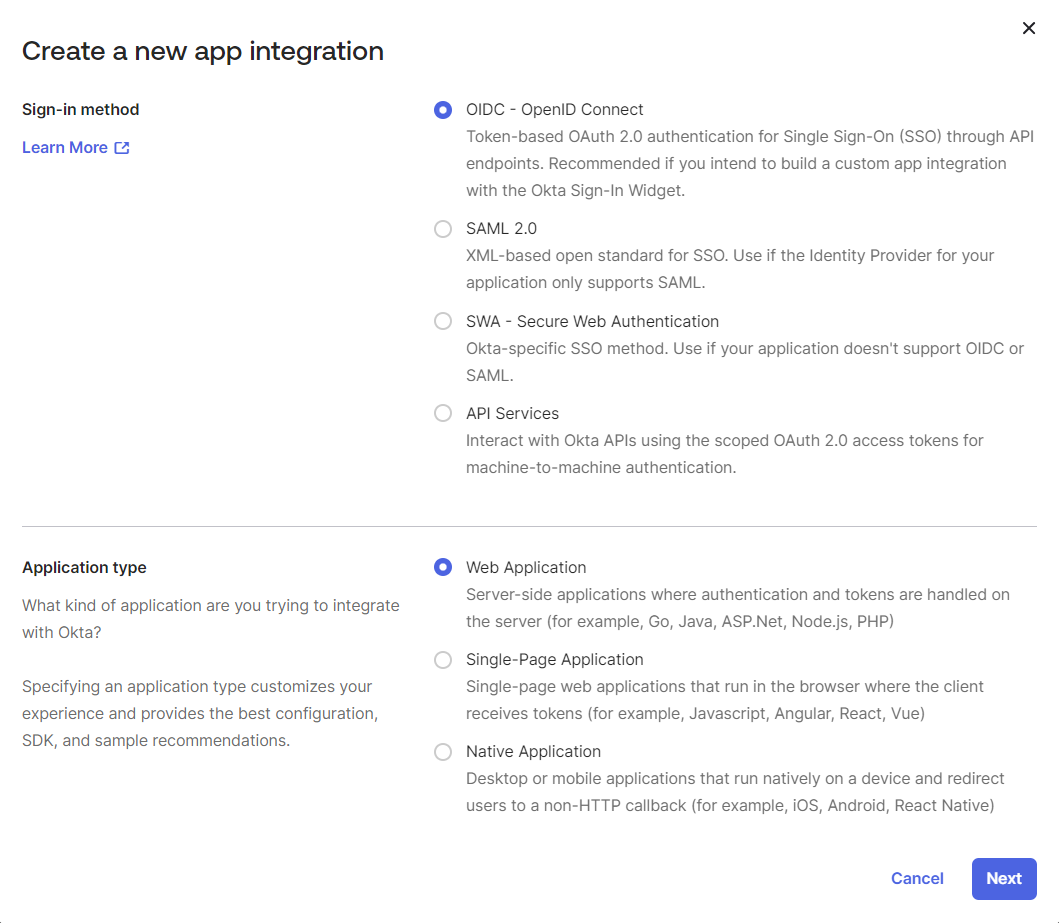
To add a new application, click on Create App Integration and all sign-in methods will appear in a window.
-
In Create a new app integration window, select OIDC - OpenID Connect as the sign-in method and a new section will appear for selecting the Application type.
-
Now Select Web Application as the application type that is integrated with Okta and click on the Next button.
-
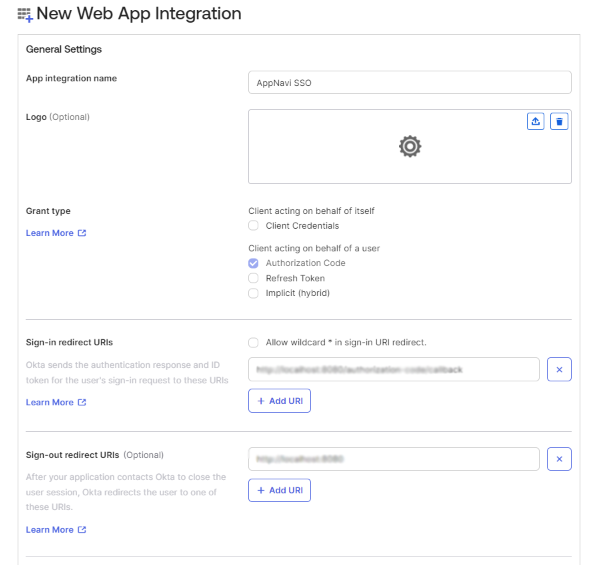
A new page will appear New Web Integration with all settings.
-
In the general settings, enter the integration name, for example "AppNavi SSO", into the App integration name field.
-
Select Client Credentials checkbox.
- Open the AppNavi portal and click on Manage Settings and the settings tab will open.
the URL from the Callback URI field. - Click on the Single Sign On toggle button to enable the OAuth tab and save changes and then open the OAuth tab.
- Now copy the URL from the Callback URI field and go back to Okta to the New Web Integration page in the General Settings.
- Paste the Callback URL that you copied earlier into the field under Sign-in redirect URIs.
- Now under Assignments, select the appropriate access level according to your organization usage.
- Click Save to save all the settings.
Step# 2 Build and enter URIs in AppNavi Settings
To build all the Uniform Resource Identifiers (URIs) that are needed for configuring OAuth 2.0, follow these steps:
-
Open Okta admin and copy the Okta domain
"https://{yourOktaDomain}/oauth2" from the Okta admin. -
Now open the AppNavi portal and go to Manage Tenant Settings and click on OAuth tab to open the SSO settings.
-
Now in the Authorization URI field, paste the Okta domain that you copied earlier and use it as a basis to build the URI
(for example "https://{yourOktaDomain}/oauth2/v1/authorize"). -
In the Token URI field, enter "https://{yourOktaDomain}/oauth2/v1/token".
-
Under UserInfo URI, select "GET" from the drop-down menu and paste the UserInfo endpoint URL
"https://{yourOktaDomain}/oauth2/v1/userinfo" into the field. -
Now select the Skip reading entities from ID token checkbox. This means that user information, specifically the user email address, will be read upon login from the UserInfo URI instead of the token URI.
-
Open the Okta administrator dashboard and click on Security tab.
-
Now click on API tab from the last in the drop down and the API settings window will open.
-
Now copy the Issuer Url from the Authorization Servers Settings section and paste it in the OAuth settings under the Issuer URL in the AppNavi portal.
-
Return to the Appnavi portal’s Settings page, on the OAuth tab, Paste the Issuer that you copied earlier from Okta into the Issuer field.
-
In the Scopes field, enter "openid, email". "Email" represents the field in which the user's email address is stored.
-
Go to Okta administrator dashboard > APPLICATIONS > Applications, Select the active application, on the General tab, under Client Credentials, copy the Client ID.
-
Return to the Appnavi portal’s Settings page, on the OAuth tab, Paste the Client ID that you copied earlier from Okta into the Client ID field.
-
Return to Okta and open the application integrated and all the settings will appear.
-
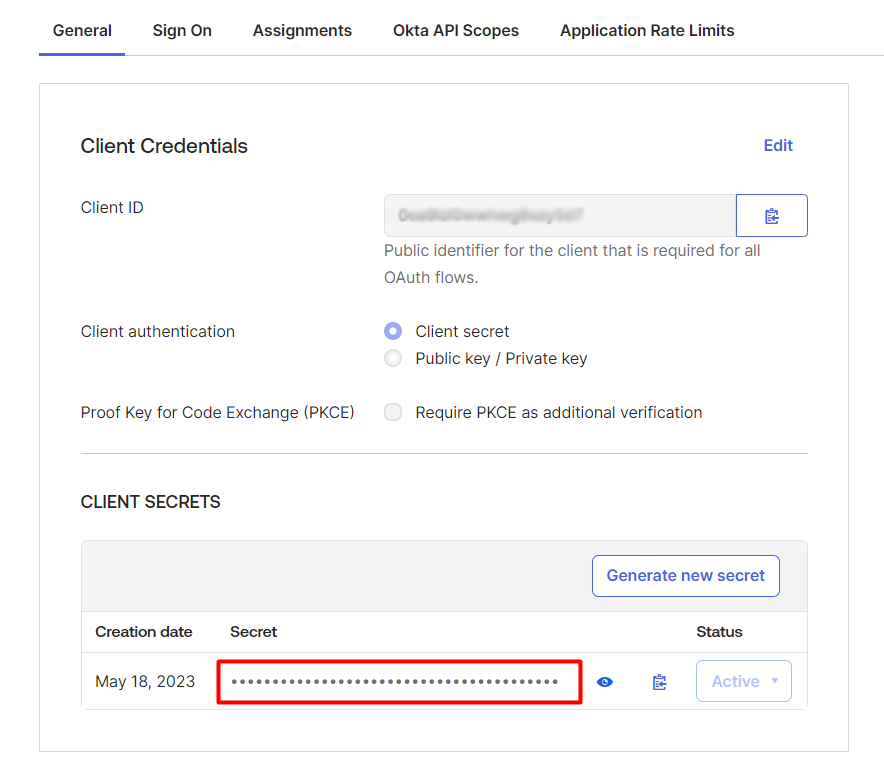
In the General settings under Client Credentials section, copy the Client ID.
-
Return to AppNavi. Paste the Client ID that you copied earlier from Okta into the Client ID field.
-
Now copy the Client Secret from Okta and paste it under the Client Secret field.
-
Under the Claim Field, select Use default from the drop down provided.
-
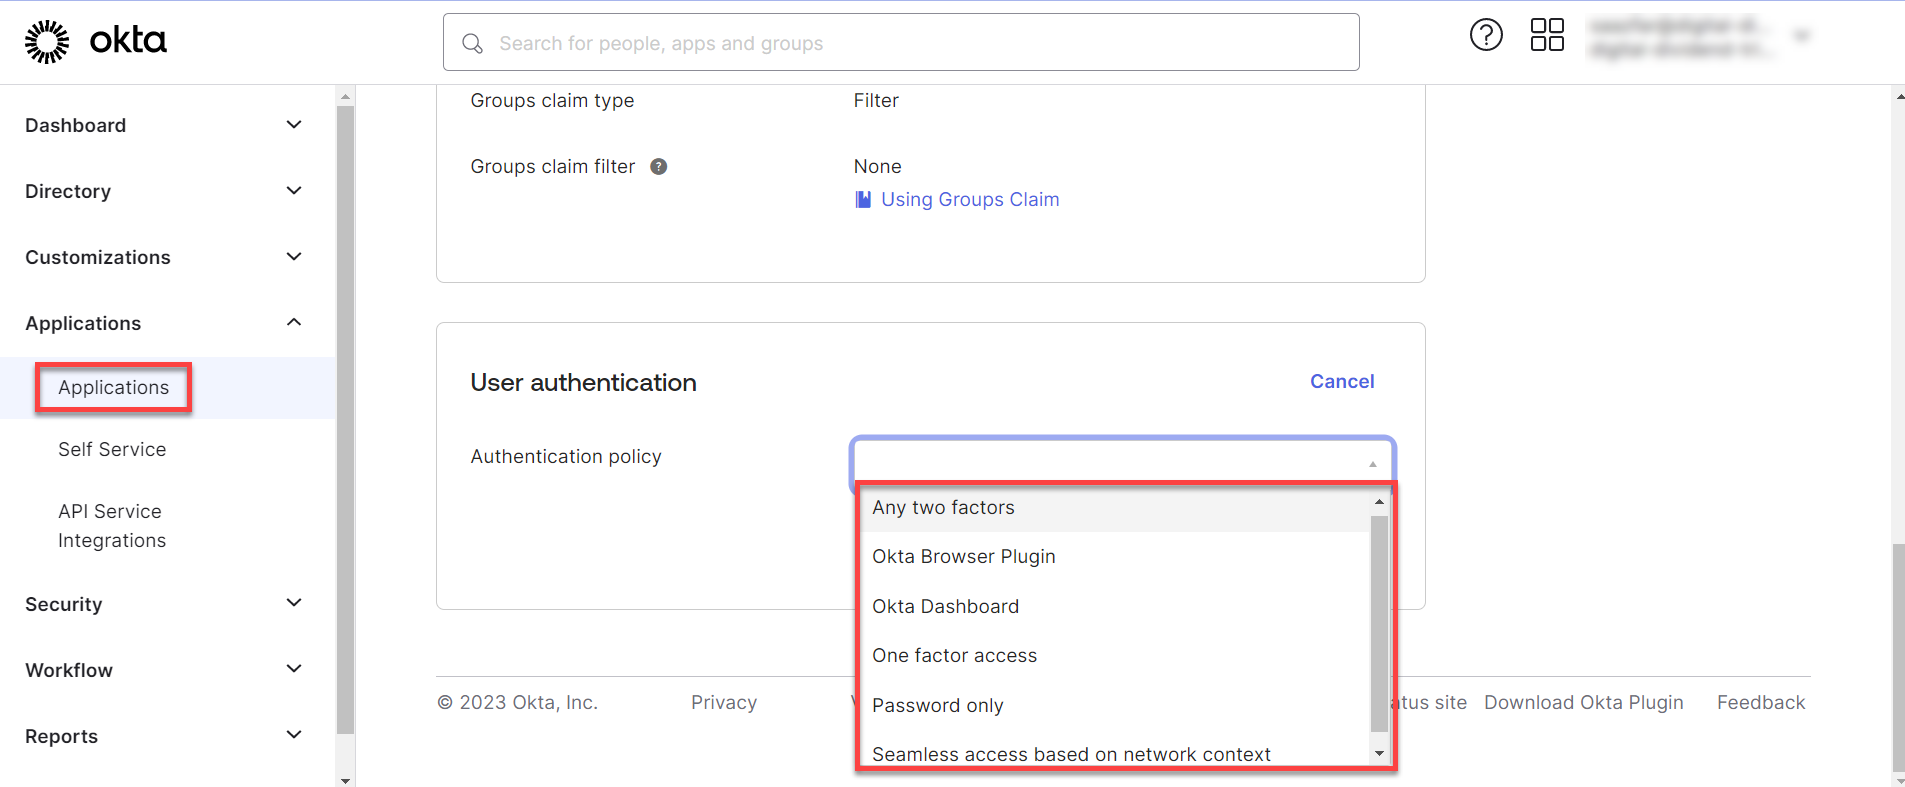
Return to OKTA account and click on APPLICATIONS in the menu and click on theApplications button from the drop down and select the application that you integrated.
-
Now click on the Sign-On tab and click on the edit button of the user authentication options.
-
Click on the drop down and select the best option suitable and click save.
Step# 3 Review and Test
-
Review the data that you have entered in the AppNavi portal in the OAuth settings.
-
When you are certain that you have entered all the data correctly, click Save Changes to save the data.
-
To test the OAuth connection, click on the Test Configuration to test the connection settings.
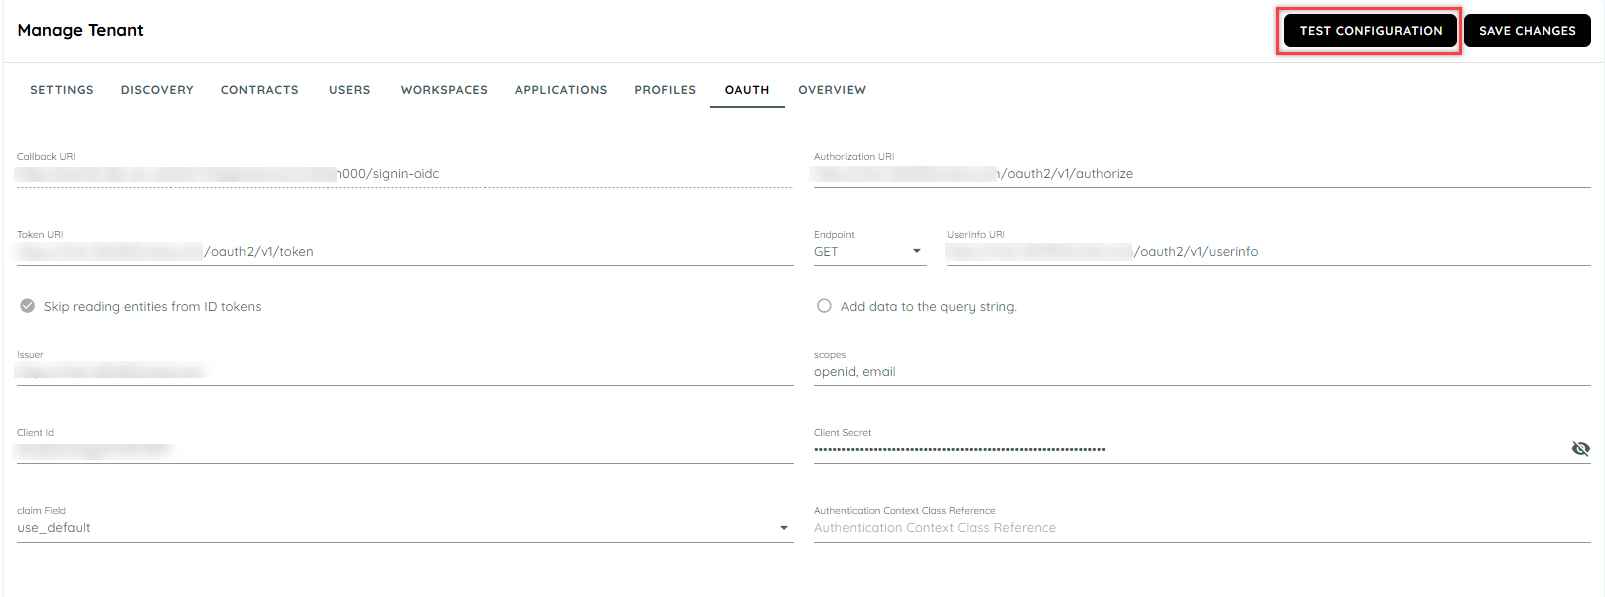
Test Configuration
- If there are errors, a message will be shown to the user and will be redirected to Okta.
To be able to use SSO, the user must be added to both Okta and AppNavi. The email address that is entered in Okta under Directory > People > Primary must match the email address used in AppNavi.
- If the settings are correct then the portal will redirect to a sign-in page on the portal to login to portal using the Okta user id.
- To succesfully login to the portal using a Okta id, the user must create a user with same user email on the portal which was used to create an account or sub account on Okta.
Note: Sub accounts can be created using the admin Okta account and then user can use the same email to login to the AppNavi Portal.
User Requirements
For SSO authentication to work, the user must exist in both Okta and AppNavi.
The email address returned by Okta must match the email address associated with the user's AppNavi account.
If the user is not assigned to the Okta application, assign the user or the appropriate group in
Okta > Applications > Applications > AppNavi SSO > Assignments.
Troubleshooting
Callback or Redirect URI Error
Callback or Redirect URI Error
If Okta reports a redirect or callback URI error:
- Open AppNavi > Manage Tenant > Settings > OAuth.
- Copy the Callback URI shown by AppNavi.
- Open the AppNavi application in Okta.
- Check the Sign-in redirect URIs configuration.
- Make sure the URI in Okta exactly matches the URI provided by AppNavi.
Check for differences such as:
- Missing or additional characters
- Incorrect tenant ID
- Incorrect domain
- Missing HTTPS
- Extra spaces
- Incorrect trailing characters
Claim or User Information Error
If authentication succeeds but AppNavi cannot identify the user:
- Confirm that the user's email address exists in both Okta and AppNavi.
- Verify that the email address returned by Okta matches the user's AppNavi email address.
- Confirm that the email scope is configured.
- Verify the UserInfo URI.
- Confirm that the Claim Field is configured correctly.
- Make sure Skip reading entities from ID token is configured according to the selected UserInfo flow.
Test Configuration Fails
If Test Configuration fails, verify each OAuth value:
| AppNavi field | Okta value |
|---|---|
| Callback URI | Callback URI generated by AppNavi |
| Authorization URI | https://{yourOktaDomain}/oauth2/v1/authorize |
| Token URI | https://{yourOktaDomain}/oauth2/v1/token |
| UserInfo URI | https://{yourOktaDomain}/oauth2/v1/userinfo |
| Issuer | Issuer URL from the Okta authorization server |
| Client ID | Client ID from the Okta application |
| Client Secret | Client Secret from the Okta application |
| Scopes | openid, email |
User Is Redirected to Okta but Cannot Complete Login
If the user is redirected to Okta but authentication does not complete:
- Confirm that the user is assigned to the AppNavi application in Okta.
- Confirm that the user exists in AppNavi.
- Verify that the email addresses match.
- Check the Sign-in redirect URI.
- Verify the Okta application type and authentication settings.
- Confirm that the Client ID and Client Secret are correct.
- Check the Okta application and authorization-server configuration for required claims or scopes.
For general SSO requirements and AppNavi-side configuration, see the Single Sign-On (SSO) Setup Guide.
Updated 7 days ago