UBM Push Event API
In some instances, certain elements may not be recorded during mining due to their customized nature. To address this issue, users can utilize the Push API within UBM. This API allows users to customize areas themselves and record mining for those elements.
However, if UBM and recording are disabled within the application, events should not be recorded or pushed via custom code Push API.
The events will be sent based on the user-defined limit specified in the "Events to Cache" field of the UBM Configuration in the portal.
API Code:
window.appnaviApi.analytics.pushEvent({type: "ubm", events: [ubmEvent]});Configuration:
let ubmEvent = {
    eventType: "RIGHT_CLICK",
    areaLabel: "This is area",
    elementLabel: "This is element label",
    tagType: window.appnaviApi.tagType.button
}
ubmEvent is an array and can be sent multiple events at a time.
let ubmEvent1 = {
    eventType: "RIGHT_CLICK",
    areaLabel: "area one",
    elementLabel: "element one",
    tagType: window.appnaviApi.tagType.button
}


let ubmEvent2 = {
    eventType: "LEFT_CLICK",
    areaLabel: "area two",
    elementLabel: "element two",
    tagType: window.appnaviApi.tagType.div
}

window.appnaviApi.analytics.pushEvent({type: "ubm",events: [ubmEvent1, ubmEvent2]
})
PROPERTIES
Following properties will be require to add in custom code to sent UBM record via Push API.
- Area Label
- Element Label
- Event type
- Tag type
UBM EVENTS
Only these events will consider to be sent via push API.
- RIGHT_CLICK
- LEFT_CLICK
- PAGE_LOAD
- And CUSTOM EVENT
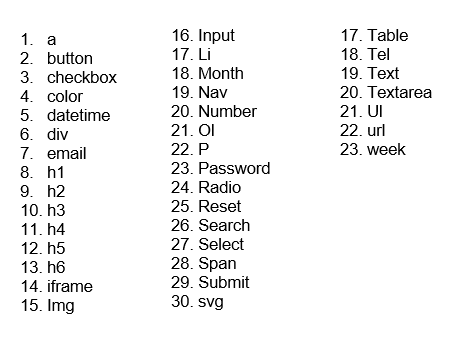
TAG TYPE
Users should include the tag type in the custom code as shown below:
tagType: window.appnaviApi.tagType.button Various tag types are available, and users can select the appropriate one based on their element.

Example of setting custom Code for Push API
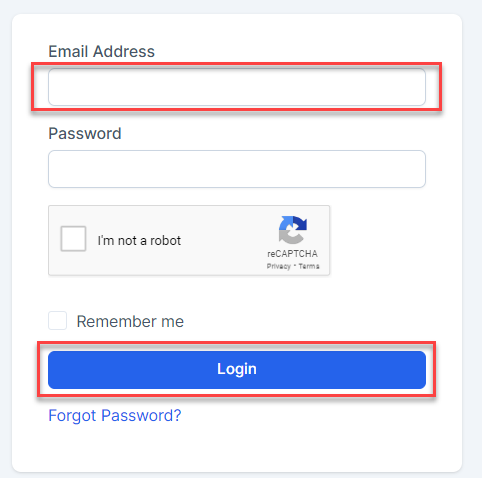
Suppose user wants to set custom code for first language field and for login button in following example.

User then go to manage application and add following custom code on the custom area of application and save it.
console.log("Custom Code executed")
Array.from(document.querySelectorAll("button[title='English']")).forEach((x) => {
    console.log(x, "Element")

    x.addEventListener('mouseup', function(event) {
        let eventType = "LEFT_CLICK"
        // Check if it's a left click
        if (event.which === 1 || event.button === 0) {
            eventType = "LEFT_CLICK"
        }
        // Check if it's a right click
        else if (event.which === 3 || event.button === 2) {
            eventType = "RIGHT_CLICK"
        }
        let ubmEvent = {
            eventType,
            areaLabel: "my code area",
            elementLabel: "my element 1",
            tagType: window.appnaviApi.tagType.button
        }

        window.appnaviApi.analytics.pushEvent({type: "ubm",events: [ubmEvent]})
    });
})

Array.from(document.querySelectorAll("button[type='submit']")).forEach((x) => {
    console.log(x, "Element")

    x.addEventListener('mouseup', function(event) {
        let eventType = "MOUSE_OVER"
        // Check if it's a left click
        if (event.which === 1 || event.button === 0) {
            eventType = "MOUSE_OVER"
        }
        // Check if it's a right click
        else if (event.which === 3 || event.button === 2) {
            eventType = "MOUSE_OVER"
        }
        let ubmEvent = {
            eventType,
            areaLabel: "my code area 2",
            elementLabel: "my element 2 BUTTON",
            tagType: window.appnaviApi.tagType.button
        }

        window.appnaviApi.analytics.pushEvent({type: "ubm",events: [ubmEvent]})
    });
})
After adding the code, navigate to Analytics -> UBM and enable User Behavior Mining and Recording for the respective application. Additionally, adjust the "Events to Cache" setting if necessary. Save the changes and proceed to the client side.
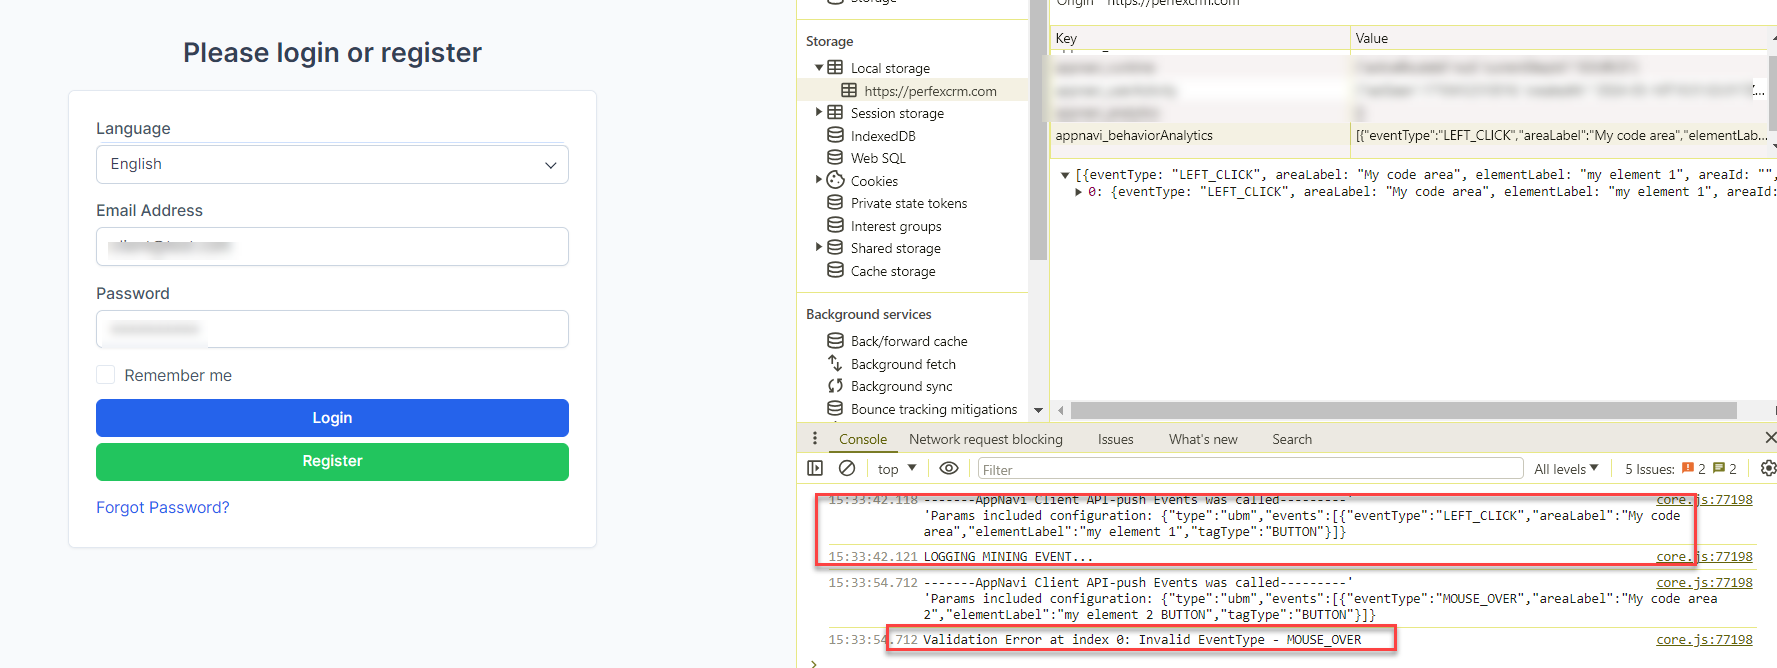
In the provided example, if the user clicks on the language field, the event will be recorded successfully. However, if the user moves to the login button and clicks on it, a validation error will be displayed on the console indicating that "MOUSE_OVER" is an invalid event type, and consequently, the event will not be recorded.

Custom push event API
The Custom Event API allows developers to track specific user interactions within an application by sending custom events. These events can be used to gain insights into user behaviour and can be integrated seamlessly into the portal's analytics.

Event Field Requirements Matrix for Custom and UBM Events
| Field | Custom Events | UBM Events | Notes |
|---|---|---|---|
| EventType | Mandatory (CUSTOM: prefix) | Mandatory (PAGE_LOAD, RIGHT_CLICK_LEFT_CLICK) | Describes the type of event being logged. |
| pageUrl | Optional | Optional | If not provided, defaults to the current page's URL. |
| pageTitle | Optional | Optional | If not provided, defaults to the current page's title. |
| customField_1 | Optional | Optional | Used to capture additional custom data. |
| customField_2 | Optional | Optional | Used to capture additional custom data. |
| customField_3 | Optional | Optional | Used to capture additional custom data. |
| areaId | Mandatory | Mandatory | Identifies a specific area within the application. |
| areaLabel | Optional | Optional | Descriptive label for the area within the application. |
| elementId | Optional | Optional | The HTML element ID that triggered the event. |
| elementLabel | Optional | Optional | Descriptive label for the element that triggered the event. |
Steps to Enable Custom Events
- Login: Access the portal with your credentials.
- Navigate to Insights: Go to the 'Insights' tab.
- Select an Application: Choose the application you want to monitor.
- Access Settings:
- Click on the context menu (three dots).
- Select 'Settings' from the dropdown.
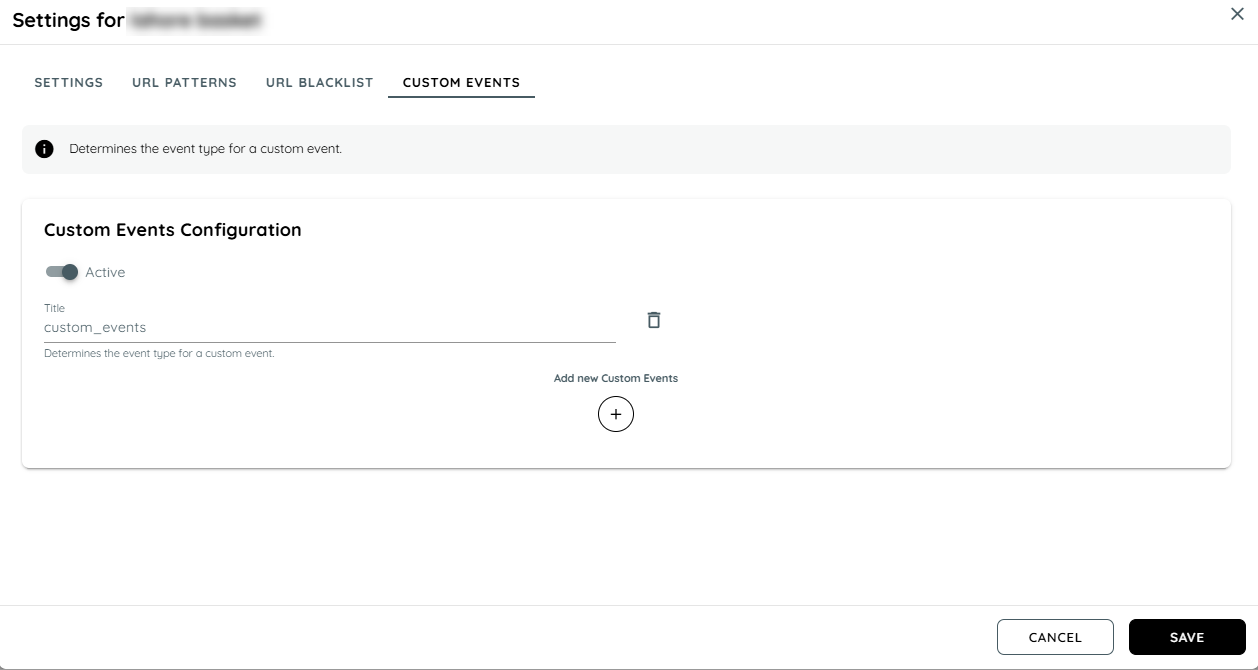
- Enable Custom Events:
- Move to the 'Custom Events' tab.
- Use the toggle button to activate or deactivate custom events.
- Once enabled, the 'Title' field will become visible, allowing you to add up to 10 titles.
Using the Custom Event API
Basic Custom Event Code
Below is the basic code to push a custom event. This can be used for standard events like LEFT_CLICK, RIGHT_CLICK, and PAGE_LOAD.
For custom events, a prefix of "CUSTOM:" followed by the event name is required

Optional Parameters:
- pageUrl and pageTitle are optional parameters
- If provided by the user, they will overwrite the default values.
- If not provided, the system will use the default values (likely taken from the current page's URL and title).
Adding Custom Fields
Users can add up to 3 custom fields to the event for additional data capture.

Important Note
There are also system values that must not be overwritten (e.g., Tenant ID, AppID, resolution, timestamp, etc.).
Fields Explanation
eventType: The type of event being logged. For custom events, use the prefix "CUSTOM:" followed by the event name.
pageUrl: The URL of the page where the event occurred.
pageTitle: The title of the page where the event occurred.
customField_1, customField_2, customField_3: Optional fields for additional event data.
Updated 3 months ago