
Manage Users
This guide provides step-by-step instructions for managing users in the AppNavi Portal,
including adding users, assigning roles and workspaces, resending invitations, resetting passwords, and deactivating users.
User management is available to users with the required Tenant Owner or Workspace Owner permissions.
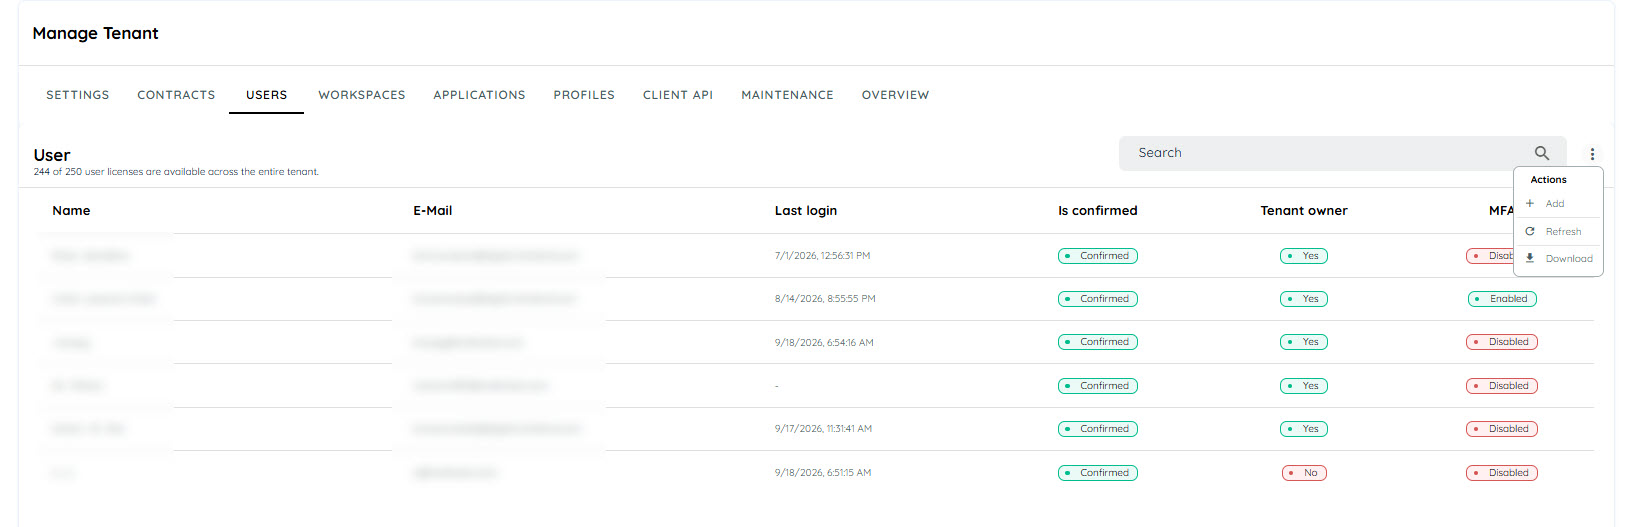
Open User Management
- Sign in to the AppNavi Portal.
- Go to Manage Tenant.
- Select Users.
The Users section displays the users available in your tenant.
From the three-dot menu, you can access actions such as:
- Add – create a new user
- Refresh – refresh the user list
- Download – download the user list
Additional actions are available from the context menu of an individual user.
Steps to Add a New User
To create a new user:
- Open Manage Tenant → Users.
- Open the three-dot menu.
- Select Add.
- Enter the user's information.
- Select the required workspace.
- Configure the user's role and other available options.
- Click Save.
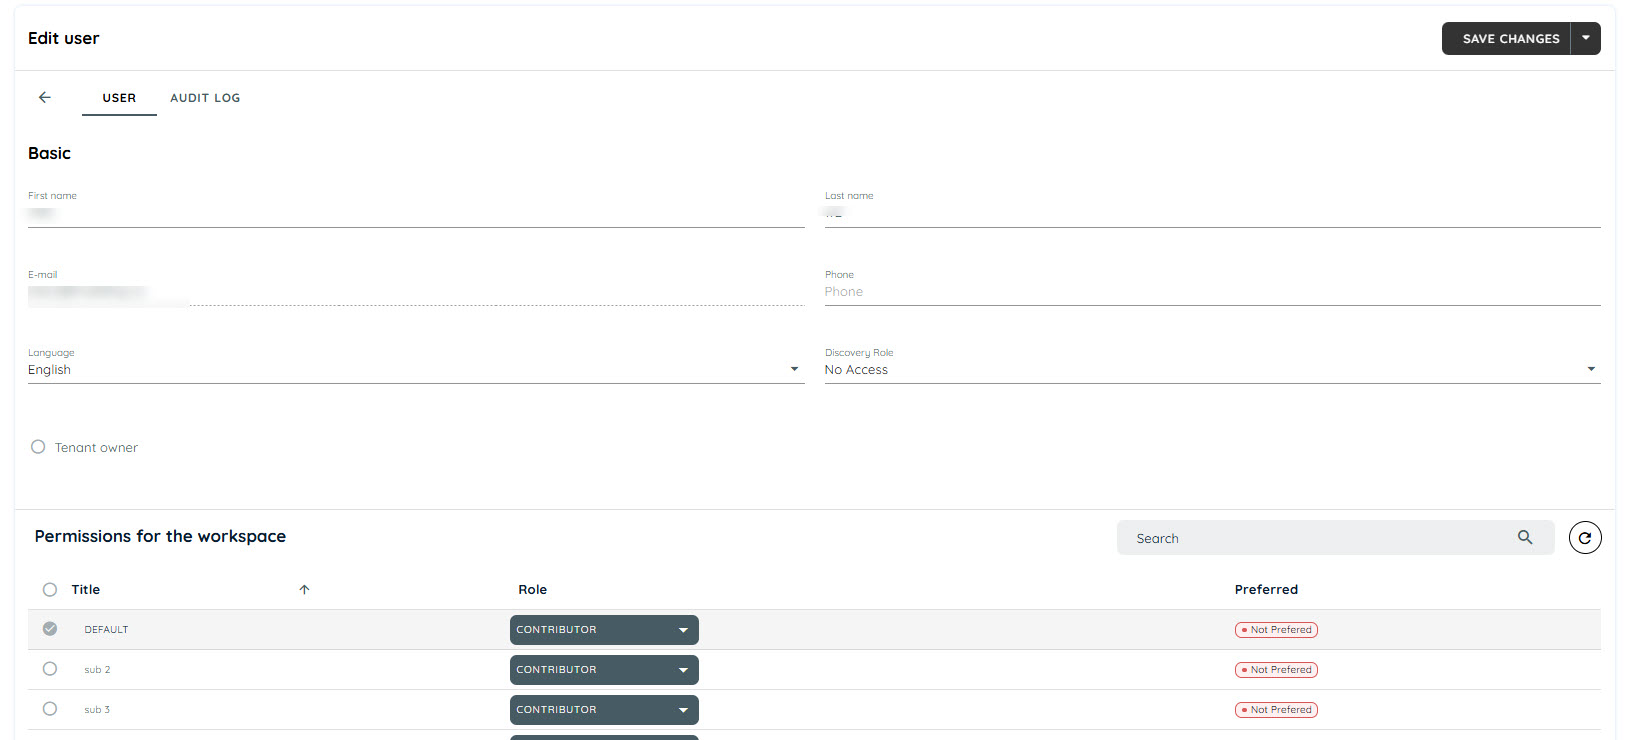
Fill in the following fields:
| Field title | Description | Required |
|---|---|---|
| First Name | The first name of the user. | Yes |
| Last Name | The last name of the user. | Yes |
| The E-Mail address of the user. | Yes | |
| Phone | The telephone number of the user. | No |
| Language | The language of the user. This is used, for example, when sending automatic system e-mails. | Yes |
| Tenant Owner | Defines whether the user has Tenant Owner permissions. | No |
| Activate MFA | Enable/Disable Multi Factor Authentication(if enabled on tenant) | No |
| Workspace | Workspace or workspaces the user can access. | Yes |
At least one workspace must be selected when creating a user.
After you save the user:
- AppNavi sends an email to the submitted email address.
- The user confirms their email address.
- The user is directed to the confirmation screen.
- AppNavi sends a welcome email containing a link to set the user's password.
- The user sets their password and can then sign in to AppNavi.
Assign Roles and Permissions
User access is controlled through roles and permissions.
When creating or editing a user, assign the appropriate role based on the responsibilities the user needs to perform.
For a detailed explanation of available roles and permissions, see Role & Permission Model.
Example
A user who only needs to work inside a specific workspace should receive access to the required workspace without granting unnecessary tenant-level permissions.
A user who needs to administer users across the tenant may require Tenant Owner permissions.
Tip: Give users only the permissions and workspace access required for their responsibilities.
Assign Workspaces
A user must have access to at least one workspace.
When creating or editing a user:
- Open the user's settings.
- Select the required workspace or workspaces.
- Save the changes.
Workspace assignment determines which workspace-level resources the user can access.
If a user cannot see expected content or functionality, first verify that the correct workspace has been assigned.
For more information about workspace administration, see Workspaces.
Roles
Select Tenant Owner to grant the user tenant-level administrative permissions. When Tenant Owner is selected, all available workspaces are automatically selected.
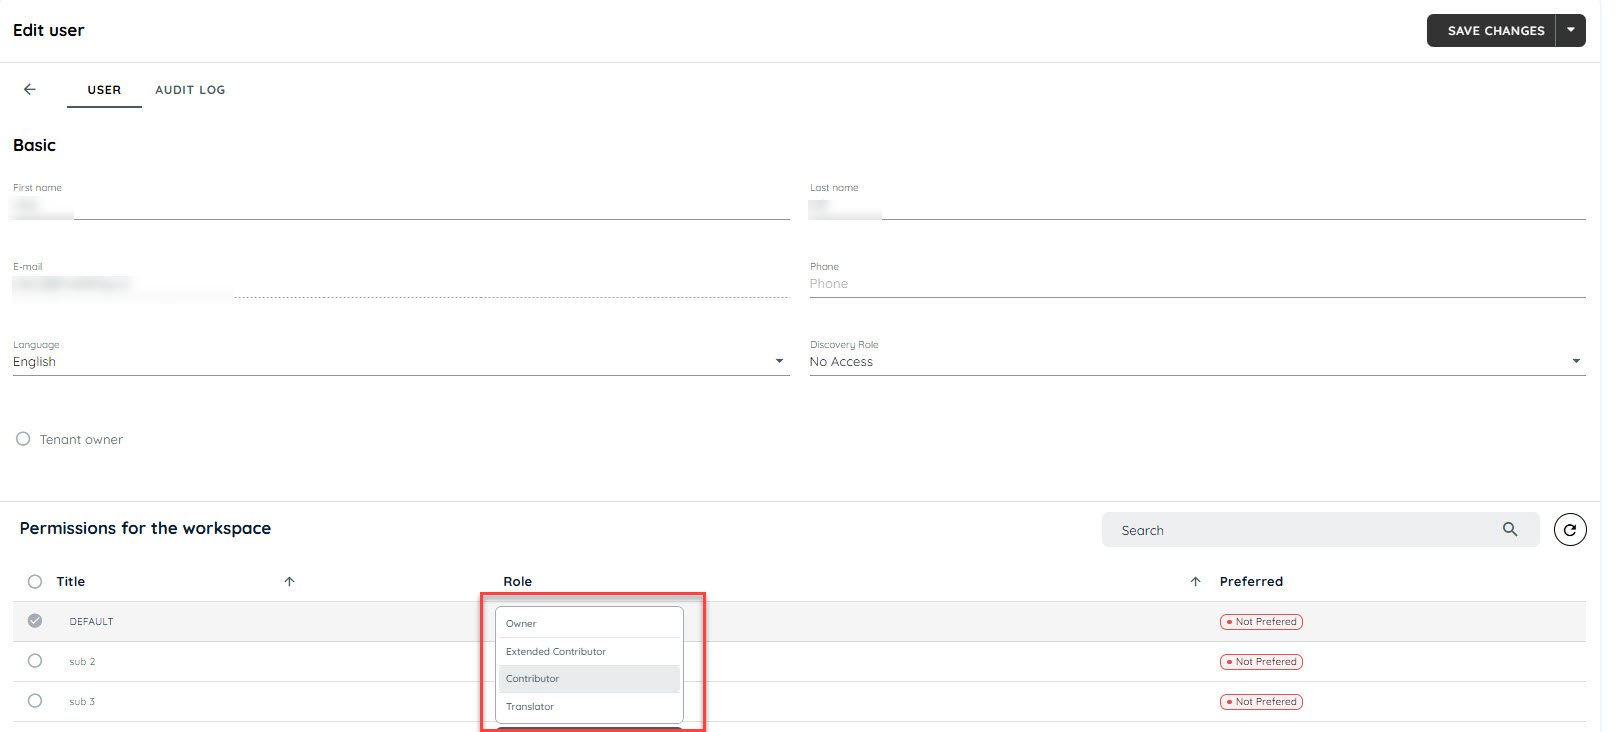
If Tenant Owner is not selected, you can assign permissions by:
- Selecting the required workspace(s).
- Selecting the desired role for each workspace.
This allows users to have specific permissions based on their assigned workspace and role.
Assigning Roles
Assign Languages to a Translator
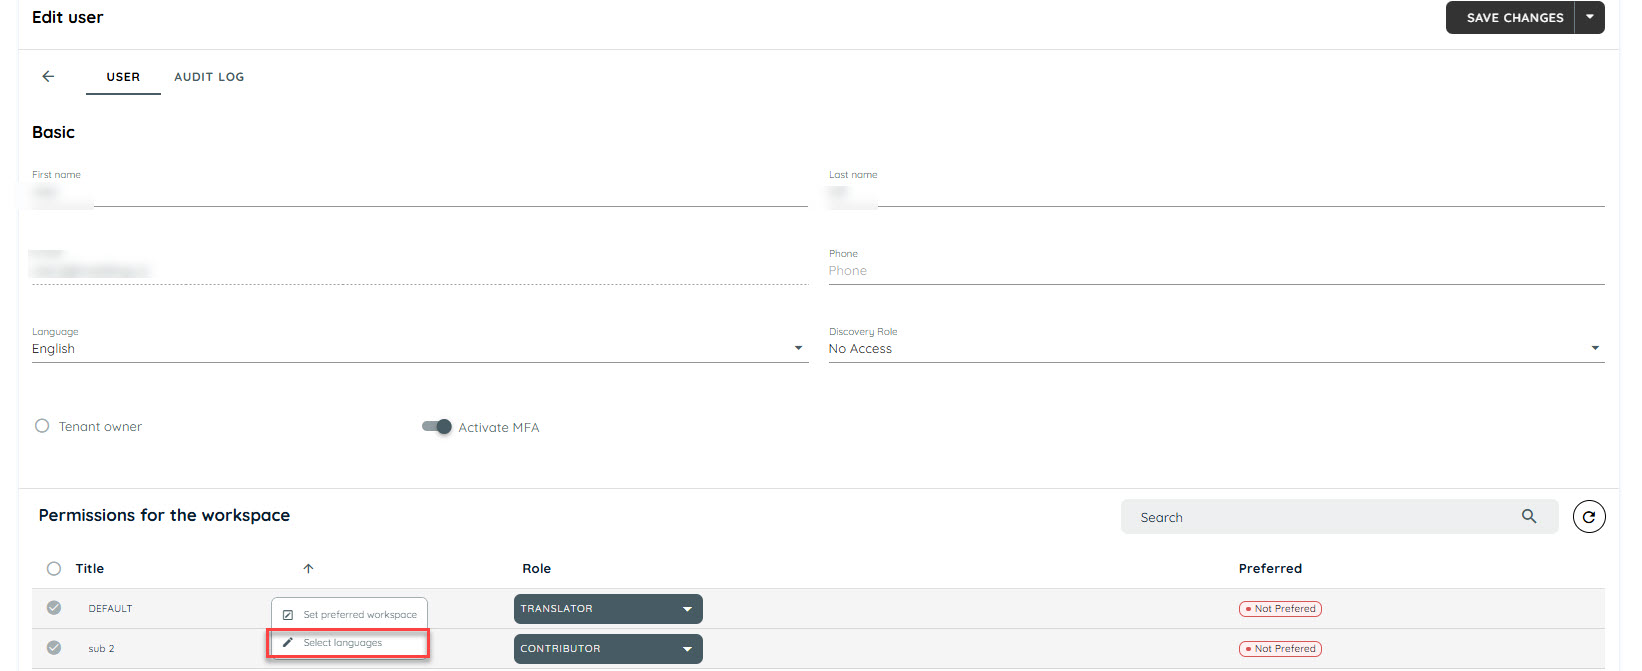
If the user is assigned the Translator role, you can specify which languages they are allowed to manage.
- Select the Translator role for the user.
- Click the context menu next to the Translator role.
- Select Languages.
- Select the languages you want to assign to the translator.
- Save the changes.
The translator will only have permission to manage the languages assigned to them.
Resend an Invitation
If a user has not completed registration, an administrator can resend the invitation.
The initial invitation expires after 24 hours if the user has not confirmed the email address.
To resend the invitation:
- Go to Manage Tenant → Users.
- Find the user who has not completed registration.
- Open the user's context menu.
- Select Resend Invite.
The user receives a new invitation email.
If the invitation has expired
If the user opens an expired invitation, they cannot complete the original registration link. They should contact an administrator, who can resend the invitation.
Reset a User's Password
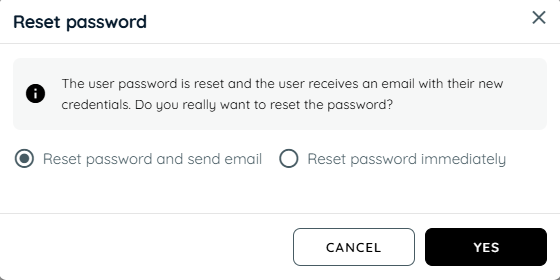
The password of a user can be reset via the context menu of the respective user using the Reset Password option. Two options are then available to the user:
- Sending the password as an e-mail: The user receives an e-mail with instructions on how to change the password.
- Reset Password immediately: The user's password is reset and displayed directly in the user interface.
An administrator can reset a user's password from the user's context menu or from inside the edit user dialog.
- Go to Manage Tenant → Users.
- Find the user.
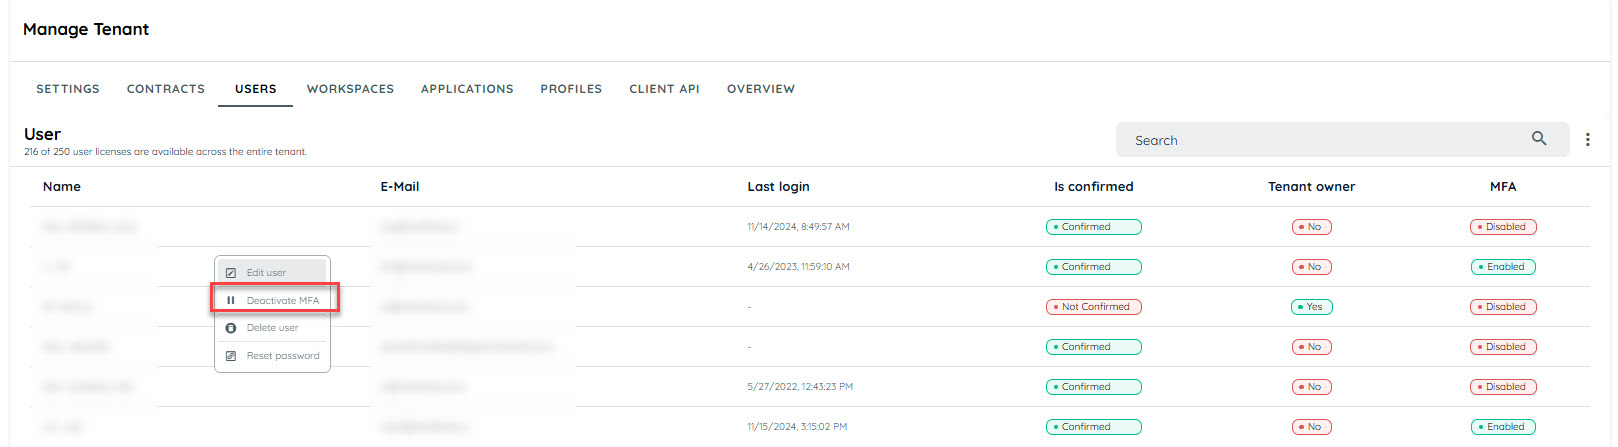
- Open the user's context menu.
- Select Reset Password.
Depending on the available options, you can choose:
- Send Password Reset Email
The user receives an email containing instructions for changing their password.
- Reset Password Immediately
The user's password is reset immediately and the new password is displayed in the AppNavi interface.
Use the appropriate option based on your organization's security procedures.
Expired Password Setup Link
If the user has already confirmed their email but does not set their password within the available time, the password setup link expires.
The user can use the Reset Password option on the login screen or contact an administrator to request another password reset email.
Multi-Factor Authentication (MFA)
The Activate MFA option allows an administrator to enable or disable multi-factor authentication for an individual user.
Activate MFA
When Activate MFA is selected, MFA is enabled for the user. The user will be required to complete the configured multi-factor authentication process when signing in.
To enable MFA:
- Go to Manage Tenant → Users.
- Find the required user.
- Open the user's settings.
- Select Activate MFA.
- Save the changes.
Deactivate MFA
If MFA is no longer required for the user, an administrator can disable it by clearing the Activate MFA option.
To disable MFA:
- Go to Manage Tenant → Users.
- Find the required user.
- Open the user's settings.
- Select Deactivate MFA.
- Save the changes.
Note: Deactivating MFA does not deactivate the user's AppNavi account or remove their workspace or role permissions. It only disables multi-factor authentication for that user.
Updated about 1 month ago