Single Sign-On (SSO) Setup Guide
Make it simple for everyone in your organization to sign in to AppNavi using the same corporate credentials you already use every day. Follow these steps to turn on SSO, enter a few settings, and you’re done.
-
Before you begin, confirm that:Prerequisites- You have Tenant Admin access in AppNavi.
- Your AppNavi tenant is active.
- You’ve registered an application in your identity provider (Microsoft Entra ID or Okta) and collected:
- Client ID
- Client Secret
- Metadata (Discovery) URL
- Redirect URI (explained in Step 3)
- Scopes: usually openid profile email
-
Turn On SSO
- Sign in to the AppNavi portal with your Tenant Admin account.
- In the left menu, click Manage Tenant.
- On the Settings tab, scroll to the Authentication section.
- Flip the Enable SSO switch to On.
- As soon as you enable SSO, a new OAUTH tab appears next to Settings.
-
What You’ll Need
- Tenant Owner account in AppNavi (this is the admin user).
- An active tenant in AppNavi.
- A prepared app in your identity service (Microsoft Entra or Okta) that gives you:
- Client ID (a long code)
- Client Secret (a secret code)
- Metadata URL (a web address where AppNavi checks settings)
- Scopes (just type openid profile email)
-
Configure Your Identity Provider
Field Value Callback (Redirect) URI https://portal-prod-eu-central-1.inappnavi.com/xxxxxxxx/signin-oidc
(replace with your actual domain along with designated tenant ID)Authorization URI https://<your-entra/okta-domain>/oauth2/v1/authorize Token URI https://<your-entra/okta-domain>/oauth2/v1/token Userinfo URI https://<your-entra/okta-domain>/oauth2/v1/userinfo Issuer https://<your-entra/okta-domain>/oauth2/default Client ID your-client-id Client Secret your-client-secret Scopes openid email Token Endpoint Method GET
Note: Some IdPs call “Redirect URI” or “Reply URL” what AppNavi labels as Callback URI.
- The "xxxxxxxx" in the table above represents the Tenant ID provided by AppNavi.
-
Test Your SSO
- Browse to:
https://portal-prod-eu-central-1.inappnavi.com/Login/tenant/<tenantId> - Click Login with SSO.
- You’ll be sent to your IdP’s sign-in page enter your corporate credentials.
- After successful authentication, you’ll be redirected back and logged in automatically.
- Browse to:
Setup single sign-on (SSO) with Microsoft Entra ID
To set up SSO in AppNavi with Microsoft Entra ID, follow the steps below,
When carrying out this configuration, open the AppNavi portal and Microsoft Entra ID in separate tabs.
Step# 1 Register and create a new Application in Microsoft Entra ID
Register and create a new application in Microsoft Entra ID
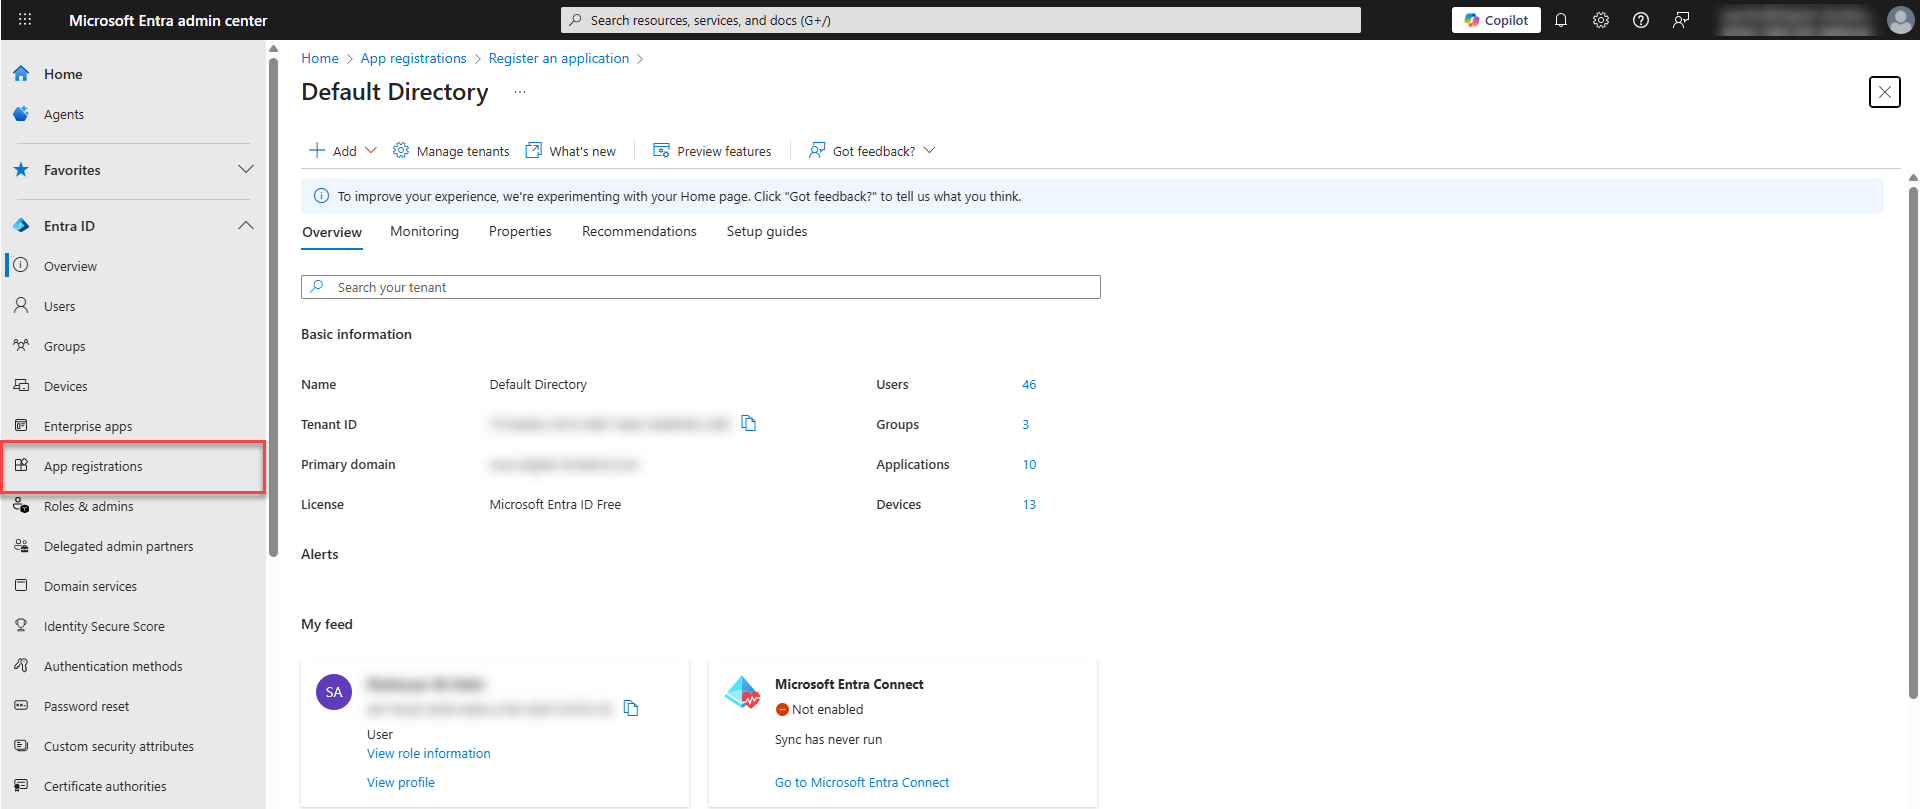
- In the Microsoft Entra admin center, go to the main menu and clickEntra ID and then App Registrations.
- To register a new application for AppNavi, click New Registration.
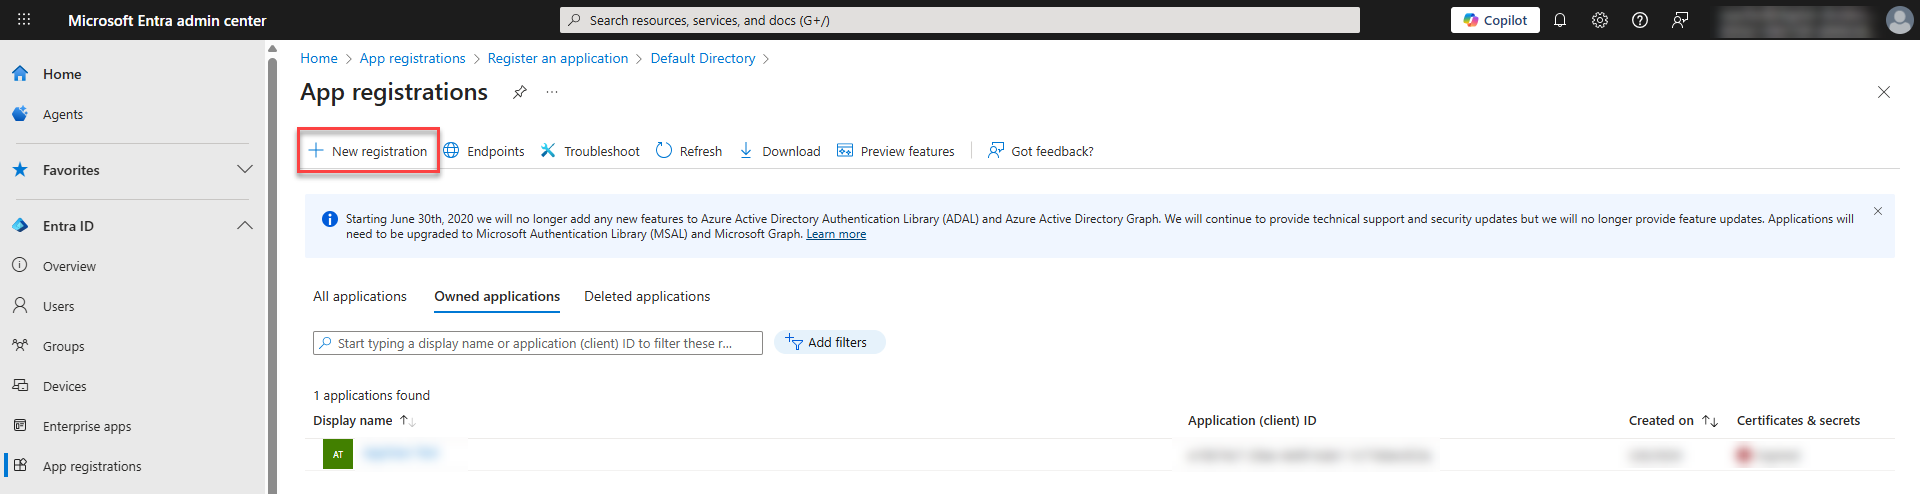
- In the Name field, enter a name for the application, for example, "AppNavi SSO".
- Under Supported account types, select the account type that can use the application or access the API.
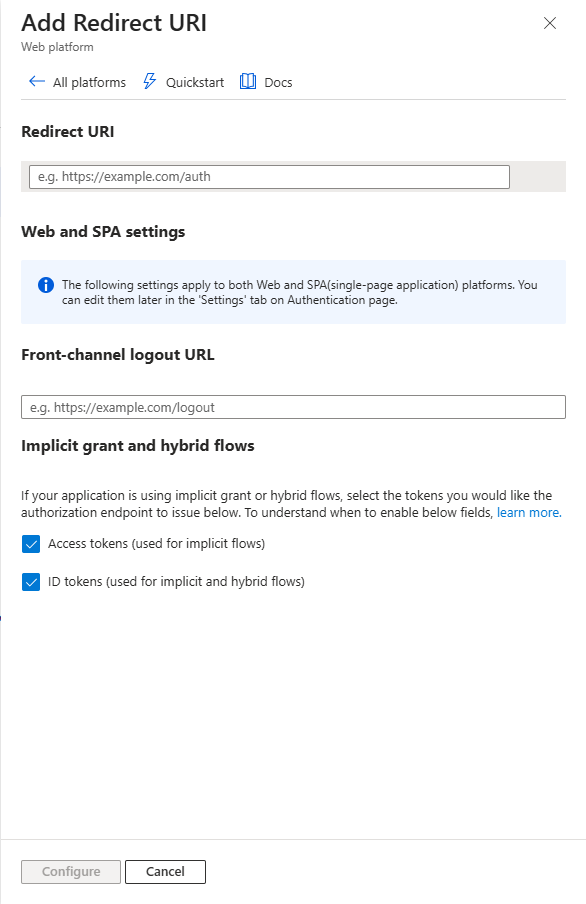
- Click on Authentication from the side menu of the app created.
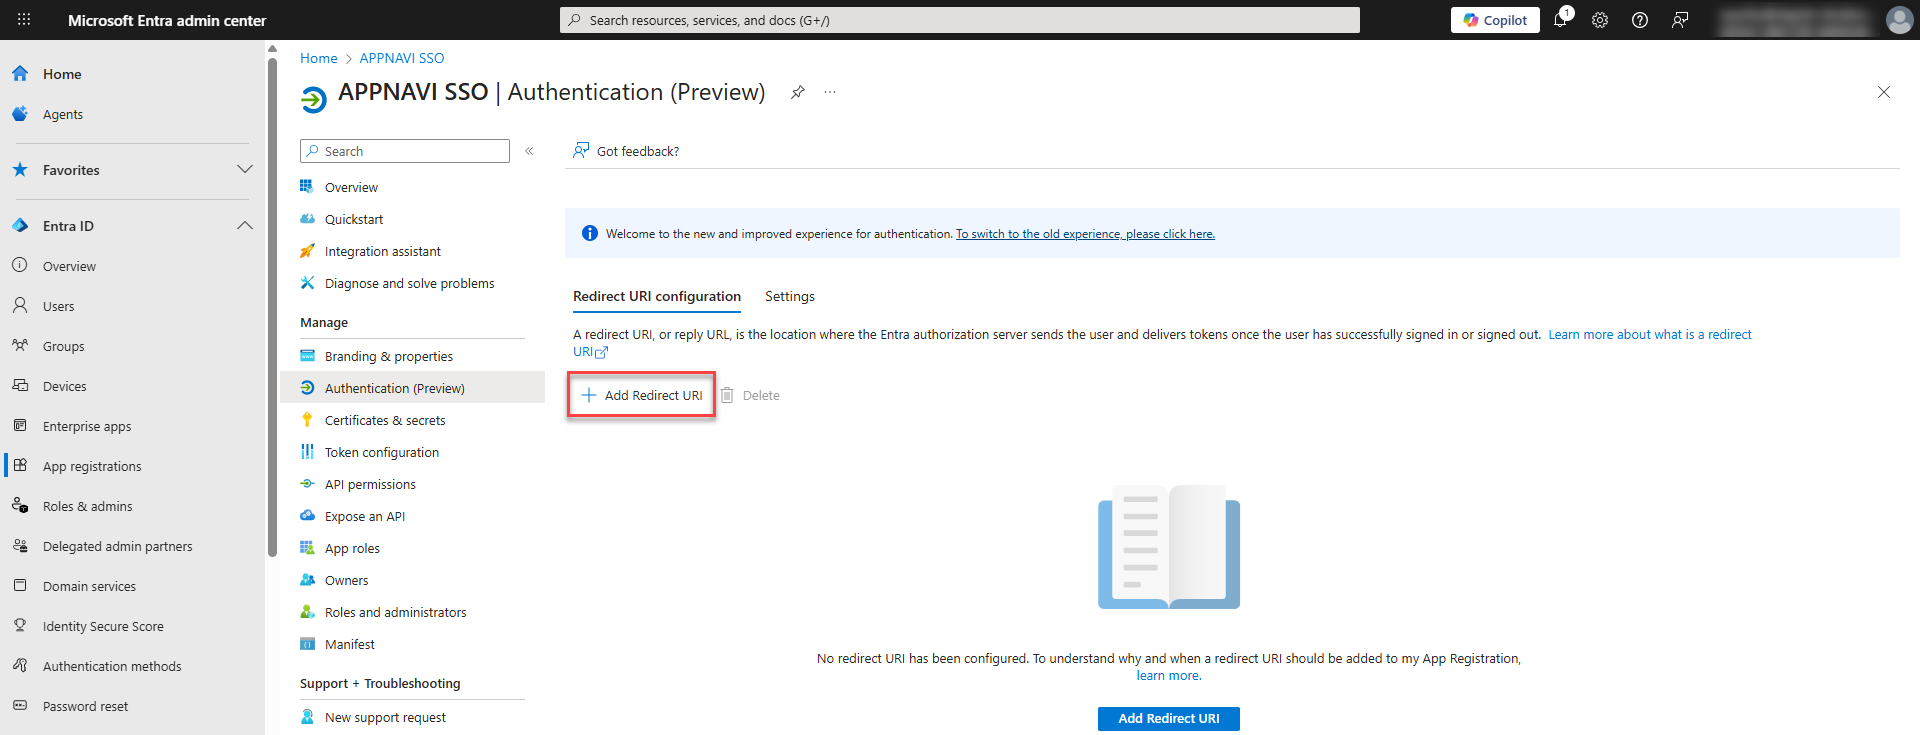
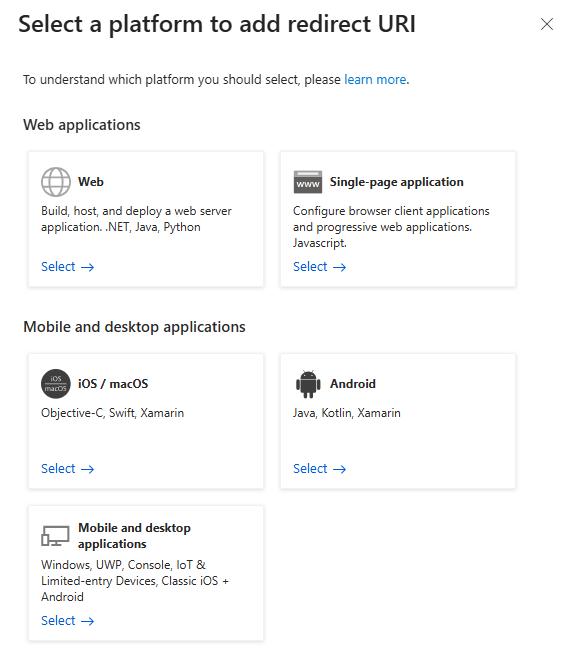
- Click on Add redirect URL and select the platform to add the URL.
- Make sure to check both Access Tokens and ID Tokens.
- In the AppNavi portal, go to Settings > OAuth.
- Copy the URL from the Callback URI field.
- Return to Azure AD, Paste the callback URI that is copied from the AppNavi portal into the field under Redirect URI.
- Ensure that the Web is selected from the drop-down menu as the redirect type
- To register the application, click Register.
A message will display to confirm that the application has successfully been created and you will be taken to the new application.
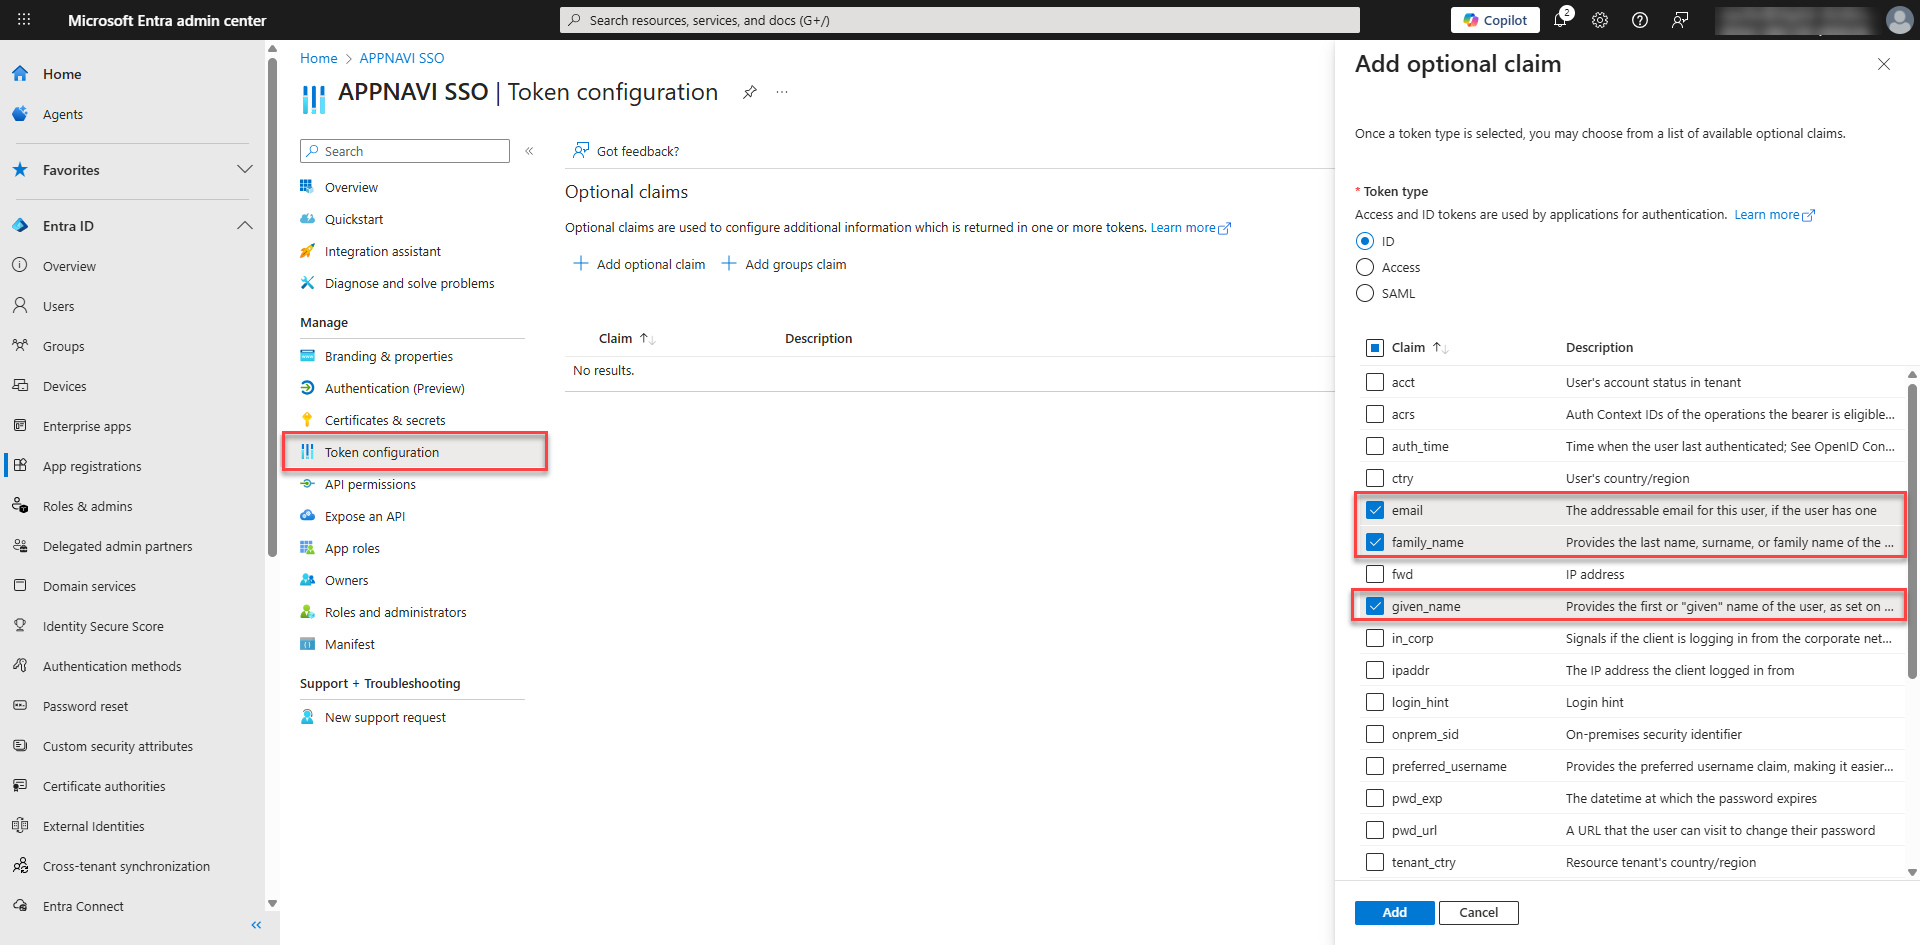
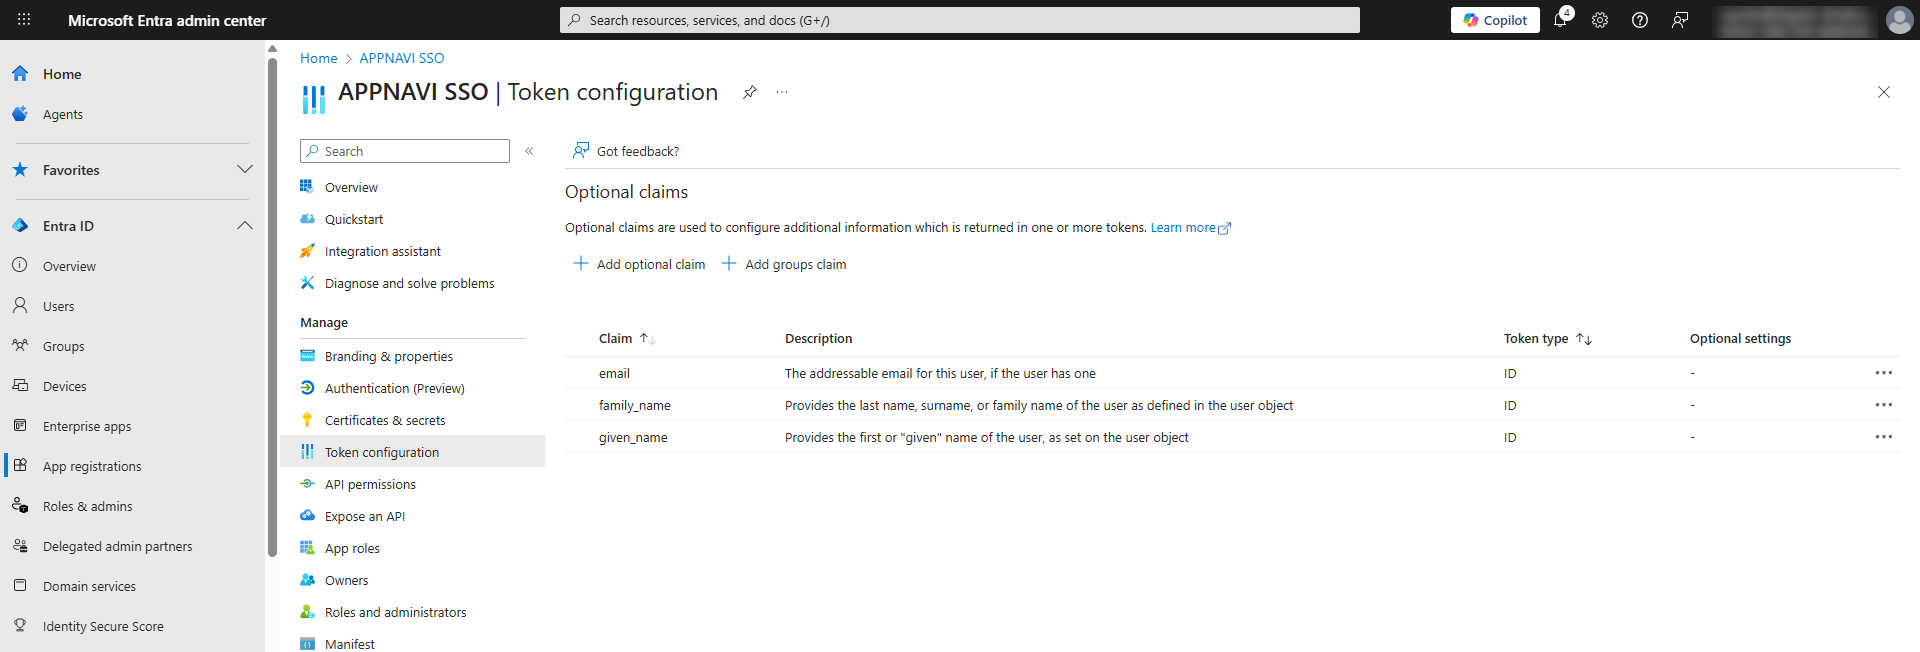
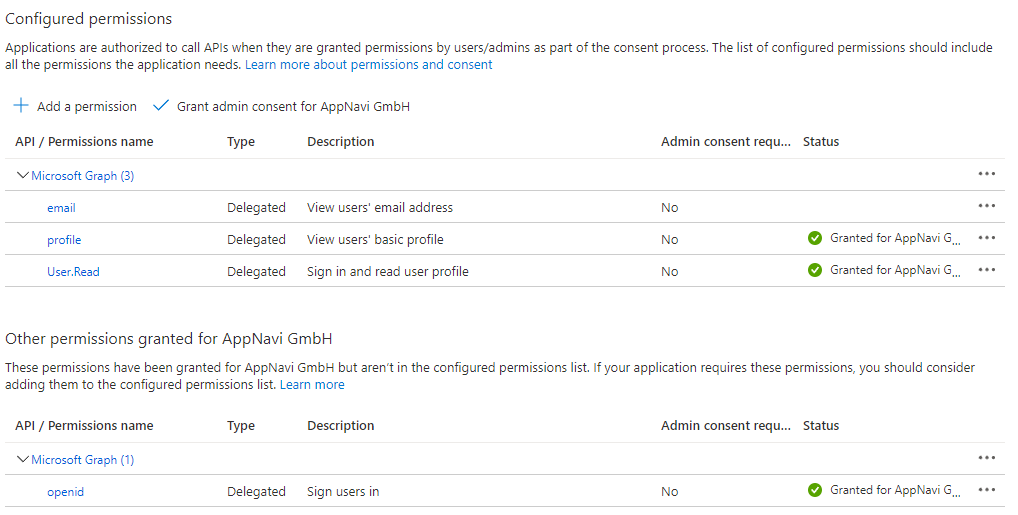
- The following tokens must be issued for AppNavi:
- family_name
- given_name
Step# 2 Copy URIs in the AppNavi Settings
- In the AppNavi portal, go to the Settings page in Manage Tenant tab and enable Single Sign On on the Settings tab.
- In the AppNavi portal, open the OAUTH tab.
- Now open the new application that you have created in Microsoft Entra, go to the Overview and click on Endpoints.
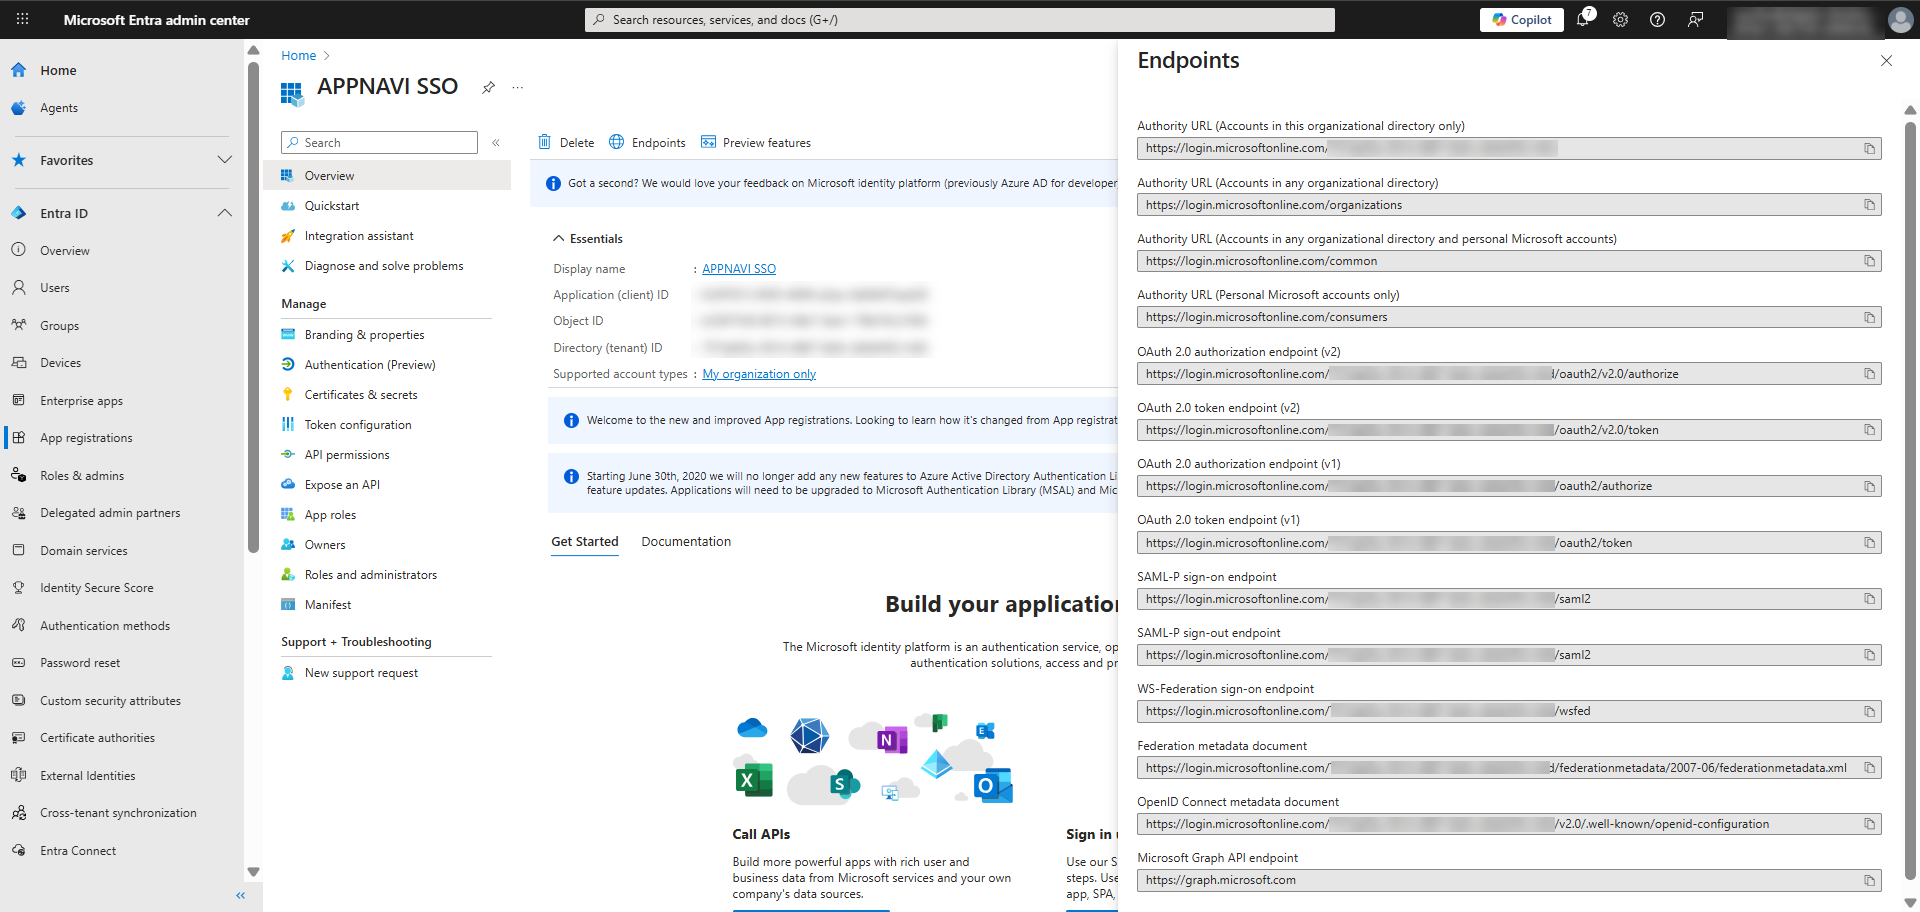
- Copy the value in the OAUTH 2.0 authorization endpoint (v2) field.
- Paste the value that you copied earlier from the OAuth 2.0 authorization endpoint (v2) field into the Authorization URI field.
- Return to Endpoints in Azure AD. Copy the value in the OAuth 2.0 token endpoint (v2) field.
- Return to the AppNavi portal, paste the value into the Token URI field.
- Under UserInfo URI, select "GET" from the drop-down menu and paste the UserInfo endpoint "https://graph.microsoft.com/oidc/userinfo" into the field. The Skip reading entities from ID token and Add data to the query string checkbox is selected by default. This means that user information, specifically the user email address, will be read upon login from the UserInfo URI instead of the token URI.
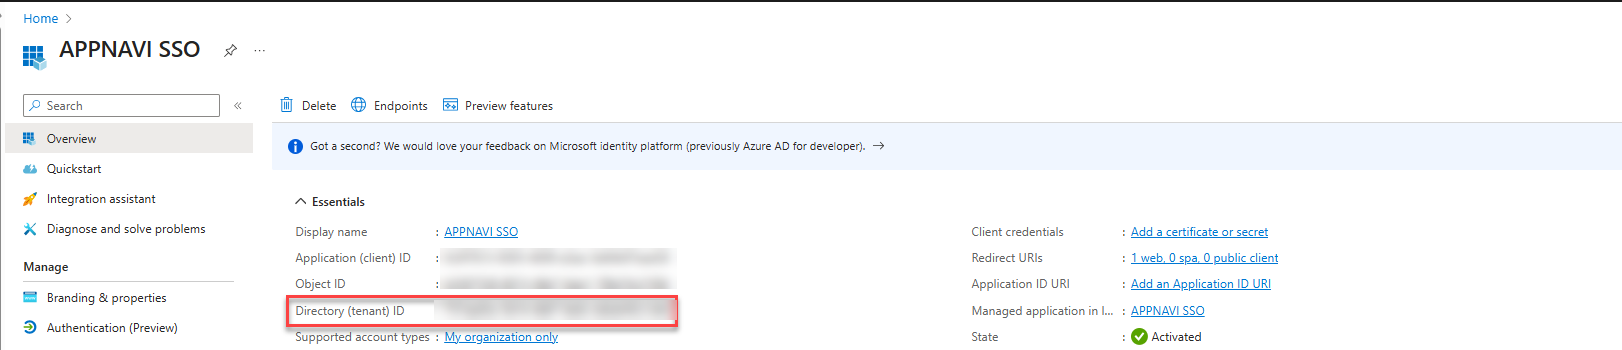
- The Issuer URI for OpenID Connect in Azure AD will typically follow the format “https://login.microsoftonline.com/{tenant-id}/v2.0”. The Client Id can be copied from the Overview of the Application in Entra.
- Under Scopes, enter "openid, email".
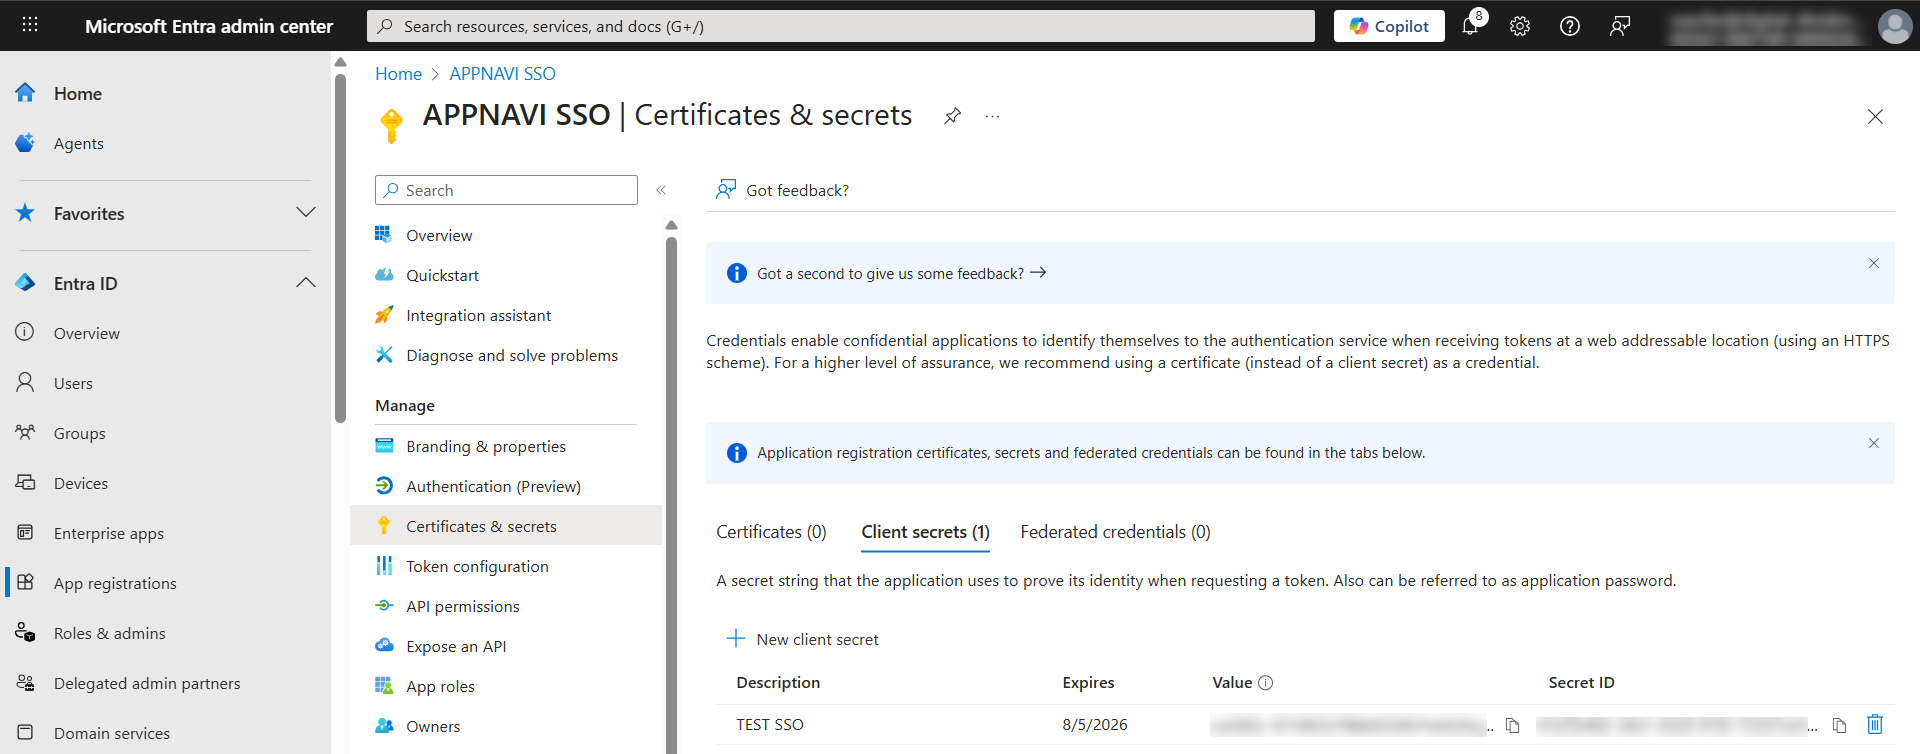
Step# 3 Register a new Client Secret
- In the application that you have created in Microsoft Entra, go in the Manage list and click on Certificates & Secrets.
- Select Client secrets.
- Then click on Add new Client secret.
- In the Description field, enter a name for the client secret and choose the relevant expiry date from the Expires drop-down menu.
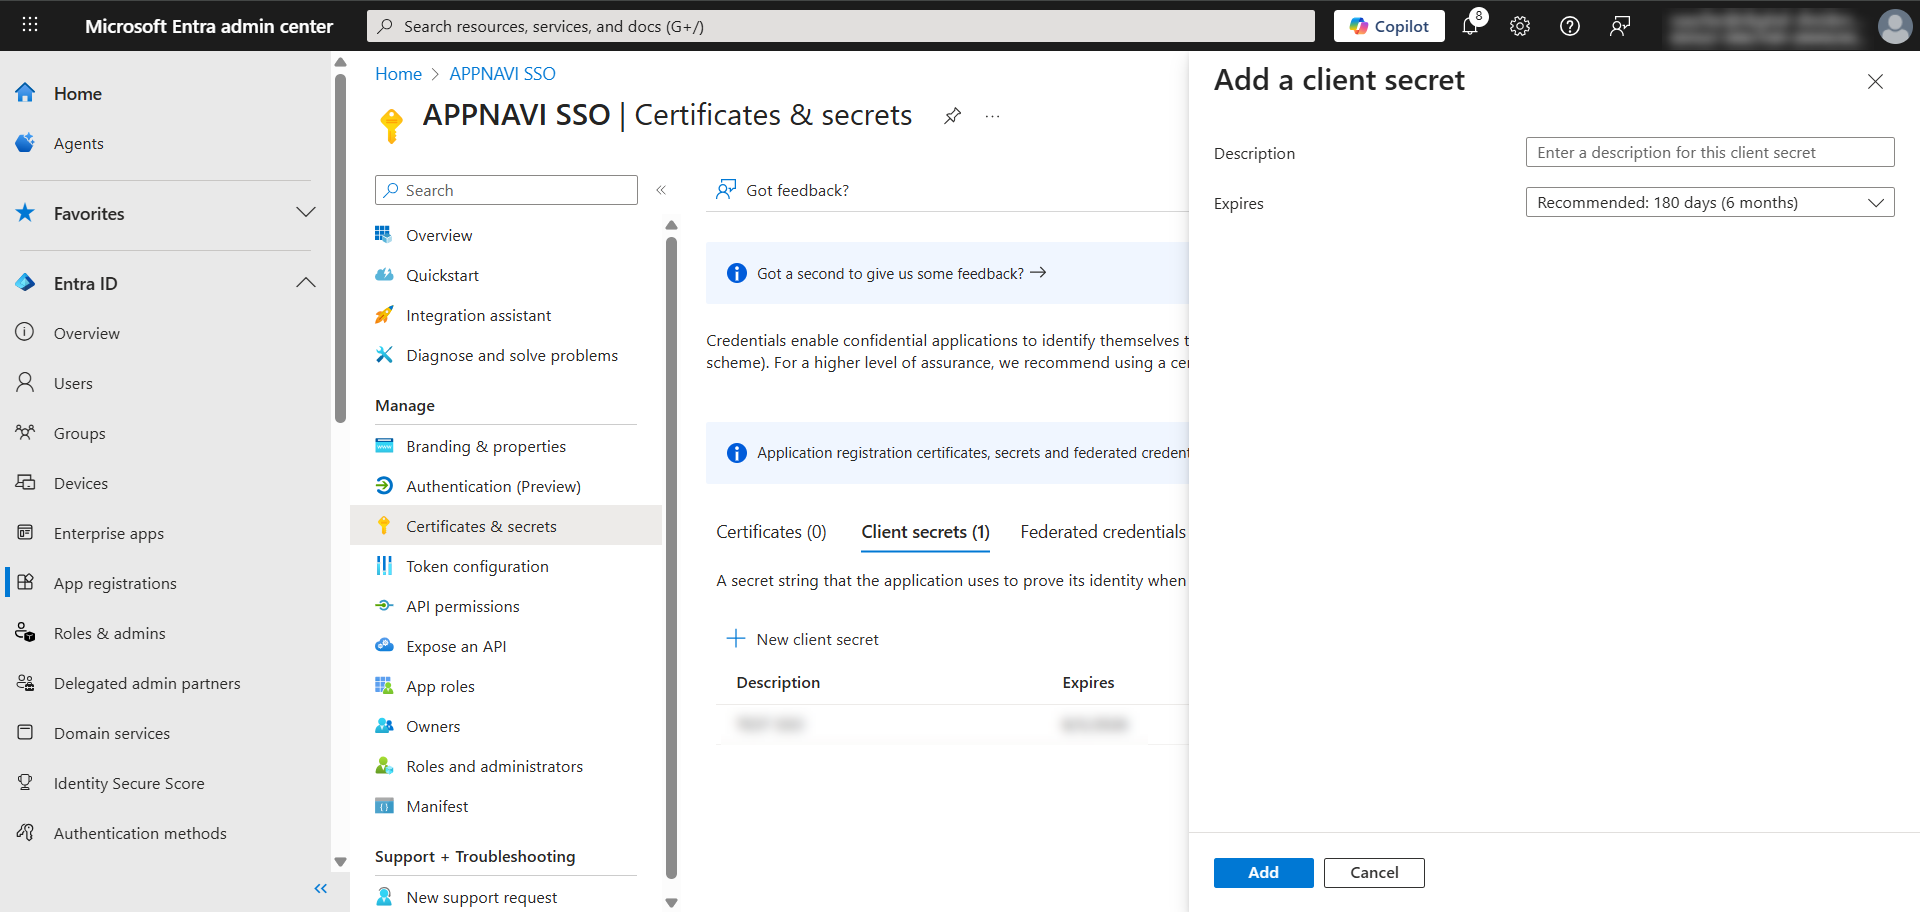
- Click on the Add button.
- A page is displayed showing an overview of the application credentials. Copy the value listed under the Value column.
- In the AppNavi portal open the OAUTH tab.
- Now paste the value that you copied earlier into the Client secret field.
- Return to Microsoft Entra and open the Overview. Copy the value that is listed for the Application (client) ID.
- Return to the AppNavi portal. Paste the value into the Client ID field.
Step# 4 Select the Claim
Under the Claim field, select the field in Microsoft Entra where the email addresses of users are stored. To validate that a user exists in AppNavi, the value will be checked if it is in the field that corresponds to the email address used in AppNavi. Depending on your setup in Entra, you can choose between "email", "unique_name", "sub" and "upn".

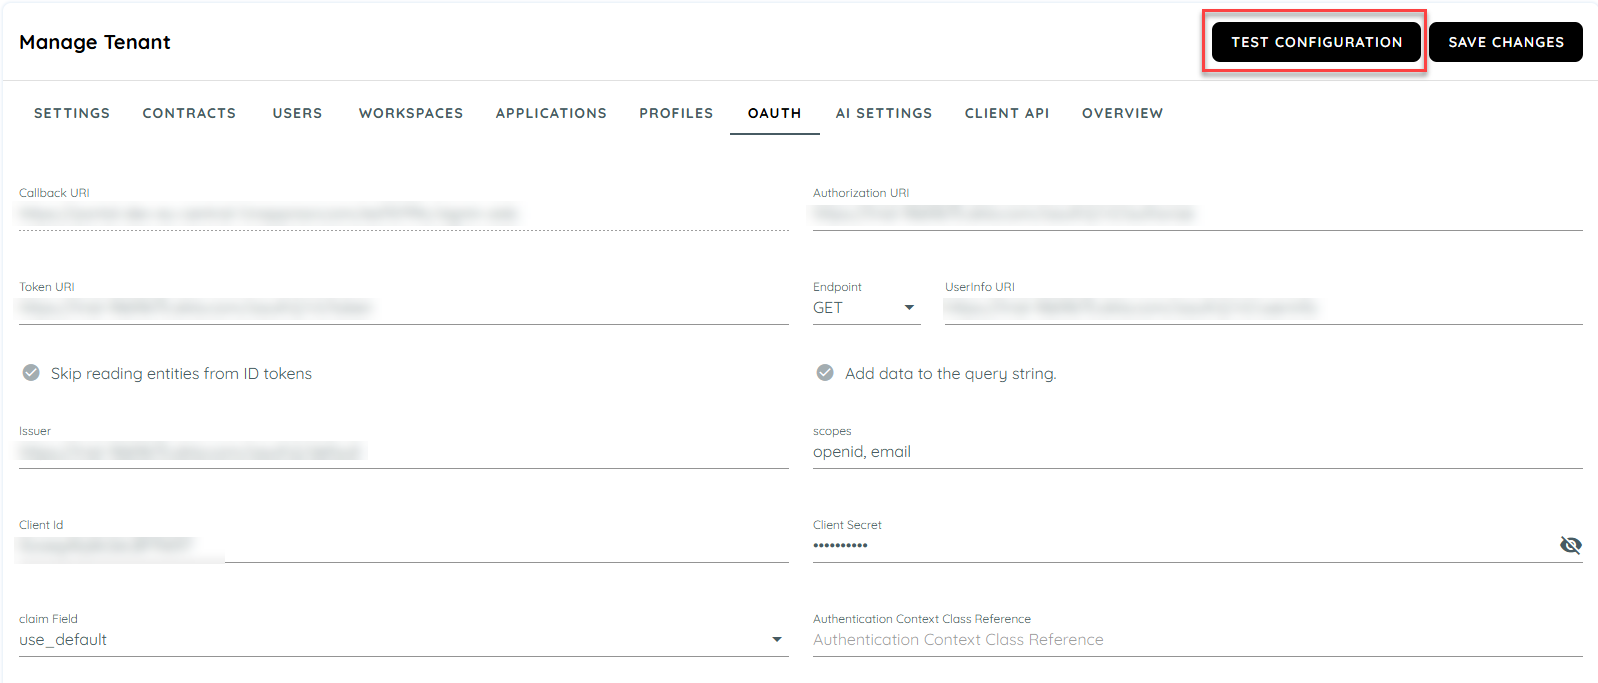
Step# 5 Review and test
- Review the data that you have entered in AppNavi portal in the OAUTH tab.
- When you are certain that you have entered all the data correctly, click Save Changes to save the data.
- To test the OAuth connection, click Test Configuration.
A user will be redirected to Microsoft Entra. If there are errors, a message will be shown.
To be able to use SSO, users need to have user profiles in both Microsoft Entra ID and AppNavi. The email address that is entered in Entra in the field you have selected under the Claim field must match the email address used in AppNavi.
Setup Single Sign-On (SSO) with Okta
To set up SSO in AppNavi with Okta, follow the steps below:
Step# 1 Create a new Application in Okta
- On the Okta administrator Menu click on the APPLICATIONS dropdown.
- Now click on the Applications button in the dropdown and the add application page will appear.
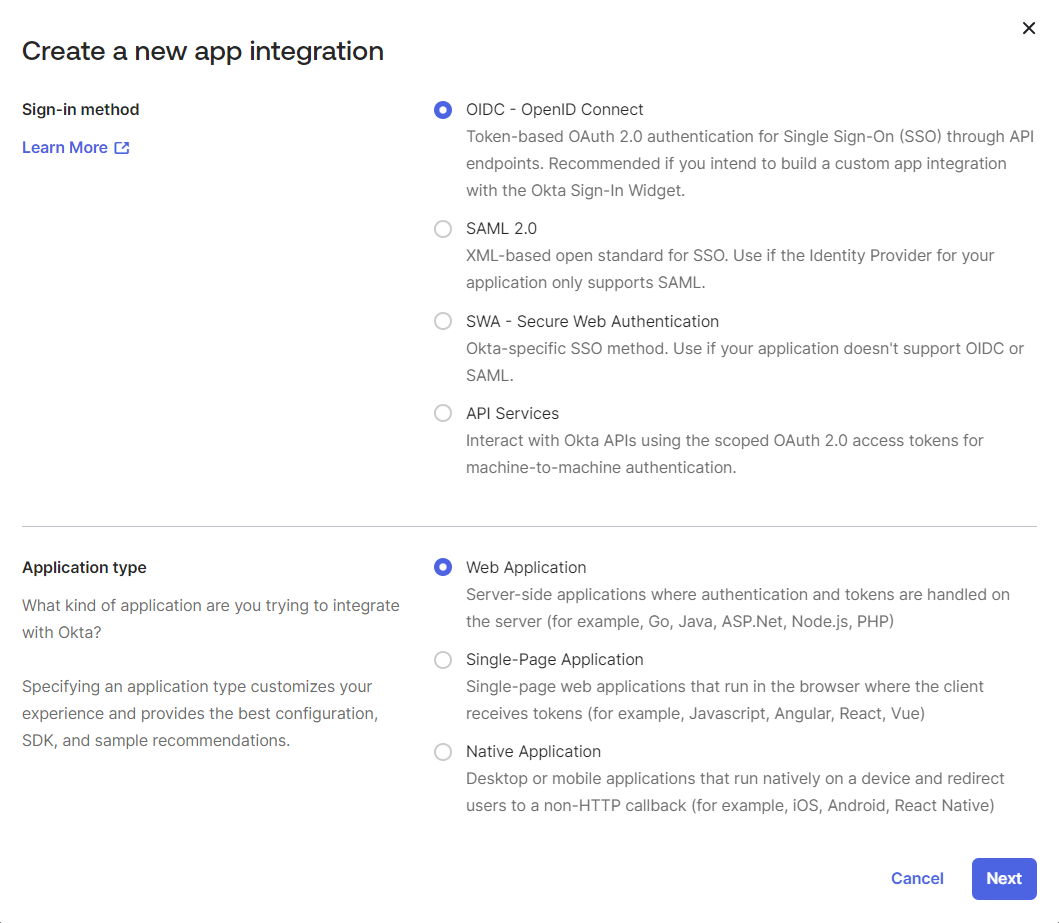
- To add a new application, click on Create App Integration and all sign-in methods will appear in a window.
- In Create a new app integration window, select OIDC - OpenID Connect as the sign-in method and a new section will appear for selecting the Application type.
- Now Select Web Application as the application type that is integrated with Okta and click on the Next button.
-
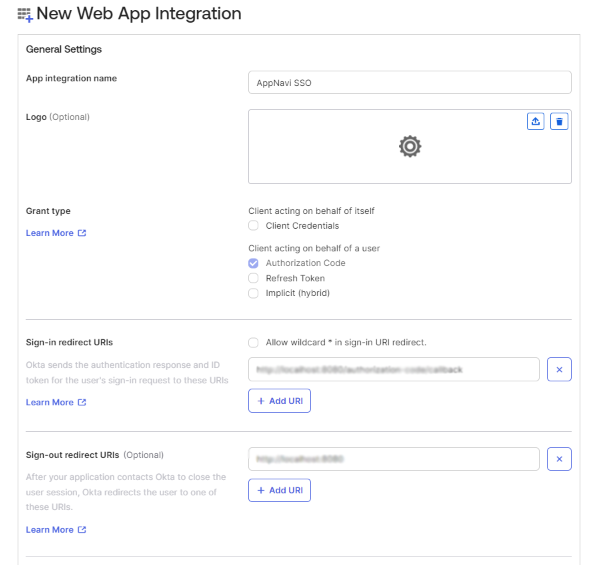
A new page will appear New Web Integration with all settings.
-
In the General Settings, enter the integration name, for example "AppNavi SSO", into the App integration name field.
-
Select Client Credentials checkbox.
-
Open the AppNavi portal and click on Manage Tenant and the settings tab will open.
-
Click on the Single Sign On toggle button to enable the OAuth tab and save changes and then open the OAUTH tab.
-
Now copy the URL from the Callback URI field and go back to Okta to the New Web Integration page in the General Settings.
-
Paste the Callback URL that you copied earlier into the field under Sign-in redirect URIs.
-
Now under Assignments, select the appropriate access level according to your organization usage.
-
Click Save to save all the settings.
Step# 2 Build and enter URIs in AppNavi Settings
To build all the Uniform Resource Identifiers (URIs) that are needed for configuring OAuth 2.0, follow these steps:
-
Open Okta admin and copy the Okta Domain "https://{yourOktaDomain}/oauth2" from the Okta admin.
-
Now open the AppNavi portal and go to Manage Tenant Settings and click on OAuth tab to open the SSO settings.
-
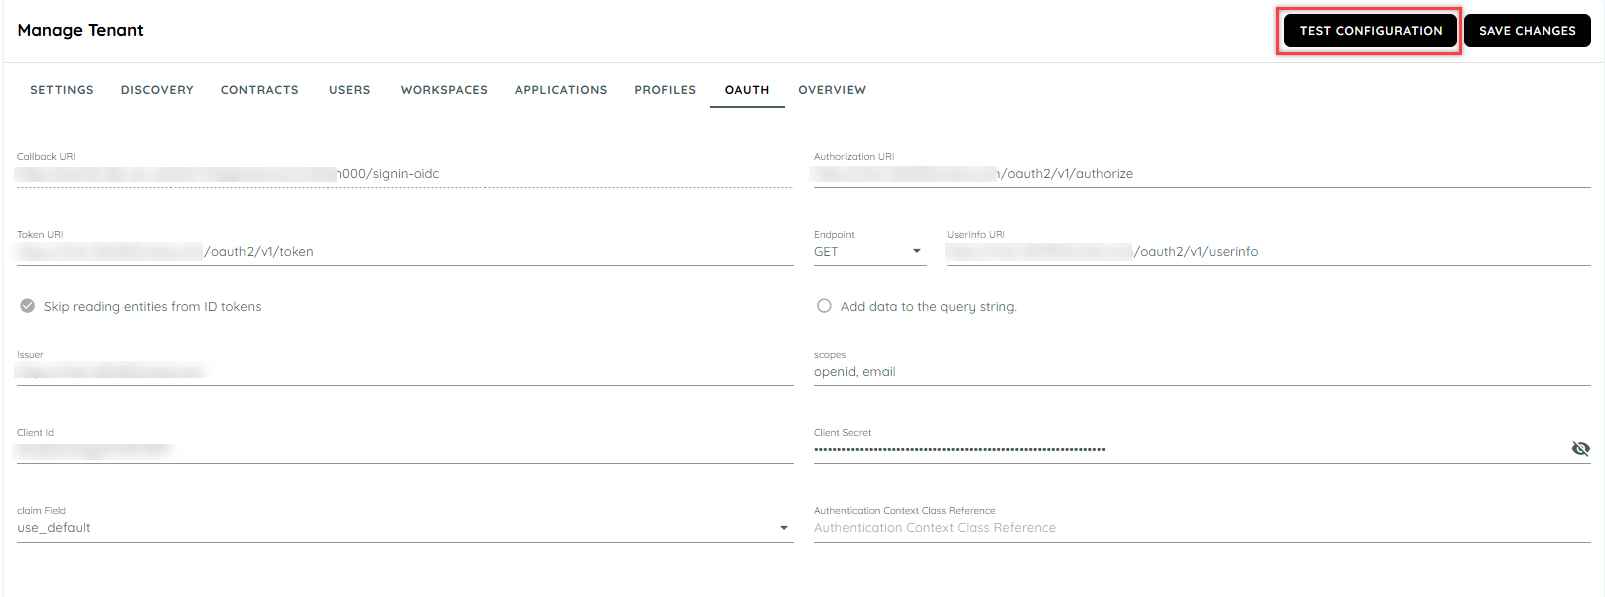
Now in the Authorization URI field, paste the Okta domain that you copied earlier and use it as a basis to build the URI (for example "https://{yourOktaDomain}/oauth2/v1/authorize").
-
In the Token URI field, enter "https://{yourOktaDomain}/oauth2/v1/token".
-
Under UserInfo URI, select "GET" from the drop-down menu and paste the UserInfo endpoint URL "https://{yourOktaDomain}/oauth2/v1/userinfo" into the field.
-
Now select the Skip reading entities from ID token and Add data to the query stringcheckbox. This means that user information, specifically the user email address, will be read upon login from the UserInfo URI instead of the token URI.
-
Open the Okta administrator dashboard and click on the Security tab.
-
Now click on the API tab from the last in the drop down and the API settings window will open.
-
Now copy the Issuer Url from the Authorization Servers Settings section and paste it in the OAuth settings under the Issuer URL in the AppNavi portal.
-
Return to the Appnavi portal’s Settings page, on the OAuth tab, Paste the Issuer that you copied earlier from Okta into the Issuer field.
-
In the Scopes field, enter "openid, email". "Email" represents the field in which the user's email address is stored.
-
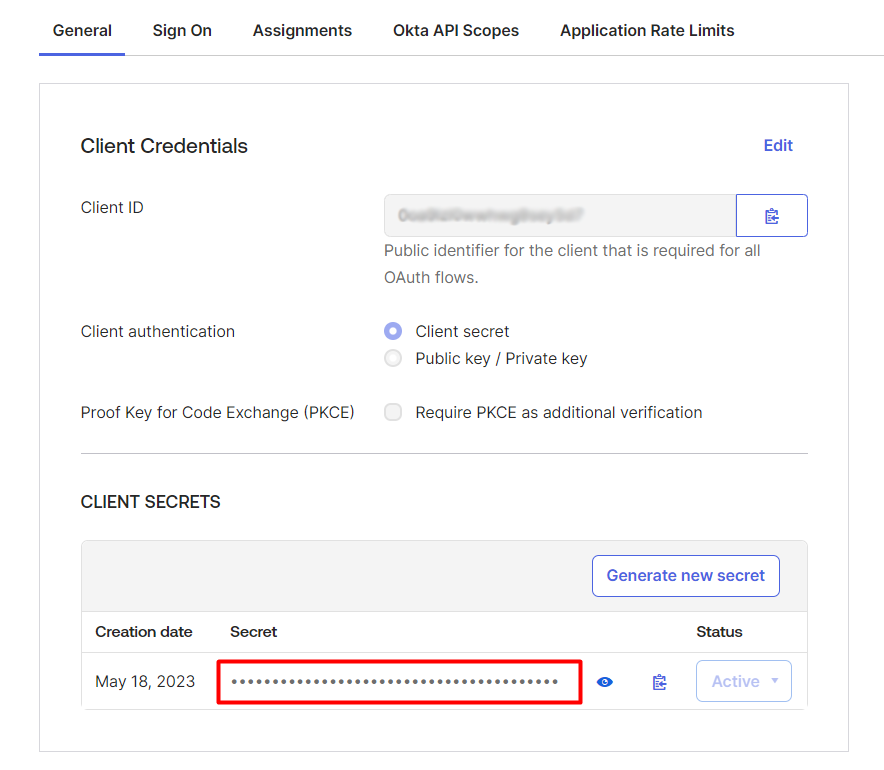
Go to Okta administrator dashboard > APPLICATIONS > Applications, select the active application. On the General tab under Client Credentials, copy the Client ID.
-
Return to the Appnavi portal settings page on the OAuth tab, paste the Client ID that you copied earlier from Okta into the Client ID field.
-
Return to Okta and open the application integrated and all the settings will appear.
-
In the General settings under Client Credentials section, copy the Client ID.
-
Return to the AppNavi portal and paste the Client ID that you copied earlier from Okta into the Client ID field.
-
Now copy the Client Secret from Okta and paste it under the Client Secret field.
-
Under the Claim Field, select Use default from the drop down provided.
-
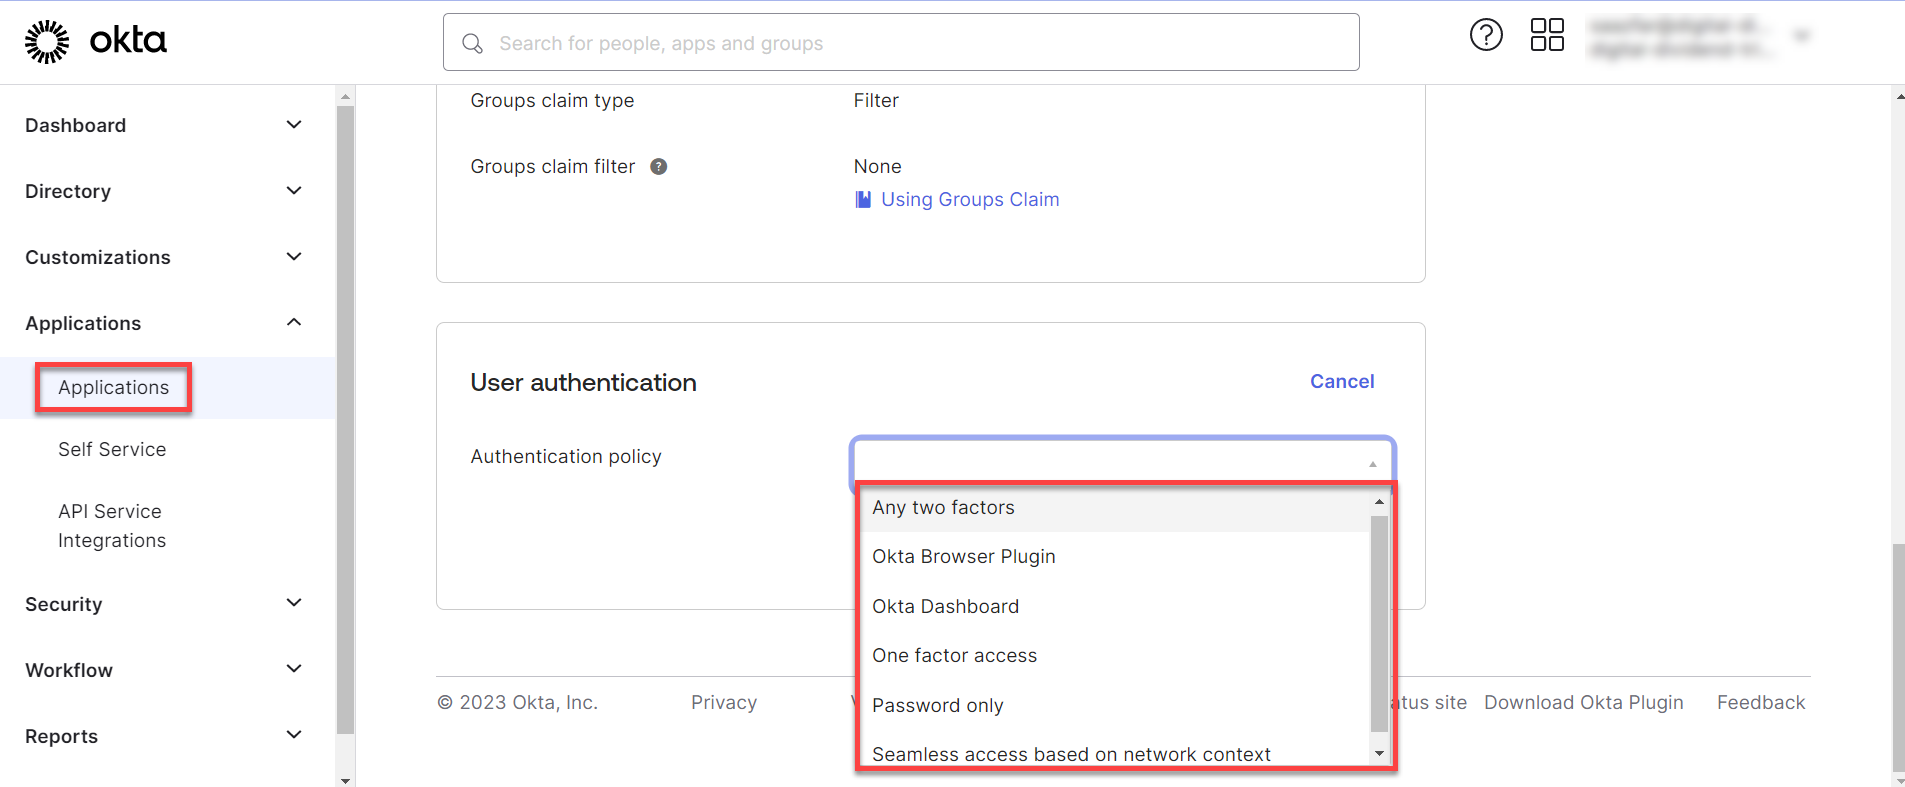
Return to the OKTA account and click on APPLICATIONS in the menu and click on theApplications button from the drop down and select the application that you have integrated.
-
Now click on the Sign-On tab and click on the edit button of the user authentication options.
-
Click on the drop down and select the best option suitable and click save.
Step# 3 Review and Test
-
Review the data that you have entered in the AppNavi portal in the OAuth settings.
-
When you are certain that you have entered all the data correctly, click Save Changes to save the data.
-
To test the OAuth connection, click on the Test Configuration button to test the connection settings.
-
f there are errors, a message will be shown to the user and will be redirected to Okta.
To be able to use SSO, the user must be added to both Okta and AppNavi. The email address that is entered in Okta under Directory > People > Primary must match the email address used in AppNavi.
-
If the settings are correct then the portal will redirect to a sign-in page on the portal to login to portal using the Okta user id.
-
To successfully login to the portal using an Okta id, the user must create a user with same user email on the portal which was used to create an account or sub account on Okta.
Note: Sub accounts can be created using the admin Okta account and then user can use the same email to login to the AppNavi Portal.
Updated 8 months ago