Integrate AppNavi in ServiceNow
This guide provides a step-by-step process to integrate AppNavi into ServiceNow, supporting Classic View and Workspace View. Follow the instructions carefully to enable seamless AppNavi functionality within your ServiceNow instance.
Integration Overview
AppNavi is integrated into ServiceNow by injecting a script that loads the AppNavi client. The integration differs based on the interface:
AppNavi Integration Options Overview
| Integration Method | Interface Supported | Injection Approach | Strengths | Limitations |
|---|---|---|---|---|
| UI Script | Classic UI (Desktop) | UI Script injects AppNavi loader via script tag | Simple to implement; loads automatically on all classic pages | Does not work in Workspace; limited timing control; always runs globally |
| Client Script | Workspace (Forms only) | onLoad Client Script injects external AppNavi loader | Works reliably on Workspace Forms; easy setup | Only executes on Forms; does not work on lists, home pages, UI Builder pages, or the app shell |
| Now Experience Component | Workspace (All pages) | Custom component injects AppNavi loader globally | Works on every Workspace page; most reliable workspace integration; full control | Requires component development; typically needs CLI deployment; CSP must allow external script |
Classic View Integration (UI Script)
Steps:
-
Navigate to UI Scripts
- In your ServiceNow instance, go to:
System UI > UI Scripts
- In your ServiceNow instance, go to:
-
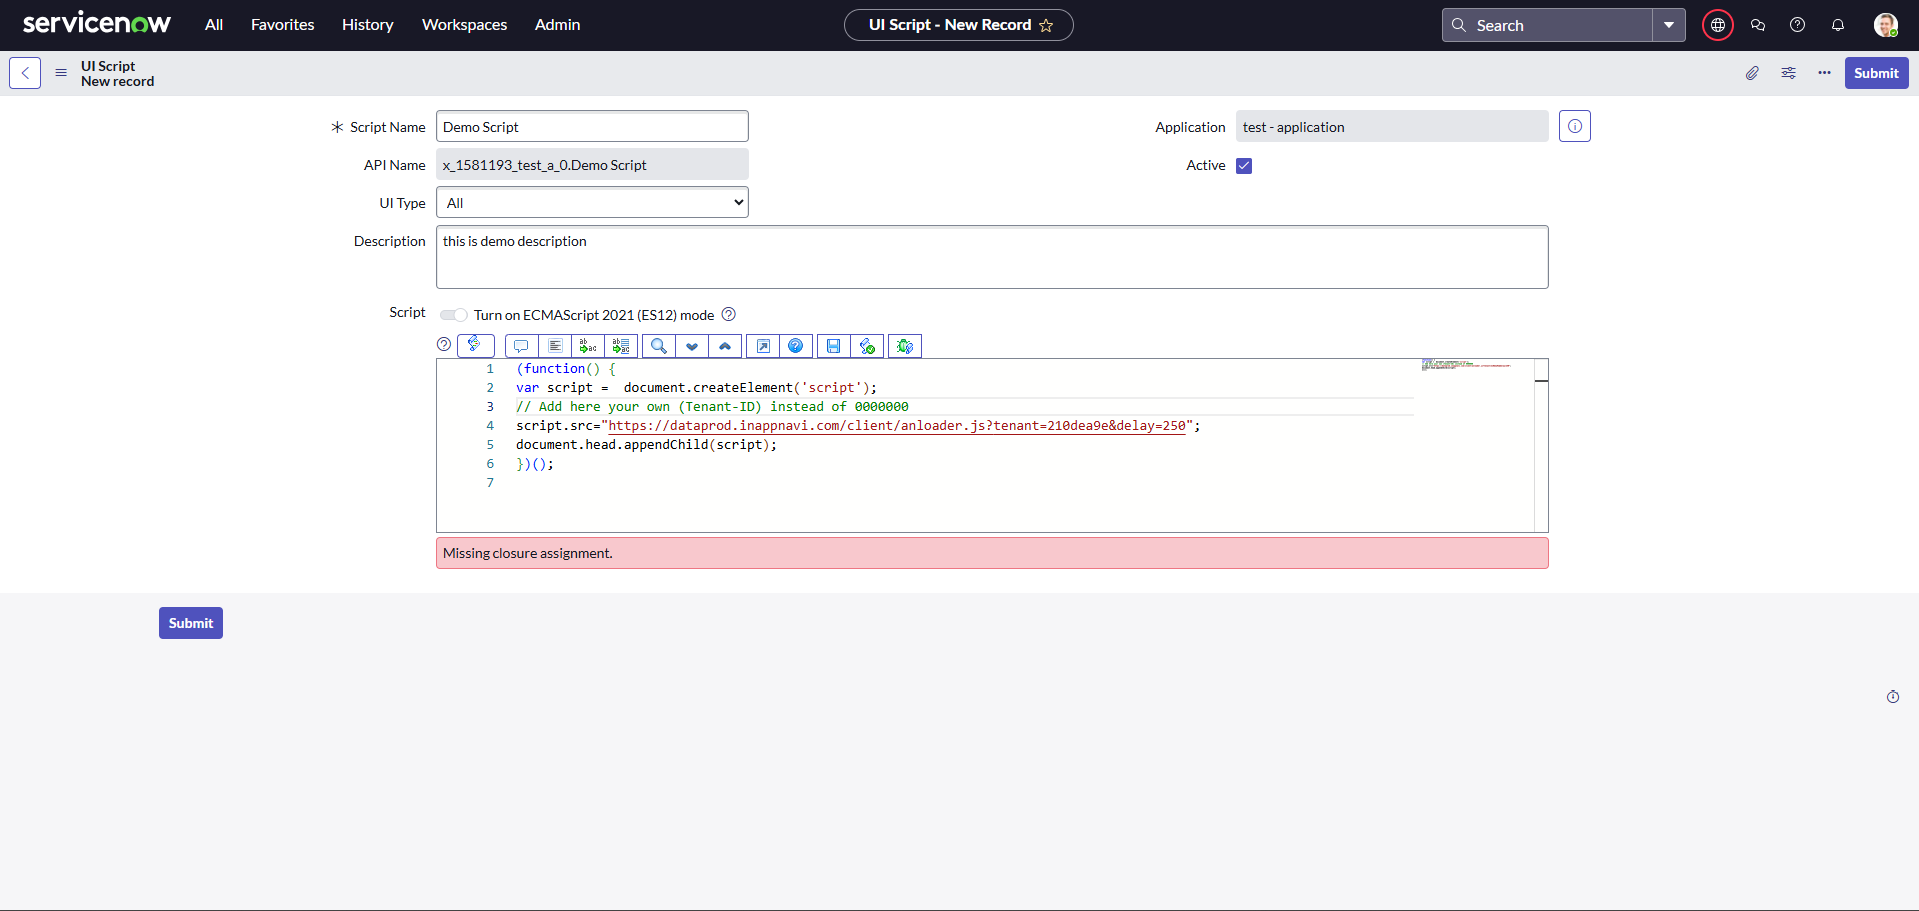
Create a New UI Script
- Click New.
- UI Type: Select Desktop (or All if you want wider coverage).
- Scope: Ensure it includes Global.
- Name & Description: Enter a meaningful name (e.g., AppNavi_Integration) and a clear description.
-
Add the Integration Code
(function() {
    var script = document.createElement('script');
    // Replace with your actual Tenant ID
    script.src = "https://data-prod.inappnavi.com/client/an-loader.js?tenant=00000000&delay=250";
    document.head.appendChild(script);
})();
Important:
- Replace 00000000 with your unique Tenant ID.
- delay=250 (milliseconds) can be adjusted to control when the script loads.
Workspace View Integration (Client Script)
Classic UI Scripts do not work in Workspace View. For Workspace, use a Client Script that dynamically injects the AppNavi loader.
Steps:
- Navigate to Client Scripts
- Go to: System Definition > Client Scripts
- Create a New Client Script
- Click New.
- UI Type: Select Mobile / Service Portal (or the relevant workspace type).
- Type: Select onload()
- Table Scope: Set to Global (or all Task tables if Global isn’t available).
- Provide a Name and Description.
- Insert the Script
Paste the following JavaScript code:
function onLoad() {
    console.log("AppNavi Integration for Workspace View");

    var doc = document;

    if (typeof doc === 'undefined' || doc === null) {
        doc = this.document;
    }

    if (typeof doc === 'undefined' || doc === null) {
        console.error("Document not found.");
        return;
    }

    if (doc.readyState === 'complete' || doc.readyState === 'interactive') {
        addAppNaviScript();
    } else {
        doc.addEventListener('DOMContentLoaded', addAppNaviScript);
    }

    function addAppNaviScript() {
        var script = doc.createElement('script');
        // Replace with your actual Tenant ID
        script.src = "https://data-prod.inappnavi.com/client/an-loader.js?tenant=18140616&delay=250";
        script.async = true;

        var target = doc.head || doc.body;
        if (target) {
            target.appendChild(script);
            console.log("AppNavi script added:", script.src);
        } else {
            console.error("Unable to append AppNavi script.");
        }
    }
}
Important:
- Replace 0000000 with your Tenant ID.
Limitations
- Classic View and Workspace View require separate scripts.
- Workspace View integration is client-side only, so ensure permissions allow script injection.
Related Resources
- Enhance Security – Direct Integration
Learn how to securely integrate AppNavi using direct integration methods, ensuring compliance with your organization’s security policies. - Ways to Integrate AppNavi into Your Application
Explore all available integration options for AppNavi, including script injection, API-based integration, and advanced configurations to meet diverse application needs.
Updated 8 months ago
Did this page help you?