End User Authentication
Overview
OIDC is an identity layer built on top of the OAuth 2.0 protocol. It allows applications to verify the identity of users based on the authentication performed by an external provider, such as Google, Microsoft Entra, or Okta. OIDC not only confirms who the user is but can also provide profile information about that user in a secure and standardised way.
Why OIDC is Used
In modern applications, secure and reliable authentication is essential. OIDC provides a standardised method that reduces the complexity of building and maintaining authentication systems. Instead of handling passwords directly, applications rely on trusted identity providers. This approach improves security, simplifies integration across multiple platforms, and gives organizations flexibility in choosing authentication providers.
Key Terms:
- IDP (Google / Okta / Microsoft Entra): The system that stores user accounts.
- Authorization Code + PKCE: The secure login flow for web applications.
- Discovery (well‑known URL): A JSON endpoint that provides important OIDC endpoints such as authorize, token, userinfo and issuer.
How OIDC Works in AppNavi
AppNavi supports OpenID Connect (OIDC) to integrate with an organization’s identity provider (IDP). Through this integration, AppNavi fetches user profile details from the IDP after authentication has been completed on the provider’s side. When OIDC is enabled, requests are redirected to the configured identity provider. The IDP verifies the user’s identity and returns the required tokens. These tokens are then used by AppNavi to retrieve user information, such as profile attributes, without handling the login process itself.
Why Use This Feature
When an organization connects its Identity Provider (such as Okta, Microsoft Entra, or Google) with AppNavi through OIDC, specific user details (known as claims) can be returned — for example, email, name, or department.
This feature makes those details usable directly inside AppNavi. Once the OIDC configuration is complete and claims are available, AppNavi fetches the user profile and applies the details through APIs.
By using this feature, organizations can:
- Maintain consistency always use verified information from the central identity system.
- Enhance reporting include claims like department in Insights and Discovery for more accurate analytics.
- Target the right users define audiences with attributes such as email, department, or role.
- Personalize content ensure that only the intended people see specific announcements, routes, or guidance.
This feature helps organizations turn identity information into trusted, actionable data within AppNavi.
Purpose of This Feature
The purpose of this feature is to connect the data received from OIDC with AppNavi’s own analytics and personalization capabilities. Once claims are returned, they can be used in different ways:
- Insights (Custom Fields): Add claims such as name or email into custom fields for analytics and reporting.
- Discovery Events: Send claims like department into Discovery data. If no claim is available, the registry value is used.
- Target Audience: Use claims to define groups of users and deliver content only to them.
- Content Delivery: Show announcements, routes based on audience rules powered by claims.
This ensures that AppNavi does more than just fetch user data — it allows organizations to apply that data for better insights, smarter segmentation, and personalized experiences.
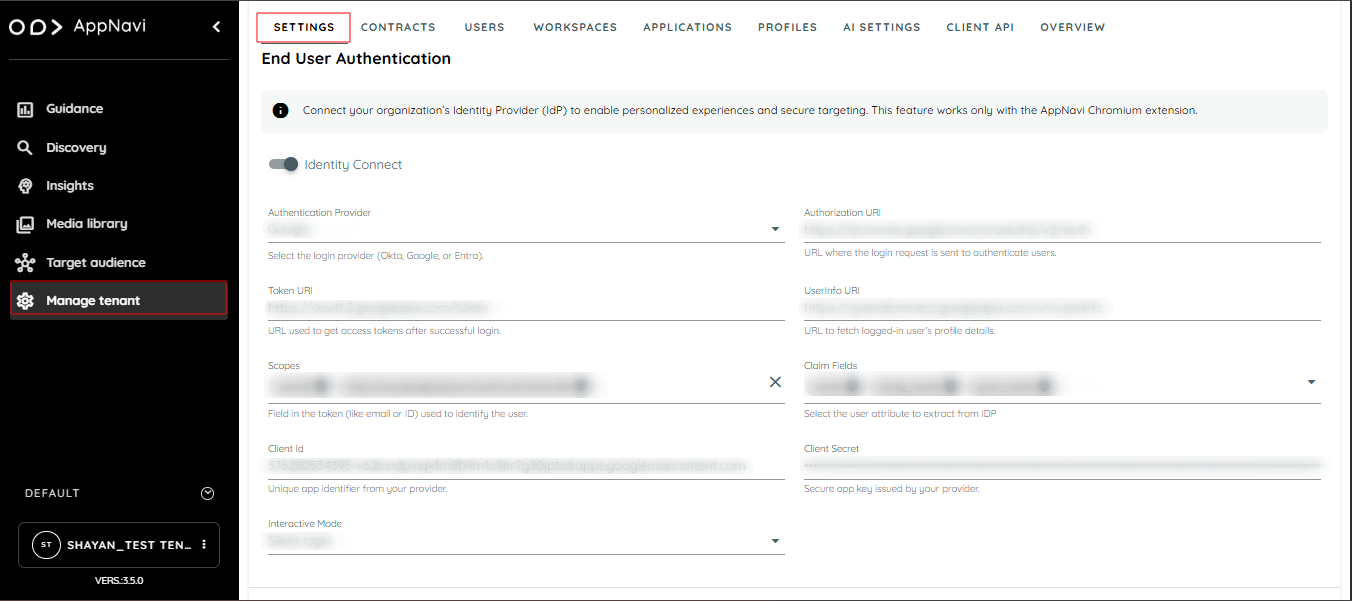
How to Configure OIDC
- Navigate to Manage Tenant in the portal.
- Open the Settings section.
- Scroll down to the End User Authentication area.
- Enable the Identity Provider toggle button.
- From the dropdown, select authentication provider (Google, Microsoft Entra, or Okta).
- Enter the following details provided by your OIDC provider:
- Authentication URI: The URL used to authenticate user. This is the entry point where login requests are sent.
- Token URI: The endpoint where an authorization code is exchanged for an access token.
- Userinfo URI: The endpoint used to fetch user profile information after authentication.
- Client ID: A unique identifier for user application, provided by the IDP.
- Client Secret: (Only required for Google OIDC) – A secret key used by the application to authenticate itself with the IDP.
- Scopes: Define the information user want to request from the IDP (e.g., openid profile email). Scopes decide which user details will be available.
- Claim fileds: Specific user attributes want from the IDP (e.g., name, email, userprofile). Claims represent the actual pieces of user data returned after login.
- Choose an Interactive Mode from the options:
- **Silent Login :**login without user interaction if a valid session exists.
- **Force Login:**always ask the user to log in.
- **Force Consent:**always request user consent for permissions.
End User Authentication
After successful configuration, the end user will see the login status in the console of the application where the AppNavi avatar is integrated.
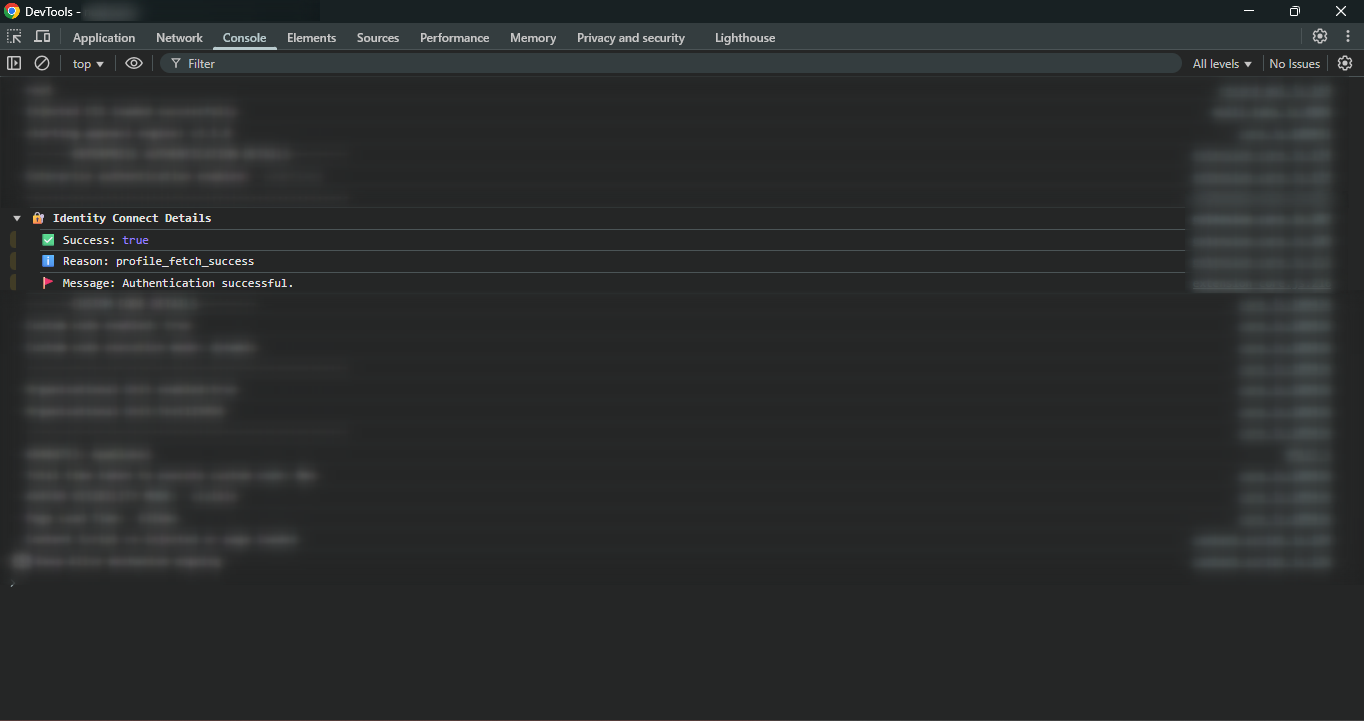
Application Console
Where to Find OIDC Information
Microsoft Entra (Azure AD)
- Open the Azure Portal and go to Microsoft Entra ID > App Registrations (https://portal.azure.com).
- Select the registered application.
- From the Overview page
- Copy the Application (Client) ID → This will be used as Client ID.
- Copy the Directory (Tenant) ID → Needed for the Discovery URL.
- Go to Certificates & Secrets and create a new secret. Copy its Value → This is the Client Secret.
- Make sure this exact Redirect URI is used, otherwise authentication will not work:
https://gldjdbpbhhpcpimpiicmglaeeehegflh.chromiumapp.org/ - Discovery URL format (replace {tenantID} with your actual Directory ID):
https://login.microsoftonline.com/{tenantID}/v2.0/.well-known/openid-configurationMicrosoft’s official documentation provides more details on OIDC app registrations and OAuth 2.0 flows:
Google
- Open Google Cloud Console and go to APIs & Services > Credentials.
- Create or open an OAuth Client ID of type Web Application.
- Copy the Client ID from the credentials page.
- Make sure this exact Redirect URI is used, otherwise authentication will not work:
https://gldjdbpbhhpcpimpiicmglaeeehegflh.chromiumapp.org/ - Discovery URL:
https://accounts.google.com/.well-known/openid-configuration
A full guide on setting up OAuth 2.0 (used by OIDC) is available on Google’s documentation portal. It covers how to obtain a client ID, set redirect URIs, and manage scopes and tokens.
Okta
- Open the Okta Admin Console and navigate to Applications > Applications.
- Select the OIDC Web Application created for integration.
- From the application’s settings page:
- Copy the Client ID
- Make sure this exact Redirect URI is used, otherwise authentication will not work:
https://gldjdbpbhhpcpimpiicmglaeeehegflh.chromiumapp.org/ - Discovery URL:
https://{yourOktaDomain}/oauth2/default/.well-known/openid-configuration
(Replace {yourOktaDomain} with the actual domain, for example trial-xxxxxx.okta.com)
Okta offers an official walkthrough for creating OpenID Connect app integrations within the Admin Console. This covers how to choose OIDC as the authentication type, set redirect URIs, and complete the app setup.
Custom Apis
After providing the correct OIDC configuration, the user will go to the target application where the AppNavi avatar is integrated. On that application, the user needs to open the browser console and run the following AppNavi API methods to verify profile details.
To access and test these APIs, please visit the dedicated page: Custom APIs Documentation
Extension Start Behavior
When the Start button is activated in the AppNavi Chrome extension, the following behavior takes place:
- The previously stored Identity Provider (IDP) session token and related IDP details are cleared from the browser’s Local Storage.
- Only IDP session information is removed. All other AppNavi-related settings, configurations, and stored values remain untouched.
- After the session cleanup is completed, the AppNavi avatar is automatically refreshed to begin a clean authentication cycle.
- If authentication is required again based on the configured mode (Silent Login, Force Login, or Force Consent), the standard sign-in flow will appear as expected.
This mechanism ensures that each extension start initializes a fresh, reliable OIDC session without affecting any other functionality or data.
Consent Popup Behavior
The consent popup is designed to appear only once within a 24-hour period to avoid interrupting the user experience repeatedly.
If needed, users can manually trigger the consent popup again by clicking the Start button. This will immediately display the popup even if the 24-hour interval has not yet passed.
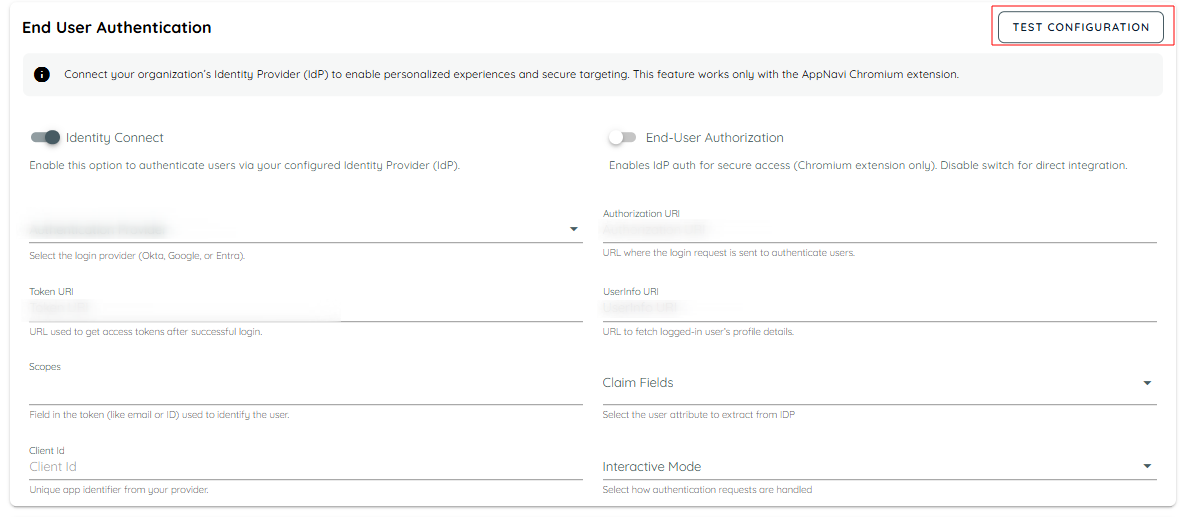
Test Identity Connect (OIDC) Configuration
This feature allows Tenant Owners to verify their Identity Connect (OIDC) settings directly from the portal, without needing to perform an external login. It ensures that the OIDC configuration is correct and reduces trial-and-error and support requests.
How It Works
- Test Configuration Button
- Click “Test Configuration” in the Identity Connect Settings section.
- The portal sends the current OIDC configuration to the Chrome Extension.
- Chrome Extension Simulation
- The extension simulates the login flow with the provided IdP.
- If authentication is successful, it fetches user profile information (claims).
- Portal Response Display
- The portal receives a structured response from the extension.
- Success: Shows user info and provider details.
- Failure: Displays an error message with remediation hints.
Example Scenario: How an User Experiences OIDC in AppNavi
An organization has connected its Okta OIDC account with AppNavi. The purpose is to allow AppNavi to fetch user profile details (like name, email, department) securely from Okta.
Steps
- Identity Provider Configuration
- The user selects Okta as the identity provider in the AppNavi portal.
- The user enters the required OIDC details:
- Authorization URI
- Token URI
- Userinfo URI
- A valid Client ID is also provided.
- Interactive Mode Enabled
- The user enables Interactive Mode (e.g., Force Consent).
- The configuration is saved.
- Scopes and Claims Setup
- The user reviews Okta documentation to find supported scopes such as openid, profile, email, department.
- These scopes are added in AppNavi.
- Claims (e.g., name, email, department) are configured in the AppNavi portal.
- Accessing the Target Application
- The user navigates to the application where the AppNavi avatar is integrated.
- The browser console is opened, and the page is refreshed.
- Force Consent Screen
- Okta displays a consent screen, asking the user to select an account and approve access.
- Profile Fetch through OIDC
- After account selection, AppNavi fetches the profile via OIDC.
- Attributes (claims) requested earlier (e.g., email, department) are returned from the IDP.
- Validating Profile Data in Console
Once authentication is successful, the user can open the browser console and use AppNavi’s API methods to verify the details:
await window.appnaviApi.identity.getToken();
// Displays the OIDC access token

await window.appnaviApi.identity.getAllClaims();
// Displays all available claims in a promise return callback

await window.appnaviApi.identity.getClaim('email');
// Displays the 'email' claim value, e.g., "[email protected]"
Troubleshooting
If user face issues while signing in with OIDC, check the following messages and suggestions:
| Status / Error Code | What It Means | Suggested Action |
|---|---|---|
| Authentication successful | Your sign-in completed without issues. | No action needed. |
| Profile re-fetched successfully | Your profile was updated successfully. | No action needed. |
| Already signed in | You are already authenticated. | Continue using the application. |
| Invalid configuration | Sign-in setup is incorrect. | Ask your admin to verify Client ID, Authorization, Token, and User Info URLs. |
| Automatic sign-in not available | Could not log you in silently. | Check if you’re signed into your IDP in this browser and allow cookies. |
| Authorization denied | You denied or cancelled the login request. | Try again and approve the request. |
| Token exchange failed | Could not exchange login code for access. | Try again. If it persists, admin should check token endpoint settings. |
| Access token missing | No access token was returned by the IDP. | Try again. If it persists, contact support. |
| Profile fetch failed | Could not fetch your profile information. | Retry. If it persists, admin should check UserInfo endpoint permissions. |
| Session refresh not available | Your login session cannot be refreshed. | Please sign in again. |
| Refresh token not returned | The IDP did not send a refresh token. | Sign in again. If it persists, admin should enable refresh tokens / offline access. |
| Session refresh failed | The attempt to refresh your session was unsuccessful. | Please sign in again. |
| idp_popup_cooldown | The Identity Connect authentication pop-up cannot be displayed again within 24 hours. | Please click the Start button in the AppNavi extension to reopen the authentication pop-up. |
Developer Guidelines: Handling Promises in Avatar
Working with Avatar involves promise-based APIs (for example, fetching tokens or claims).
The way promises are handled can directly affect reliability.
Why Avoid .then()?
Using .then() may look simple, but it can create race conditions. This means:
- Steps may run out of order.
- Data may return later than expected.
- The feature may break in unpredictable ways.
Safer Approach: Use async/await
Async/await keeps the flow clean and ensures that each step finishes before moving to the next.
This avoids timing issues and makes debugging easier.
Examples
Using .then() (Not Recommended)
window.appnaviApi.identity.getClaim('given_name').then(name => {
  console.log("Claim:", name);
});

window.appnaviApi.identity.getClaim('email').then(email => {
  console.log("Email:", email);
});
Using async/await (Recommended)
  const name = await window.appnaviApi.identity.getClaim('given_name');
  console.log("Claim:", name);

  const email = await window.appnaviApi.identity.getClaim('email');
  console.log("Email:", email);
End-User Authentication (EUA)
AppNavi now introduces End-User Authentication (EUA), a feature designed to provide stronger security, a smoother login experience, and consistent identity management across all devices and browsers.
What This Feature Does
When enabled, EUA ensures that only verified users can access tenant-specific data, dashboards, and protected resources inside AppNavi.
It adds an additional security layer on top of existing AppNavi protection.
How It Works for Users
- Users log in through their organization’s identity provider (IdP), such as Microsoft Entra, Okta, or Google.
- Once authenticated, AppNavi automatically issues a secure short-term token that allows the user to access protected resources without repeated logins.
- The login experience works consistently across supported browsers and devices.
When EUA is Enabled
- Users must be authenticated through their company’s IdP to access AppNavi.
- All sensitive tenant resources (such as dashboards, data files, and protected content) require a valid secure token.
- User identity remains stable across devices, ensuring consistent tracking, reporting, and personalization.
- Token refresh happens automatically in the background to keep the user logged in without interruptions.
When EUA is Disabled
- AppNavi continues to use the existing security model.
- No change in how users access data or how applications currently behave.
What Remains Unrestricted
- Public or non-sensitive AppNavi resources remain accessible as usual.
- Static assets and meta information load normally, with or without EUA enabled.

End User Authentication (EUA) Support for AnLoader
Overview
AnLoader now supports applications that use End User Authentication (EUA). This enhancement allows Tenant Owners to decide for each application, whether EUA should be enabled or not.
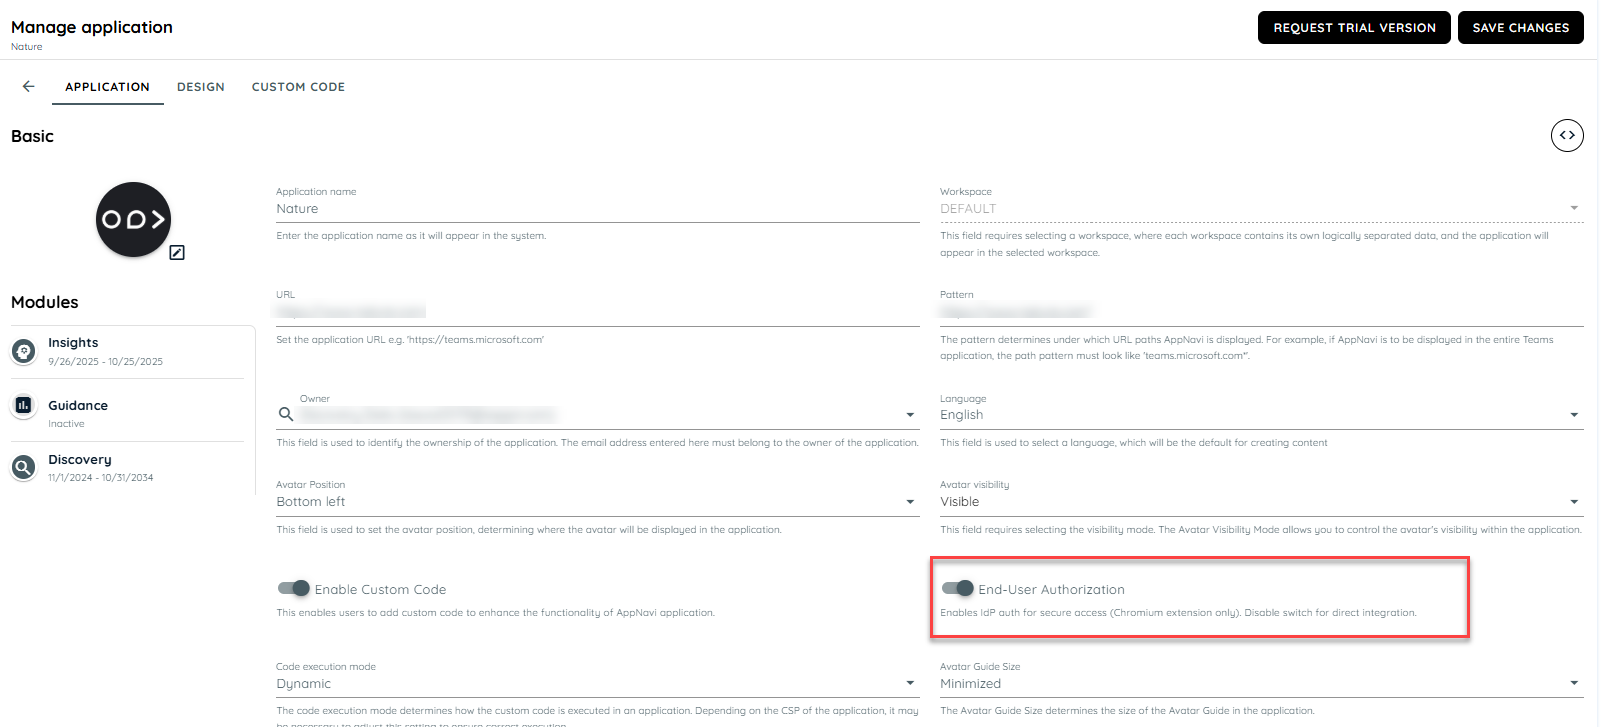
How It Works
- Each application includes a switch that controls whether EUA is enabled.
- If EUA is enabled, the application will use EUA-based authentication.
- If EUA is disabled, the application will continue using the existing authentication method.
Note: When EUA is enabled at the tenant level, an application will work with AnLoader only if the End User Authentication switch is disabled at the application level.
FAQs
The following FAQs explain how different toggle and backend settings affect the Identity Connect feature and its ability to fetch user data.
| Question | Answer | Example |
|---|---|---|
| Why is the End User Authentication option not visible in the Manage tenant settings? | If this option is not visible, the AppNavi Admin has not enabled it yet. Contact the Admin to request activation. | The portal Manage tenant settings page does not show End User Authentication. This means the Admin has not turned it on. |
| What happens if the Identity Connect toggle is enabled with correct details? | Identity Connect works successfully, and user data is fetched in the application. | After entering valid details (Client ID, URIs), the application fetches email and department as expected. |
| What happens if Identity Connect is working, but later the End User Authentication option appears? | This means the Admin has enabled an additional security step. The End User Authentication toggle must now be enabled in the portal manage tenant settings for Identity Connect to keep working. | Yesterday Identity Connect worked without this toggle. Today the option is visible. Enabling it fixes the issue. |
| What happens if End User Authentication is enabled in the portal but disabled inside the application settings? | The feature works correctly and also the AN-Loader can work | Extension continues fetching user data when the setting is disabled inside the application. |
| What happens if Identity Connect, End User Authentication, and other options are enabled but details are incorrect? | The feature will not work, because the profile must be authenticated successfully before authorization. | Wrong Client Secret prevents the user profile from being verified, so no data is fetched. |
| Does AN-Loader depend on Identity Connect? | No. AN-Loader works independently and does not require Identity Connect. | Even if Identity Connect is disabled, AN-Loader can still works. |
| What happens if End User Authentication is not enabled in Manage Tenant settings? | AN-Loader continues to work without any issue. | When End User Authentication is off in Manage Tenant, AN-Loader scripts run smoothly. |
| What happens if End User Authentication is enabled in Manage Tenant settings? | AN-Loader does not work. To resolve this, End User Authentication must be disabled inside the specific application settings. | If End User Authentication is turned on in Manage Tenant, AN-Loader fails until it is disabled in the application settings. |
Updated 6 months ago