
Advanced Reports
Overview
Advanced Reports allows you to create customized reports using SQL queries in AppNavi Insights. Use this feature when the standard report builder does not provide the filters, calculations, or level of detail you need.
You can write queries manually or use the Query Assistant to generate SQL from natural-language requests.
Prerequisites
Before using Advanced Reports, make sure you have:
- Access to the AppNavi Portal.
- Permission to access Insights Analytics and Reports for the selected application.
- An Insights contract assigned to the application.
- Basic knowledge of SQL if you plan to write queries manually.
Note: Advanced Mode must be enabled for the selected application. The Query Assistant may also require a separate tenant-level setting.
Open Advanced Mode
- Open Insights from the Portal sidebar.
- Select the application you want to analyze.
- Open the application's three-dot menu and select Insights Analytics.
- Navigate to the Reports tab.
- Enable Advanced Mode.
- Open the query panel using the menu icon on the right.
- Review the predefined query in the editor or replace it with your own SQL.
- Click Apply to execute the query and view the results.
Use Reset to restore the predefined query. Use Undo and Redo to manage changes in the editor.

Advanced Mode
Understand the available data
Advanced Reports uses the events dataset as its main data source.
The available fields depend on the event schema supported by your application. To explore them:
- Open the query editor.
- Start writing a query or reference a field.
- Use the editor's IntelliSense suggestions to discover available event fields.
- Review the suggested field names before using them in your query.
The editor also provides SQL syntax highlighting.
Important: Use FROM events when referencing the main dataset. Only simplified and supported SQL syntax is allowed.

Write SQL queries
Start with a simple query and gradually add filters, grouping, or calculations.
Example 1: Count all events
SELECT COUNT(*) AS total_events
FROM events
This returns the total number of event records available to the query.
Example 2: Retrieve event records
SELECT *
FROM events
Use this as a starting point to inspect the available event data. For larger datasets, narrow your query using supported filters and fields.
Common SQL patterns
| Requirement | SQL pattern |
|---|---|
| Count records | COUNT(*) |
| Calculate a total | SUM(field_name) |
| Calculate an average | AVG(field_name) |
| Filter records | WHERE condition |
| Group results | GROUP BY field_name |
| Sort results | ORDER BY field_name |
Replace field_name with an actual field available in IntelliSense. Confirm that the selected function and SQL syntax are supported by the editor before using them.
Query writing recommendations
- Start with a simple query and add conditions one at a time.
- Use only fields suggested by IntelliSense.
- Avoid retrieving unnecessary columns.
- Apply filters when analyzing a specific event type, user group, or time period.
- Use clear aliases for calculated columns.
- Do not assume that every standard SQL function or command is supported.

Use the Query Assistant
If you are unfamiliar with SQL, use the Query Assistant to generate a query.
- Open Manage Tenant.
- Navigate to the Insights section.
- Enable Advanced Report Query Assistant Features.
- Return to Insights Analytics > Reports.
- Enable Advanced Mode.
- Enter your reporting requirement in the Query Assistant.
For example:
- "Show the total number of events."
- "Show the number of users who clicked the homepage button last week."
The assistant generates SQL and inserts it into the query editor. Review the generated query and click Apply to execute it.
You can also ask follow-up questions to refine the query. The last five assistant-generated queries are available as history chips.
Validate report results
Before using or sharing a report, verify that the results match your expectations.
- Run the query using Apply.
- Check that the query executes without errors.
- Review the returned columns and values.
- Compare totals with the standard Reports view where the same metrics and filters are available.
- Test filters individually to confirm they return the expected records.
- Check for unexpected empty results, duplicate records, or unusually high totals.
- Adjust the query and run it again if necessary.
Tip: Validate your query with a simple record count before adding multiple filters or calculations. This makes it easier to identify incorrect conditions or field references.
Permissions and access
Advanced Reports is available through Insights Analytics. Access depends on the user's Portal permissions and the application's Insights configuration.
The Query Assistant additionally requires the Advanced Report Query Assistant Features setting to be enabled under Manage Tenant > Insights.
If Advanced Mode or the Query Assistant is unavailable, contact your AppNavi administrator to verify your access and tenant configuration.
Troubleshooting
| Issue | What to check |
|---|---|
| Advanced Mode is unavailable. | Confirm that the application has an Insights contract and that you have the required Portal permissions. |
| Query returns an error. | Check SQL syntax and confirm that the query uses FROM events. |
| A field is not recognized. | Use IntelliSense to verify the field name and availability. |
| Query returns no results. | Review your filters and confirm that matching events exist. |
| Query Assistant is unavailable. | Ask your administrator to enable its tenant-level setting. |
| Results appear incorrect. | Review filters, grouping, calculations, and compare with available standard reports. |
Query Assistant
The Query Assistant is a powerful AI-enhanced feature within the Advanced Reports section of Insights Analytics. It enables portal users to generate customized queries using natural language input, simplifying the process of report creation without requiring deep technical knowledge of SQL.
Overview
The Query Assistant helps users quickly build complex queries by describing their reporting needs in plain English. It automatically translates these requests into valid SQL statements compatible with the system's data structure and reporting framework.
Purpose of Query Assistant
Building advanced queries manually requires knowledge of SQL and the underlying data schema. Many business users may not have this expertise or may find it time-consuming to write structured queries for every report.
The Query Assistant addresses this challenge by:
• Allowing users to describe what they want in natural language
• Automatically generating optimized SQL queries
• Speeding up report creation with intelligent AI support
• Supporting iterative improvements through context awareness and editing
This makes the Advanced Reports feature more accessible, efficient, and user-friendly across roles, from analysts to decision-makers.
Key Benefits
| Benefit | Description |
|---|---|
| No Coding Required | Users can create detailed reports without writing SQL manually |
| Faster Reporting | Saves time by converting user intent into queries instantly |
| Smart Suggestions | The assistant understands your data context and previous actions |
| Customization | Users can fine-tune or extend queries if needed |
Getting Started
Step 1: Enable Query Assistant
Before using Query Assistant, ensure it is enabled for your workspace:
- From the main menu, go to Manage Tenant settings
- Click on the Insights configuration area
- Find "Advanced Report Query Assistant Features" and enable the toggle switch
- You should now see the "Ask anything, the assistant will build your query" input bar within Advanced Query mode
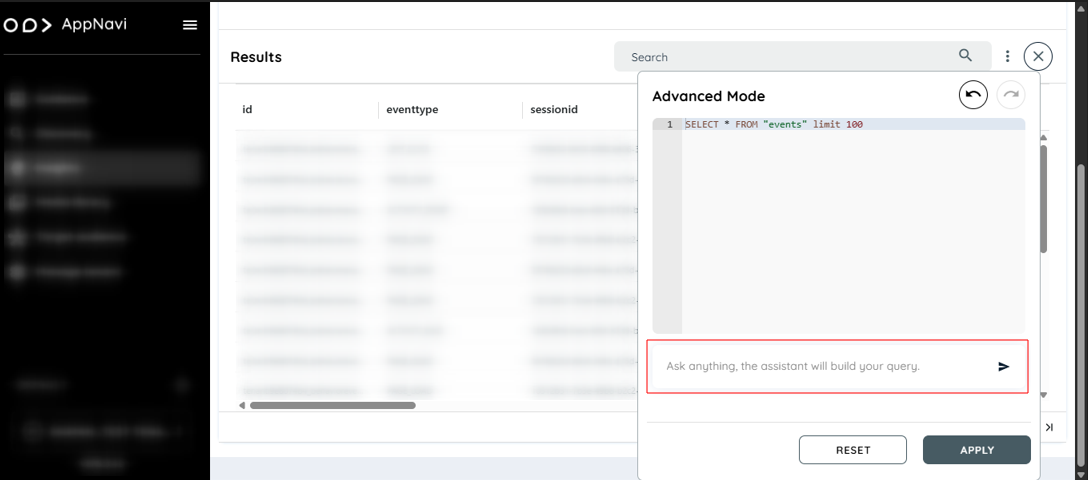
Enter natural language requests to generate SQL queries; use RESET and APPLY buttons
Step 2: Create a Query Using Natural Language
Once enabled, follow these steps to generate a query:
- Go to Insights menu and select Reports
- Toggle on the "Advanced Mode" option to access the query editor
- Find the input box labeled "Ask anything, the assistant will build your query"
- Type your query request in plain English
- Press the send icon button to submit your request
- The assistant translates your request into a SQL query and displays it in the editor
- Click "Apply" to run the query and view the results
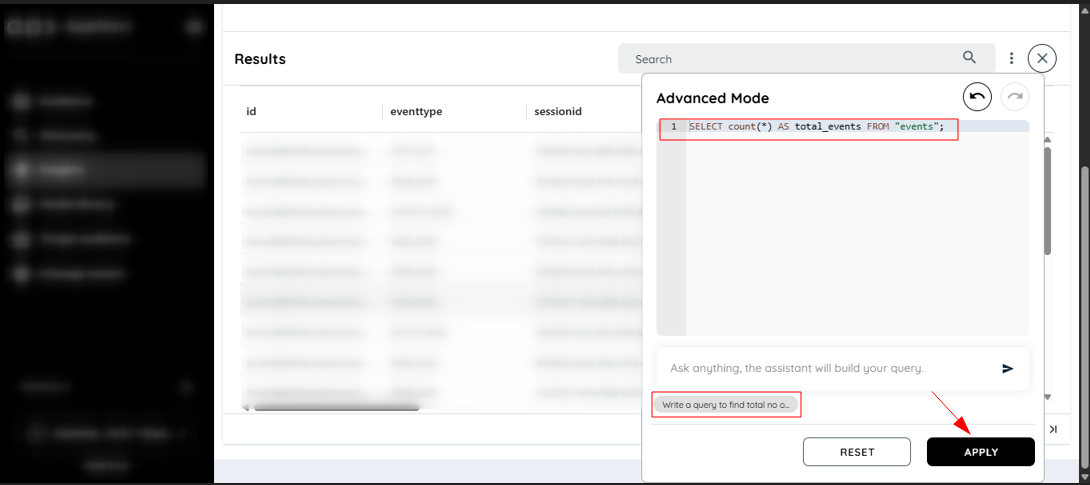
Entered in Query Assistant; system generates corresponding SQL for execution.
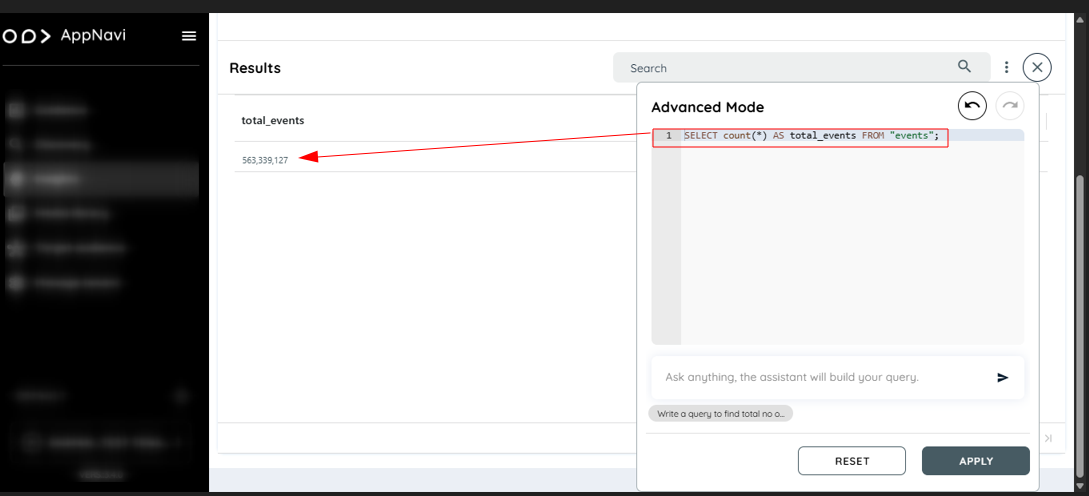
Assistant translates natural language to SQL query and displays results
Query Examples
Here are concrete examples of natural language queries you can ask the Query Assistant:
| User Request (Natural Language) | Generated SQL Result |
|---|---|
| Show me the number of users who clicked on the homepage button last week. | SELECT COUNT(DISTINCT user_id) FROM events WHERE event_type = 'click' AND page = 'homepage' AND event_date >= DATE_SUB(CURDATE(), INTERVAL 7 DAY) |
| Write a query to find total number of events | SELECT COUNT(*) as total_events FROM events |
| How many users accessed the dashboard on Monday? | SELECT COUNT(DISTINCT user_id) FROM events WHERE page = 'dashboard' AND DAYNAME(event_date) = 'Monday' |
| List the top 5 most visited pages this month | SELECT page, COUNT(*) as visit_count FROM events WHERE MONTH(event_date) = MONTH(CURDATE()) GROUP BY page ORDER BY visit_count DESC LIMIT 5 |
| Show user activity by browser type | SELECT browser_type, COUNT(*) as event_count FROM events GROUP BY browser_type |
| Get revenue breakdown by product category | SELECT product_category, SUM(revenue) as total_revenue FROM transactions GROUP BY product_category |
Editing and Refining Queries
After a query is generated, you can refine it in several ways:
Manual Editing: Directly modify the SQL query in the editor if you need to adjust filters, joins, or aggregations
Follow-up Questions: Ask the assistant follow-up questions to extend or modify the query. Example: "Now break it down by browser type."
Undo/Redo: Use Undo or Redo buttons to revert or reapply recent changes in the editor
Query History: Reuse recent queries by clicking history chips (see Query History section below)
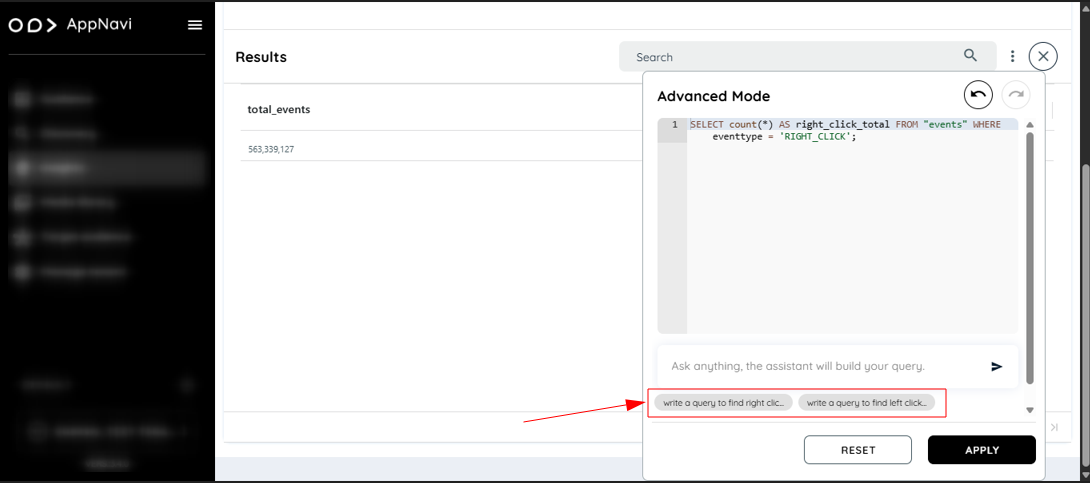
Refines SQL with WHERE clause filter; history chips below input box show previous queries for quick reuse.
Query History Chips
To enhance efficiency, the Query Assistant maintains your recent query history:
• The last five queries generated by the assistant are stored automatically
• These are displayed as clickable chips beneath the query editor
• Click any chip to instantly reload the query into the editor
• This allows quick reuse of recent queries without rewriting or rephrasing
• History is maintained within your current session
Troubleshooting
| Issue | What to check |
|---|---|
| Query Assistant is not visible. | Ask your Tenant Owner to enable the feature under Manage Tenant > Insights. |
| Generated query does not match your request. | Rephrase your request with more specific details, such as the event, time period, or grouping. |
| Query returns an error. | Review the generated SQL and confirm that it uses supported fields and syntax. |
| Results are unexpected. | Check the query filters and compare the output with your original request. |
Related documents
- Insights – Understand Insights and its analytics capabilities.
- Reports – Create and manage standard reports.
- Query Assistant – Generate SQL queries using natural language.
- Insights Mass Export – Export Insights data for further analysis.
The Advanced Query Mode in the Insights Analytics section empowers users to generate highly customized reports using SQL queries. Unlike the standard report builder that uses filters and visual options, Advanced Mode unlocks deeper analytical capabilities for users familiar with querying structured data.
This mode is best suited for users who want to perform more granular data analysis, calculate custom metrics, or extract specific results not supported by the default configuration interface.
Steps to Use Advanced Query in Insights
- Click on the "Insights" section from the sidebar.
- Select a specific application from the list.
- Click on the three-dot menu next to the application and open "Insights Analytics".
- Navigate to the "Reports" tab.
- Click the "Advanced Mode" toggle button to enable advanced query capabilities.
- On the right-hand side, click on the hamburger menu to access the advanced query panel.
- By default, a predefined query is displayed in the query editor.
- Click "Apply" to run the query and view the result.
- You can also edit the query to run your own SQL.
- Click "Reset" to restore the default query.
- Use the "Undo" and "Redo" buttons for editing control within the query editor.
Writing SQL Queries
- The editor provides syntax highlighting and intellisense to auto-suggest fields from the events table.
- Only simplified and supported SQL syntax is allowed.
- Queries should reference the main dataset using the simplified name FROM events.
Updated about 18 hours ago