Setup the Insights
Insights are application-level configurations designed to capture user interactions and provide detailed tracking capabilities. Insights can be tailored for specific applications to align with the user’s tracking preferences.
Insight Application
Setting Up Insights for an Application
To enable Insights for an application, follow these steps:
Access Contracts:
- Go to the Manage Tenant tab.
- Select the Contracts tab. This will open the Contracts page, displaying a list of available contracts.
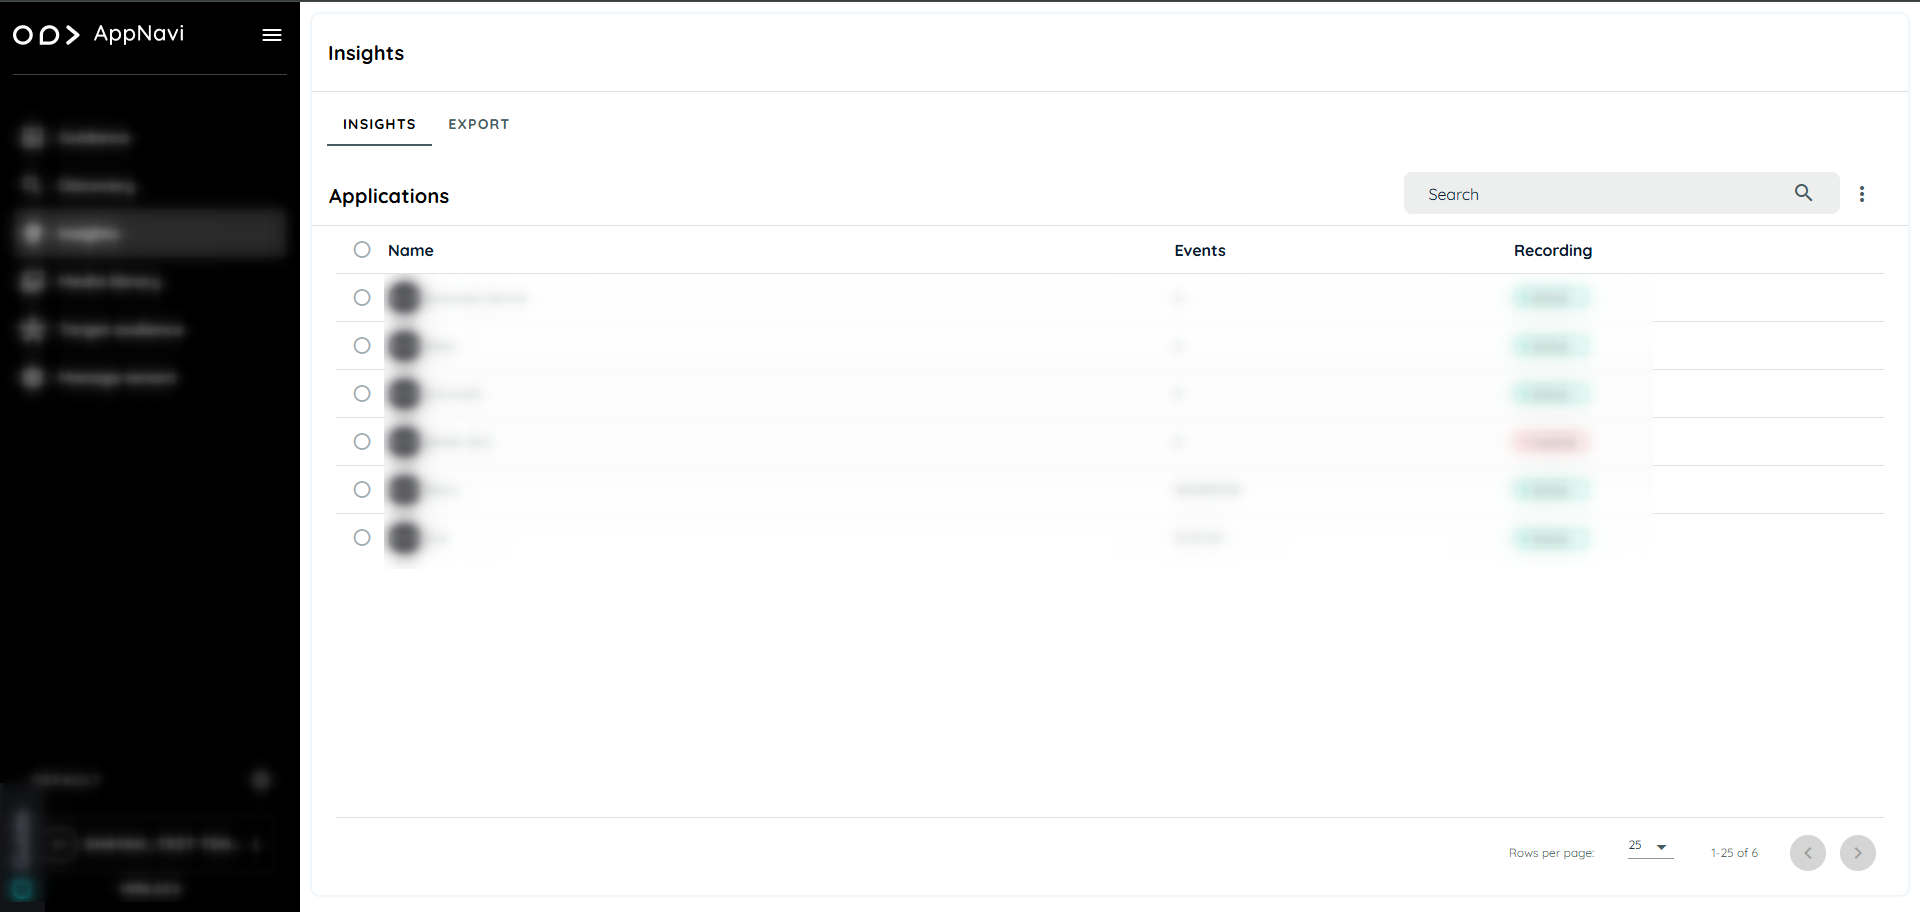
Contract lists
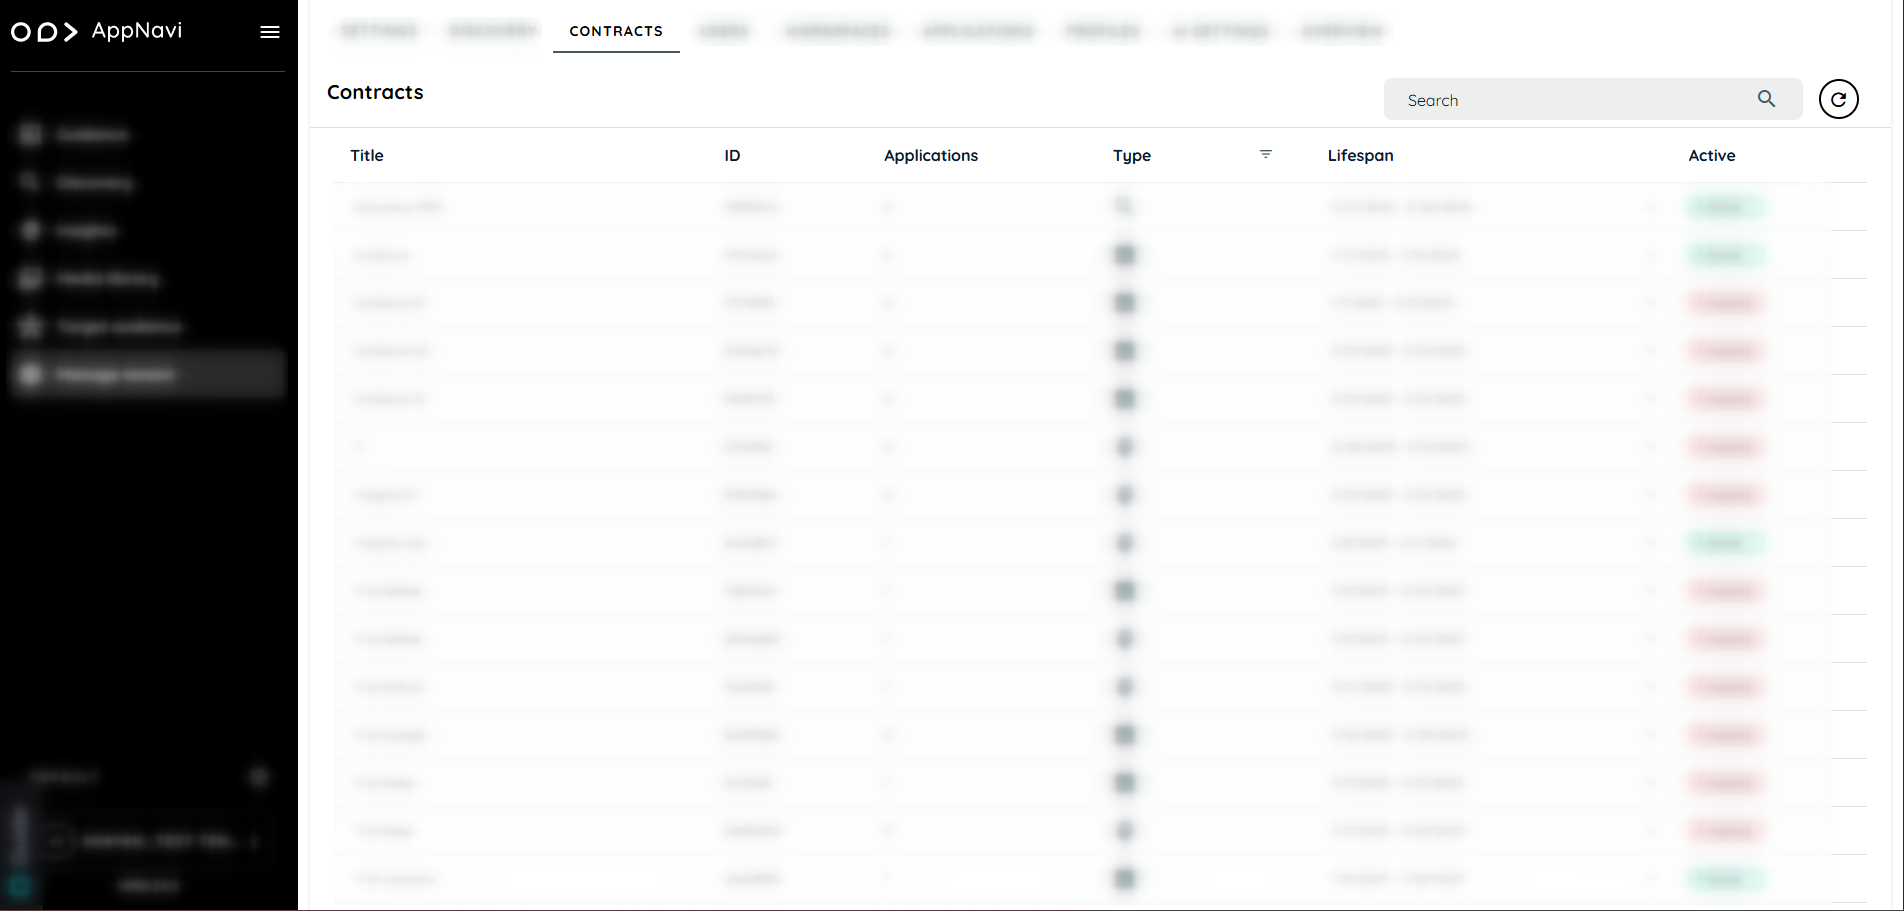
Assign the Insights Contract:
-
Locate the Insights contract from the list.
-
Assign it to the target application to enable Insights for tracking.
-
Click on plus icon to add a application
Insight Contract
Configure Insights:
- Navigate to the Insights tab.
- Search and select the application.
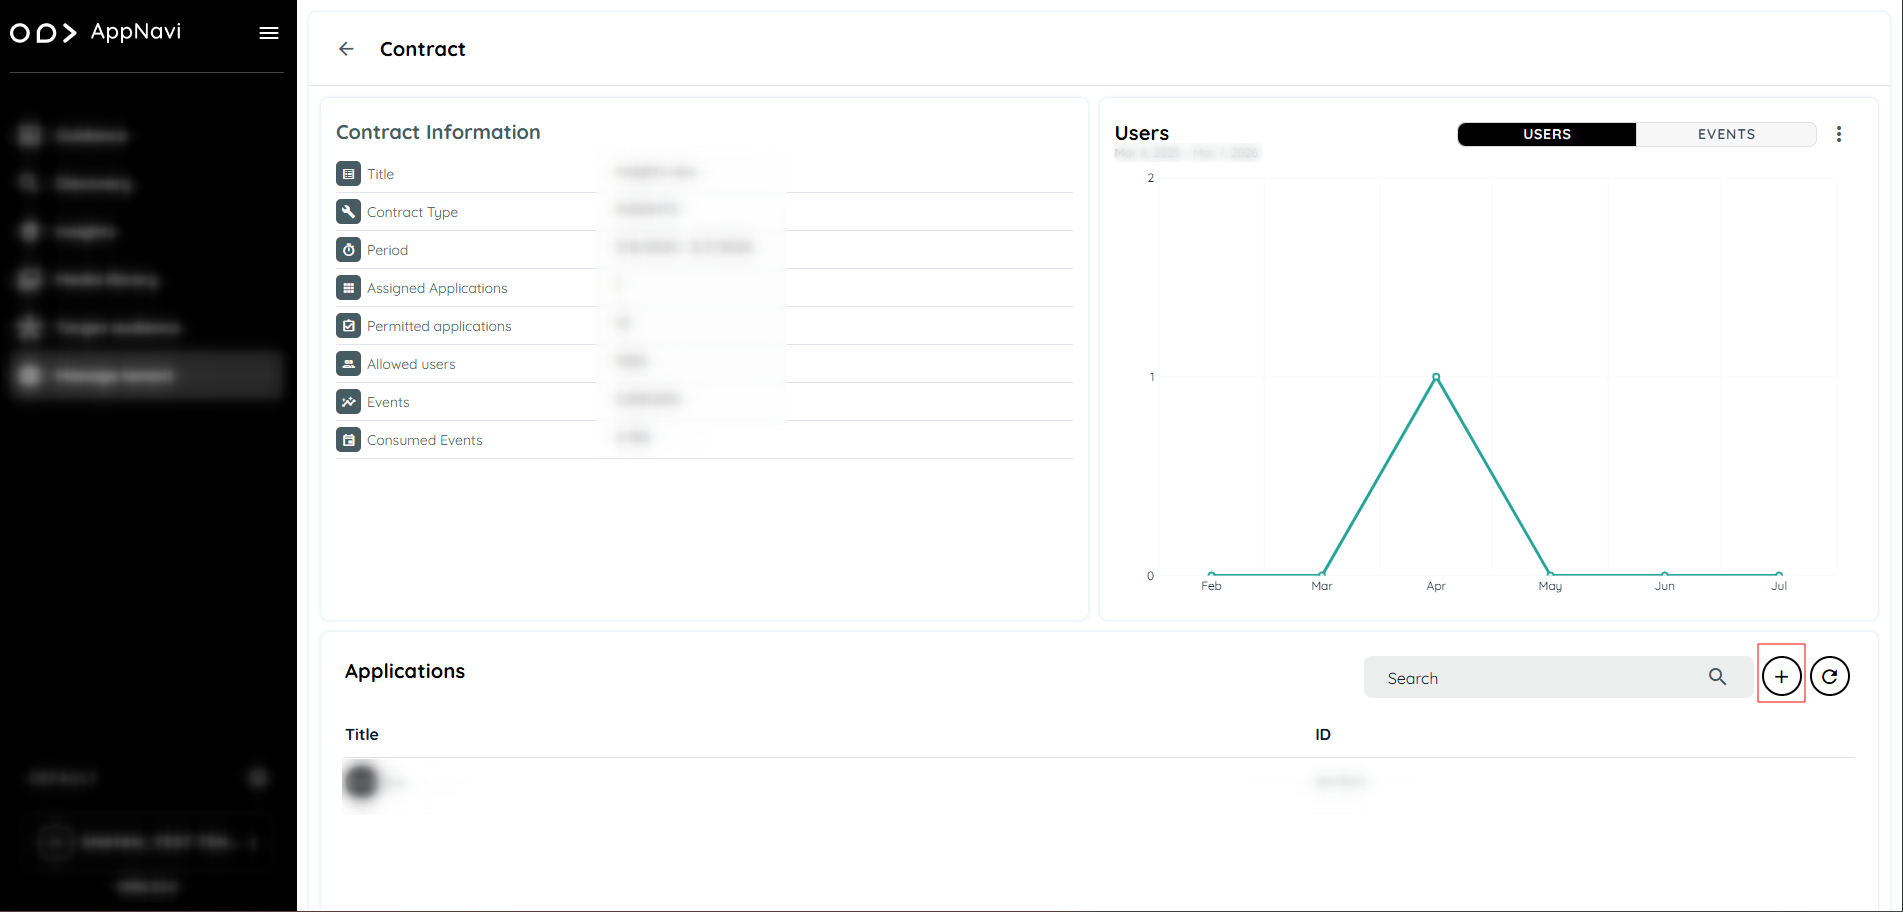
- Open Insights Settings and enable the Insights toggle along with the Recording toggle to start capturing interactions.
Insights configuration is divided into two primary types:
Insights Settings
- Basic Configuration
- Tracking Configuration
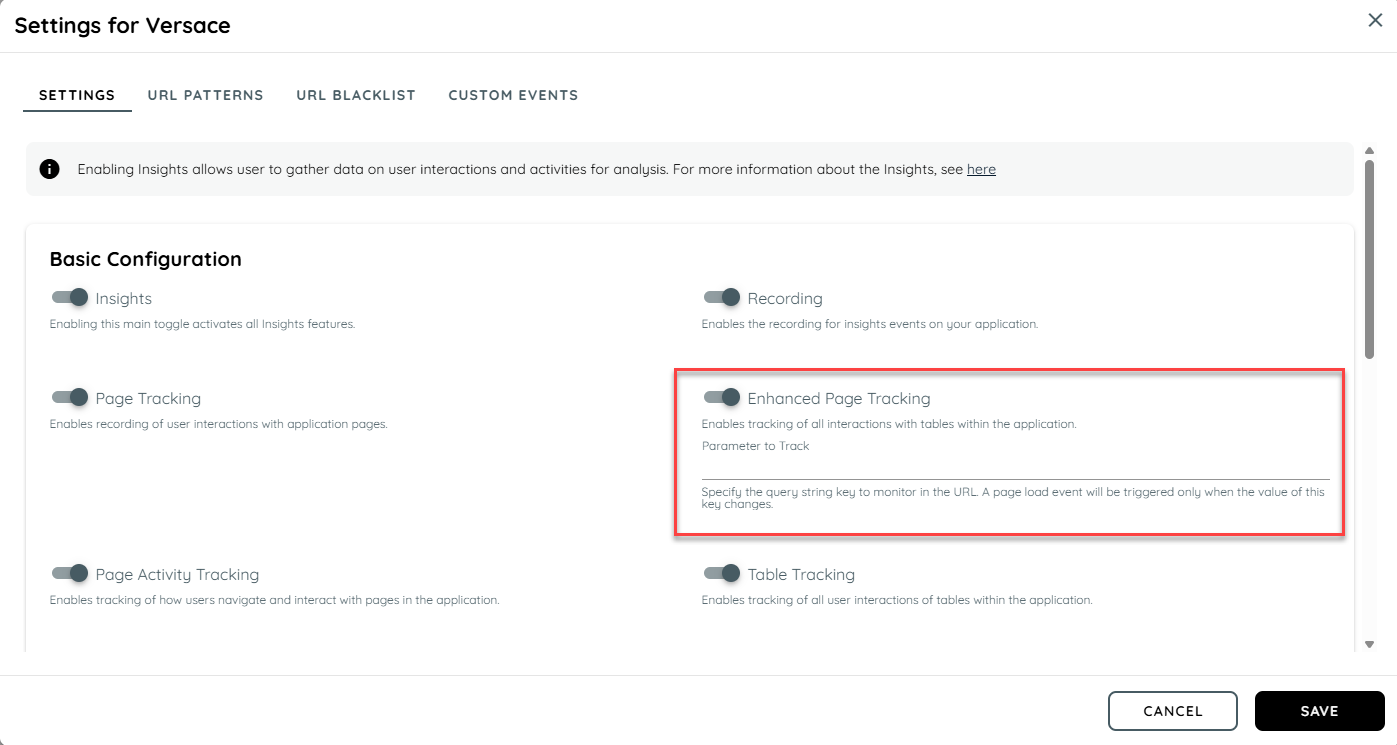
Basic Insights Configuration
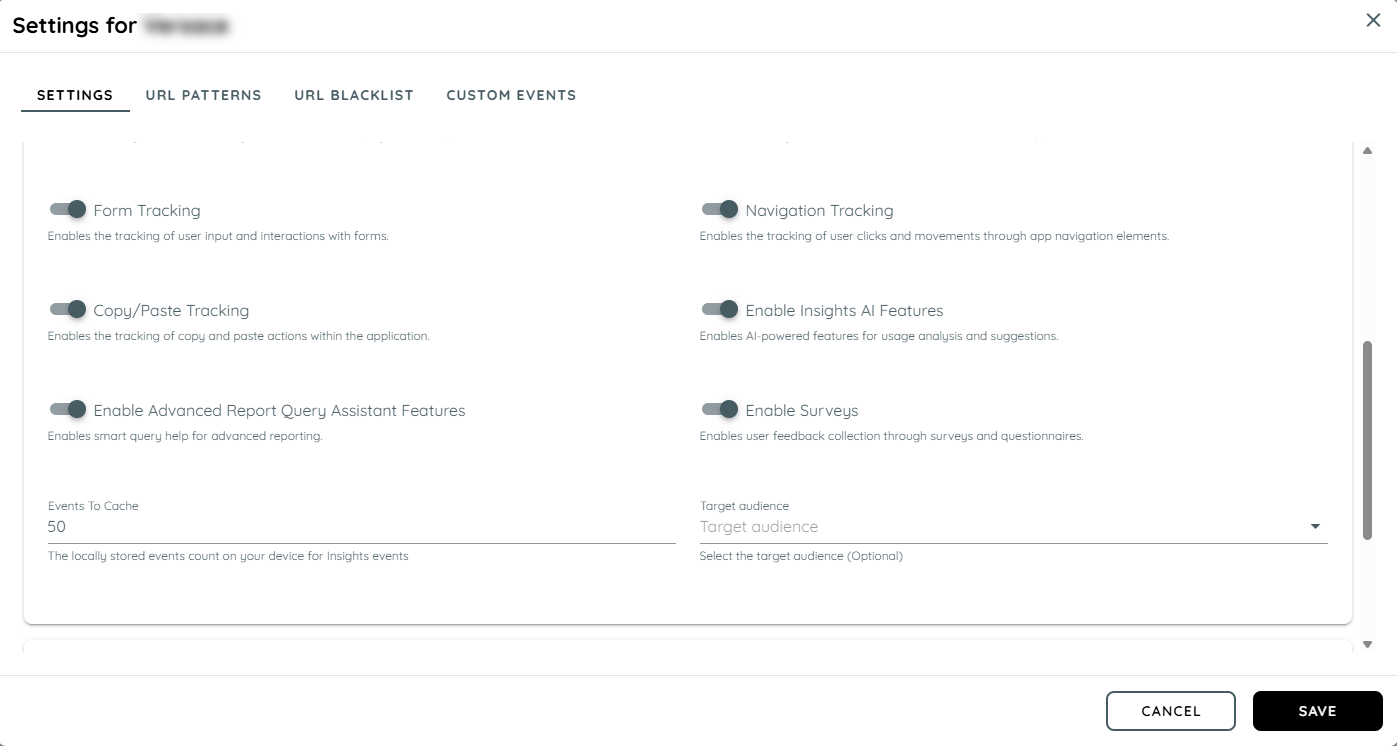
Basic configuration includes key toggles that allow users to enable or disable specific tracking features across the application:
Insights: Activates the Insights feature for this application, allowing interaction tracking based on selected settings.
**Recording:**Enables the recording of insights events for the configured elements and areas.
**Page Tracking:**Records user interactions on each page across the application, providing insights into page visits.
Enhanced Page Tracking: The Enhanced Page Tracking update improves how AppNavi detects and records navigation events in Single Page Applications.
More detail Enhance Page Tracking
**Page Activity Tracking:**Measures and records the time users spend on each page, capturing start and end times for user engagement.
**Table Tracking:**Enables tracking of all interactions within tables across the application, capturing data on table usage patterns.
**Form Tracking:**Enables tracking of user interactions within forms throughout the application, recording input activities and form submissions.
**Navigation Tracking:**Tracks user interactions with navigation elements, providing insights into navigation patterns across the application.
**Copy/Paste Tracking:**Monitors and records all copy and paste events within the application, capturing details on text manipulation activities.
**Enable Insights AI Features:**Enables AI-powered features for usage analysis and suggestions.
**Enable Advanced Report Query Assistant Features:**Enables smart query help for advanced reporting.
**Enable Surveys:**Enables user feedback collection through surveys and questionnaires.
**Events To Cache:**Allows setting the number of events stored locally for Insights, with a default of 50 events.
**Target Audience (Optional):**Enables selection of a target audience to focus insights tracking on specific user groups.
Note: Disabling the main tracking toggle stops all tracking in the basic configuration.
Enhance Page Tracking
The Enhanced Page Tracking update improves how AppNavi detects and records navigation events in Single Page Applications.
By supporting query string tracking and ensuring proper title capture, AppNavi now provides complete and accurate analytics for modern web applications.
Enhanced Page Tracking Switch
A new configuration switch is available in Page Tracking Settings.
Description: Enables AppNavi to monitor query string changes in addition to path and hash updates.
Behavior:
- Enabled: AppNavi triggers a page_load event when either the path or the query string in the URL changes.
- Disabled: Tracking follows the default behaviour (detects only path and hash changes).
Parameter to Track
You can specify a query string key to monitor in the URL In this case, a page_load event will be triggered only when the value of this key changes.
Example:
If the URL is: https://example.app/dashboard?view=reports
and the Parameter to Track is set to: view
then AppNavi will trigger a page_load event only when the view parameter changes (e.g., from reports to summary).
Enhanced Page Tracking
Scenario
In Single Page Applications, navigation often occurs without reloading the entire page.
The URL may change only in the query string (e.g., ?view=summary) rather than the path or hash.
Previously, AppNavi detected only path or hash changes, so these query string based navigation were not tracked.
Example:
/dashboard?tab=overview → /dashboard?tab=reportsThe above navigation did not trigger a page_load event under the old behaviour.
Impact:
Navigation and engagement data were incomplete for SPAs that used query parameters to represent different views or states.
Resolution:
AppNavi now supports detecting query string changes as navigation events.
This ensures that page_load events are triggered accurately when users navigate within SPAs, even if only the query string changes.
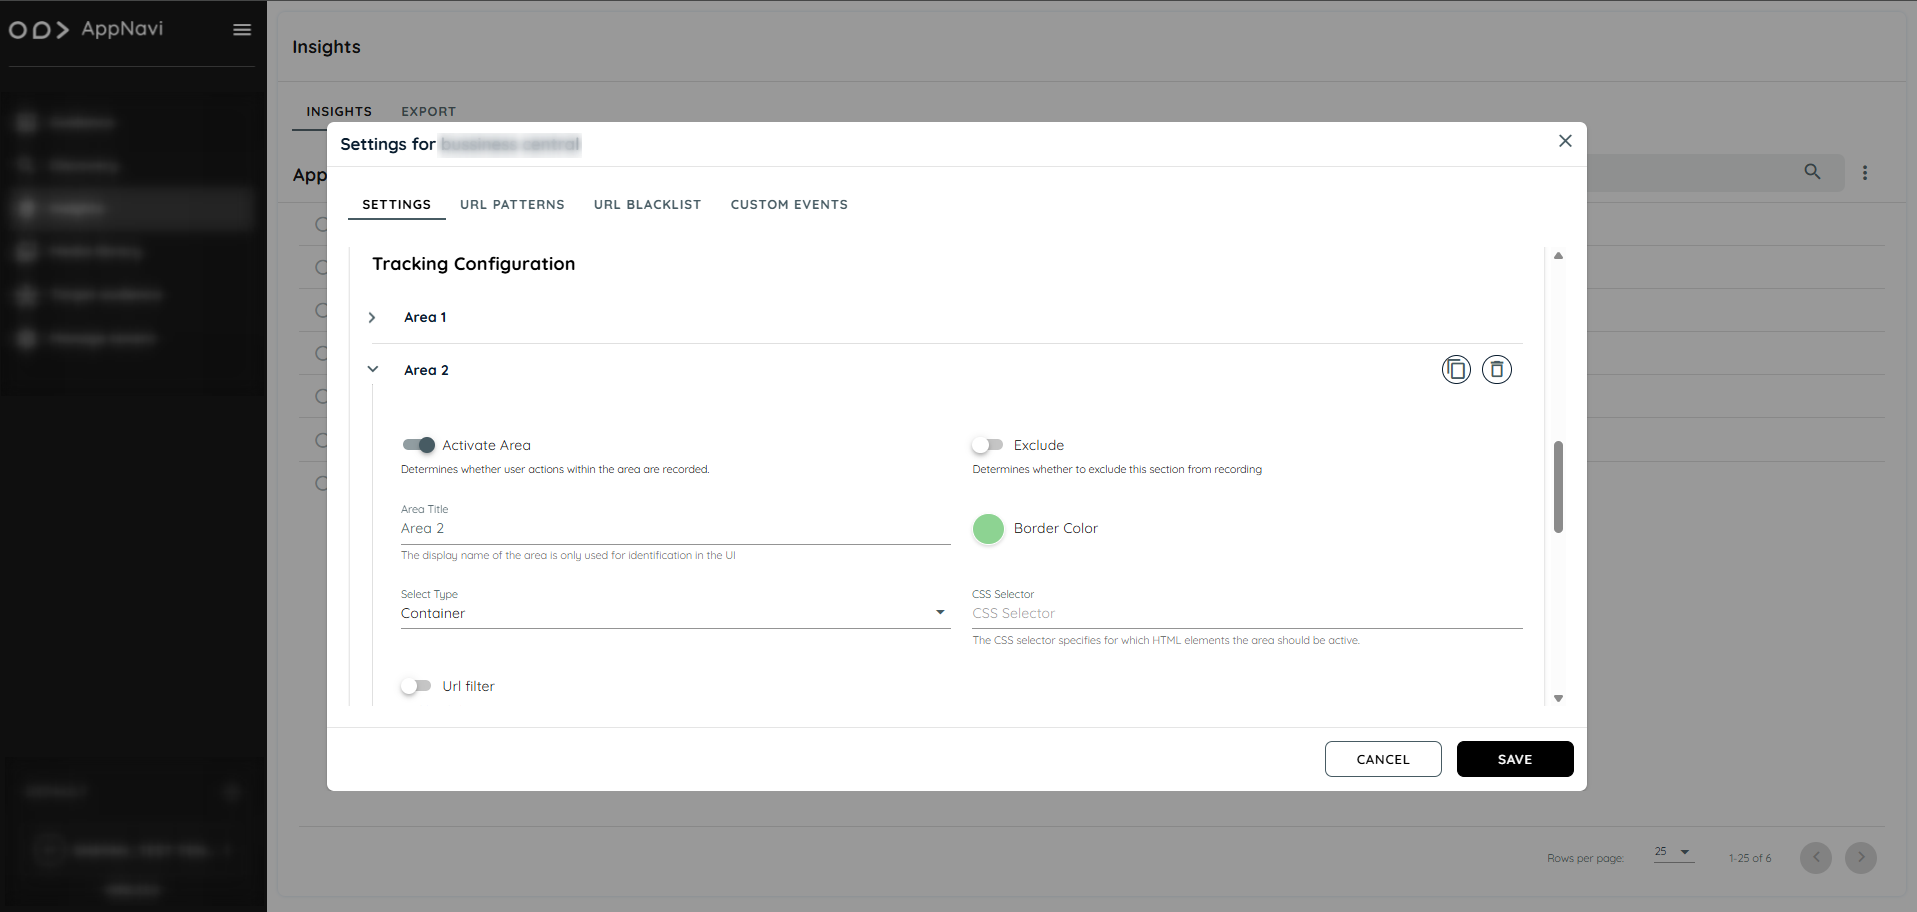
Tracking Configuration in Insights
The Tracking Configuration section provides detailed settings for managing areas and specific trackable elements within an application:
Area: A specific section of the application where interactions are monitored.
Trackable Element: Individual elements within an area that can be independently tracked.
Configuring Areas
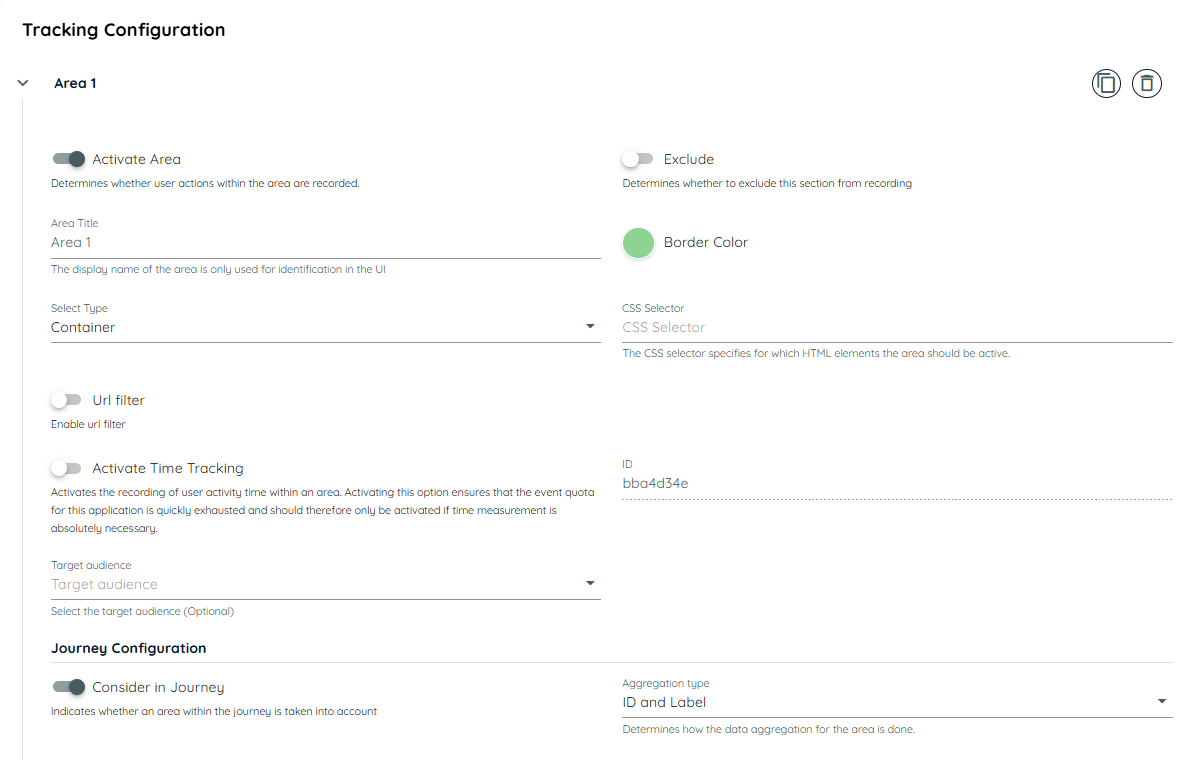
Area Configuration in Insights
Users can define multiple areas within an application to capture detailed tracking data with customizable parameters. Each area allows for specific settings to monitor user interaction patterns more effectively:
Area Configuration
**Activate Area:**Enables or disables tracking within this particular area.
**Area Title:**A user-defined title to label the area for easy reference.
**Border Color Selection:**Assigns a unique border color to visually outline the area.
Exclude: Exclude the area created from recording in the events.
Select Type: Select type from the dropdown e.g.
- Container
- Table
- Navigation
- Form
**CSS Selector:**A CSS identifier that selects the area for tracking.
**URL Filter:**Restricts tracking to specific URLs within the application, making it possible to target areas under certain page conditions.
**Activate Time Tracking:**Records the duration users spend interacting within the area.
**Target Audience (Optional):**Allows tracking for a specific user group, focusing insights on a target audience.
Journey Configuration for AreasIn the Journey Configuration section, users can further define how an area’s data integrates within a user’s journey:
**Consider in Journey:**Specifies if this area should be included as part of a user’s journey through the application.
**Text Extraction Type:**Defines the text extraction method with options:
Auto: Automatically extracts text.
Selector: Uses a specified CSS selector to extract text.
Static Text: Allows the user to input static text.
URL: Extracts text based on a pattern in the URL.
**Auto Detection:**Automatically tracks all interactive elements within the area, saving configuration time for each individual element.
**Aggregation Type:**Determines how data for the area is aggregated. Options include:
ID: Aggregates based on a unique identifier.
Label: Uses the area’s label.
Label + ID: Combines the label and ID for aggregation.
**Text Extraction:**Allows text extraction settings, with options for enabling specific extraction types like Auto for default text capture.
Trackable Elements Configuration in Insights
Within each defined area, users can set up multiple Trackable Elements to monitor finer details of user interactions. Each element has unique configuration options to control its tracking behavior:
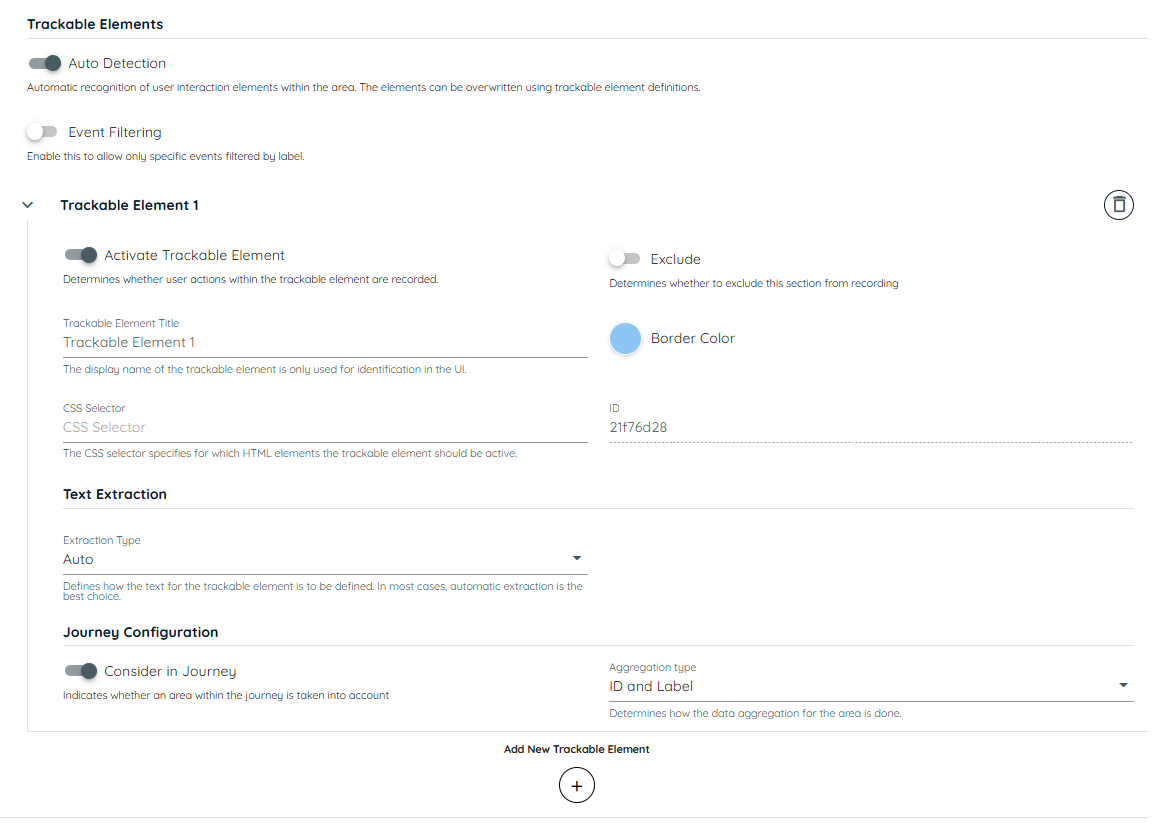
**Activate Trackable Element:**Enables or disables tracking for this individual element within the area.
**Exclude:**Determines whether to exclude this section from recording.
**Trackable Element Title:**A custom label for the element, useful for easy identification.
**Border Color Selection:**Assigns a unique border color to visually outline the area.
**CSS Selector:**A unique selector that identifies the element for tracking purposes.
**Text Extraction Type:**Specifies how text is extracted, with options including:
- Auto: Extracts text automatically.
- Selector: Uses a specified CSS selector.
- Static Text: Allows user-defined text input.
- URL: Pulls text from a URL pattern.
**Text Extraction:**Allows text extraction settings, with options for enabling specific extraction types like Auto for default text capture.
Journey Configuration for Trackable ElementsWithin the Journey Configuration settings for trackable elements, users can define parameters related to journey mapping:
**Consider in Journey:**Determines whether this trackable element should contribute to the overall user journey data.
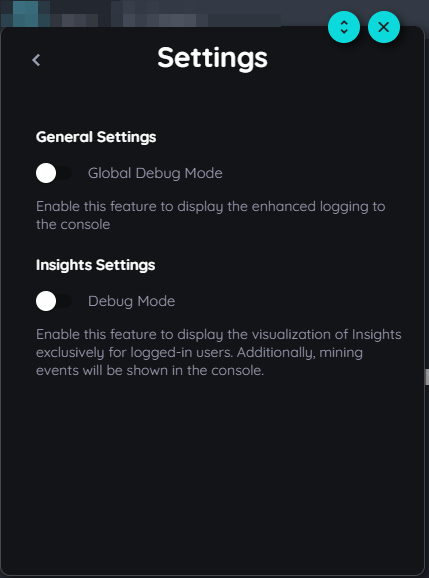
Insights Visibility on the Avatar Side
Once Insights are configured, users can review them in the Avatar Side:
- Log in and select Settings.
- Go to Insights Settings.
- Enable Debug Mode to view highlighted borders around configured areas and elements.
Note: Enabling debug mode displays configured borders but restricts navigation on tracked elements.
Delete Insights Data
Users can manually delete analytics data related to an application from the Insights section by following these steps:
- Go to the Insights page.
- Locate the application for which you want to delete the analytics data.
- Click on the context menu (three dots) next to the application's name.
- Select "Delete" from the dropdown menu.
- A confirmation dialog will appear.
- Review the warning, then confirm the action to permanently delete all analytics data for that application.
- Data will be removed after few minutes.
NOTE: This action is irreversible. Once deleted, the analytics data cannot be recovered.
Updated 8 months ago