Agents
An Agent is an automated workflow that performs specific tasks based on predefined logic, actions, and conditions. It helps users complete processes without manual intervention by guiding steps, collecting information, making decisions, and triggering actions automatically.
In simple terms, an agent works like a smart assistant inside the system that can interact with users, process inputs, validate conditions, call external services, and navigate workflows based on the configured steps.
For example, an agent can:
- Answer user queries
- Validate information
- Trigger API calls
- Capture page details
- Route users to different paths based on conditions
- Interact with Knowly for guidance
- Handle document-based processes
Agent Actions
Agent Actions are the individual steps used to build an agent workflow and define how the agent performs tasks. Each action is designed for a specific purpose, such as collecting user input, calling APIs, making decisions, capturing data, or guiding users through processes. These actions work together to automate business flows and reduce manual effort. By arranging different actions in sequence, users can create smart and dynamic workflows based on business requirements. Agent Actions help ensure the agent responds accurately and follows the correct process from start to finish.
Available Agent Actions
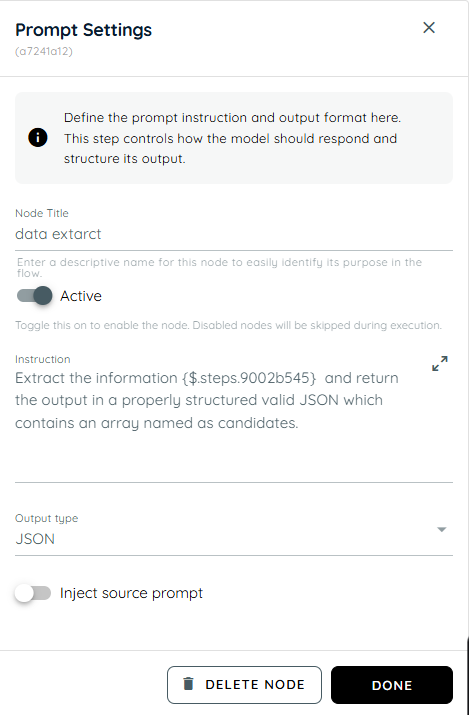
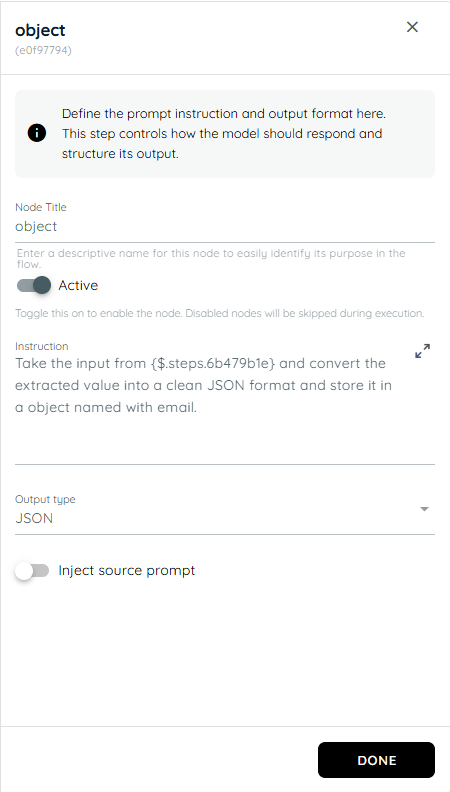
Prompt
Prompt is used to interact with users by asking questions, collecting input, or displaying important messages during the workflow. It helps guide users through the process by requesting required information at the right step. This action is useful for validations, confirmations, and user responses. It ensures the workflow continues based on the provided input.
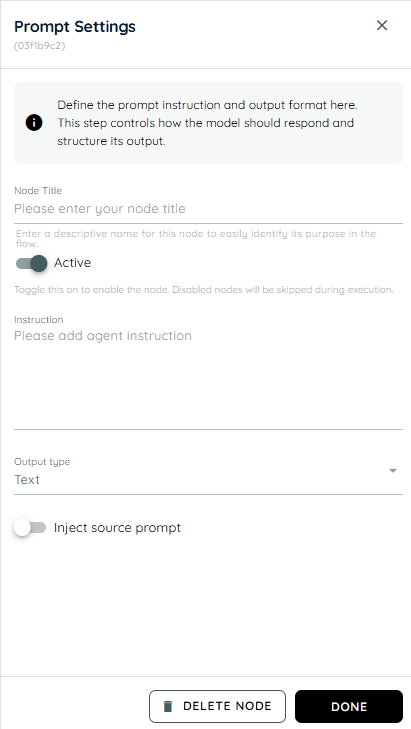
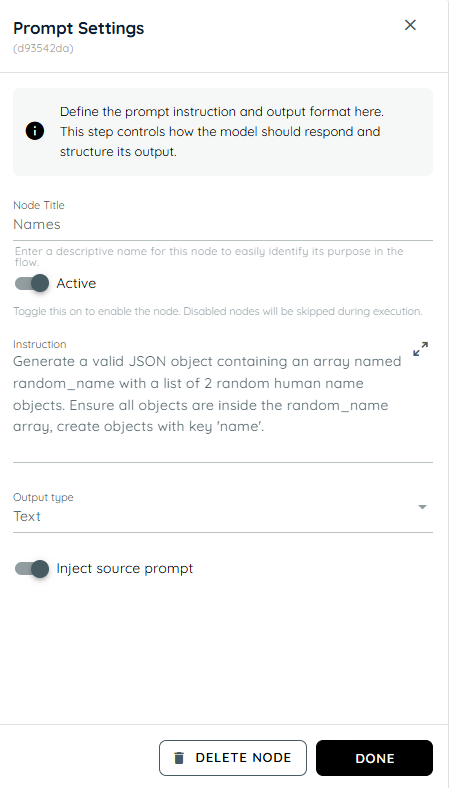
Prompt Settings
- Node Title : A node title is a clear and descriptive name assigned to a node that identifies its role or purpose within a workflow.
- Instruction: The instruction defines what the agent should do with the provided input and how results should be returned.It controls the agent’s processing behavior within the flow.
- Output Type: Output Type defines the response format expected from the prompt. It can be either Text or JSON depending on the workflow requirement.
- Inject Source Prompt: Inject Source Prompt can be enabled or disabled. When enabled, it retrieves data from the input field and uses it in the prompt response. When disabled, it does not use the input field data.
Document
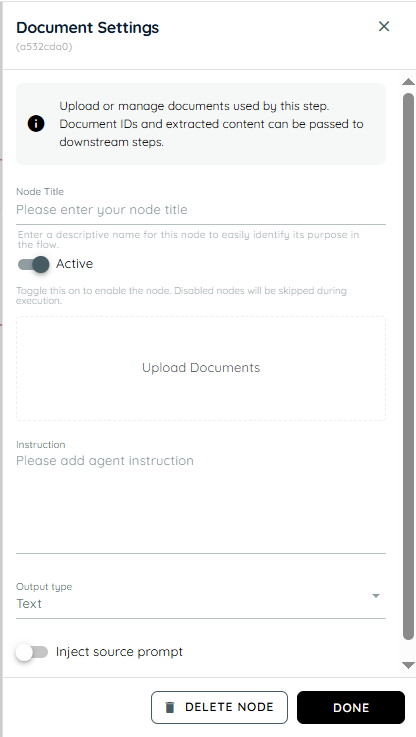
Document is used to manage document-related tasks within the workflow, such as referencing, or validating files. It helps handle business processes that require document verification or information extraction. This action ensures documents are properly linked to the workflow. It is commonly used in approval and compliance processes.
- Node Title : A node title is a clear and descriptive name assigned to a node that identifies its role or purpose within a workflow.
- Upload Document: The Upload Document section allows users to add files into the system. These documents are then made available for reading, extraction, or processing within the flow.
- Instruction: The instruction defines what the agent should do with the provided input and how results should be returned.It controls the agent’s processing behavior within the flow.
- Output Type: Output Type defines the response format expected from the prompt. It can be either Text or JSON depending on the workflow requirement.
- Inject Source Prompt: Inject Source Prompt can be enabled or disabled. When enabled, it retrieves data from the input field and uses it in the prompt response. When disabled, it does not use the input field data.
Web Service Call
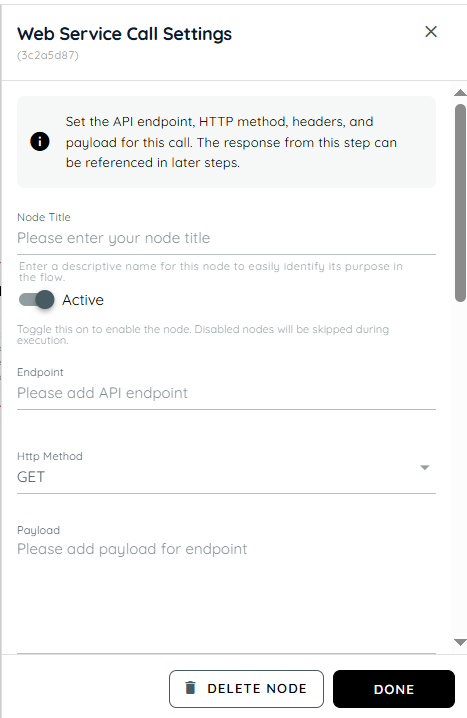
Web Service Call is used to connect the agent with external systems or backend APIs to send or retrieve data. It allows the workflow to interact with real-time business information from other applications. This action helps automate tasks like checking order status or fetching customer details. It improves integration and reduces manual work.
- Node Title : A node title is a clear and descriptive name assigned to a node that identifies its role or purpose within a workflow.
- Endpoint: The Endpoint field specifies the exact URL of the web service or API that will be called. It acts as the target address where the request is sent. This is required for identifying which backend service should process the request.
- Http Method: The HTTP method defines the type of operation to be performed on the endpoint. It determines whether data will be fetched, created, updated, or deleted.
- Get: GET is used to retrieve data from a server or API.
- Post: POST is used to send new data to the server. It is commonly used for creating new records or submitting information.
- Put: PUT is used to update existing data on the server. It replaces or modifies the complete existing resource with the new data provided.
- Delete: DELETE is used to remove existing data from the server. It permanently deletes the specified resource identified in the request. Once executed successfully, the data is no longer available.
- Payload: The Payload field contains the data sent in the body of the request. It is mainly used in POST and PUT requests where information needs to be submitted to the server. This data is structured in formats like JSON or form data.
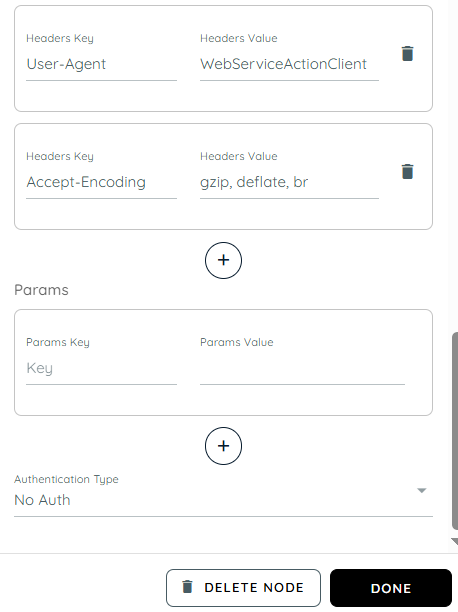
- Headers: Headers in a WebService API are additional pieces of information sent along with the API request and response. They help define how the request should be processed, what type of data is being sent, and how the server should respond. Headers act as instructions between the client and the server, ensuring proper communication and successful data exchange.
- Content-Type → application/json
This header specifies the format of the data being sent in the request body. When set to application/json, it tells the server that the request payload is structured in JSON format. This is commonly used when sending data such as user details, form submissions, or transaction information.
- Accept → /
This header defines the type of response the client is willing to receive from the server. When set to /, it means the client can accept any response format, such as JSON, XML, text, or others.
- Cache-Control → no-cache
This header controls how caching should be handled. When set to no-cache, it ensures that the request fetches fresh data from the server instead of using previously stored or cached responses.
- User-Agent → WebServiceActionClient
This header identifies the application, system, or client making the API request. It helps the server recognize the source of the request for logging, monitoring, debugging, or security purposes.
- Accept-Encoding → gzip, deflate, br
This header tells the server which compression formats the client supports for the response. Compression helps reduce response size, improve performance, and speed up data transfer.
gzip → Common compression format
deflate → Another compression method
br → Brotli compression (more efficient in many cases)
- Params: Params are key-value pairs used to pass additional data with the request, usually for filtering or customizing results. They are often appended to the URL as query parameters. Each parameter has a defined key and its corresponding value.
- Params Key: The params key is the name of a parameter that defines what kind of data you want to send or filter in the API request. It acts as an identifier for the value you are passing.
- Params Value: The params value is the actual data assigned to the key. It provides the specific input the server uses to process or filter the request based on the given key.
- Authentication Type: Authentication type defines how the request is secured and verified before access is granted. It ensures that only authorized users or systems can interact with the API.
- No Auth: No Auth means the API does not require any authentication to access it. Anyone can send a request and receive a response without providing credentials like username, password.
- Basic: Basic Authentication is a simple security method used to verify the identity of a user or system when calling an API. It requires a username and password, which are encoded and sent with each request in the header.
Username And Password: The server checks these credentials to confirm access before processing the request. If the credentials are correct, the request is allowed; otherwise, it is rejected. It is commonly used for simple or internal APIs but is less secure compared to token-based authentication.
- Bearer Token: Bearer Token is a secure authentication method where access is granted using a token instead of username and password. The token is generated by an authentication system and is included in the request header to verify access. This token is a unique string issued to the user or system after successful login or authorization. It is sent with every API request to prove identity and access rights without repeatedly sending credentials.
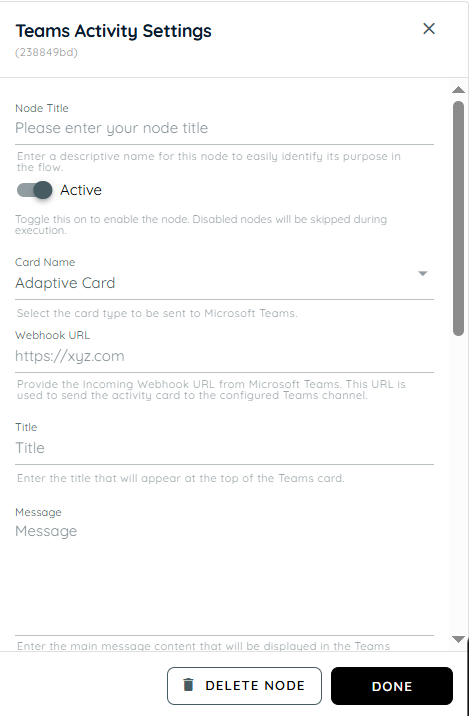
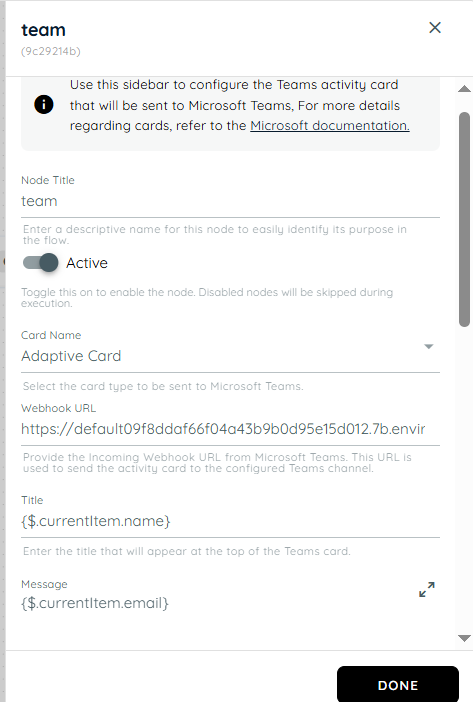
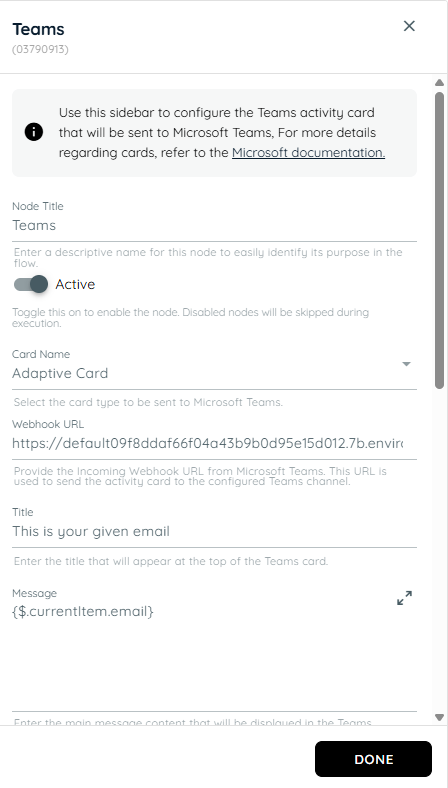
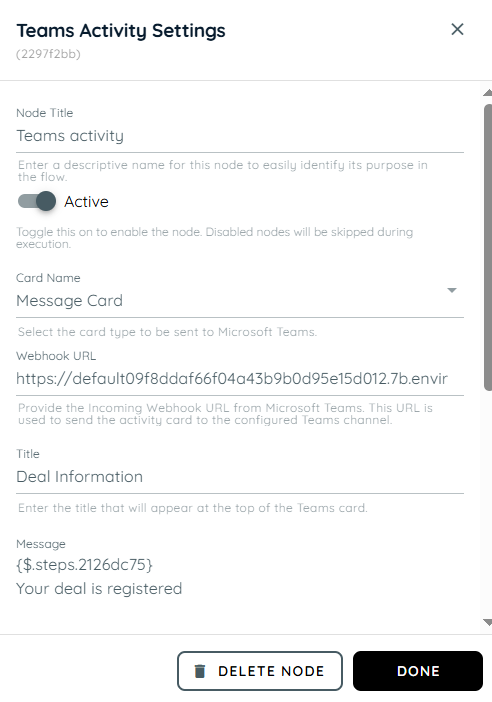
Teams Activity
Teams Activity is used for sending notifications or updating communication activities to the Microsoft Teams. It helps keep users informed during workflow execution. This action supports collaboration by connecting workflow events with Teams interactions. It is useful for alerts, reminders, and status updates.
| Title | Description |
|---|---|
| Node Title | Enter a name for the node so it can be easily identified in the workflow. |
| Active | Enable the Active toggle to allow this step to run in the workflow. If the toggle is disabled, the node will be saved but will not execute. |
| Webhook URL | Enter the Microsoft Teams Incoming Webhook URL. This webhook connects the workflow with a specific Teams channel where the card will be posted. |
| Card Name | Select the type of card you want to send to Teams. Available options: |
| Title | Enter the title of the card. This title will appear at the top of the card in Microsoft Teams. |
| Message | Enter the main message text that will be displayed in the Teams card. |
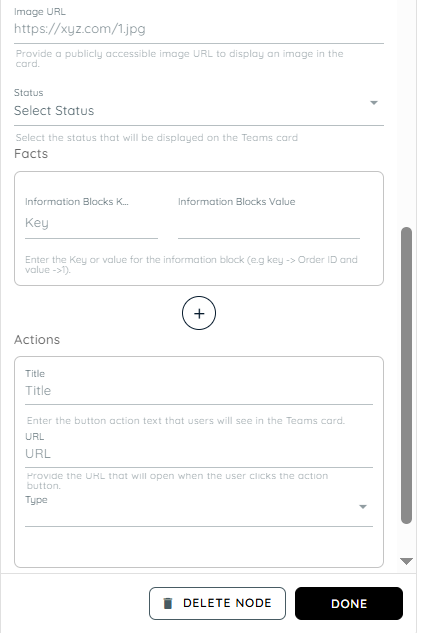
| Image URL | Enter a public image URL if you want to display an image in the card. |
| Status | Select a status indicator for the card. Success This helps users quickly understand the result or state of the notification. |
| Facts (Information Blocks) | Facts allow you to display structured key-value information inside the card. |
| Actions | Actions allow you to add buttons to the card. When a user clicks the button in Microsoft Teams, the configured URL will open. |
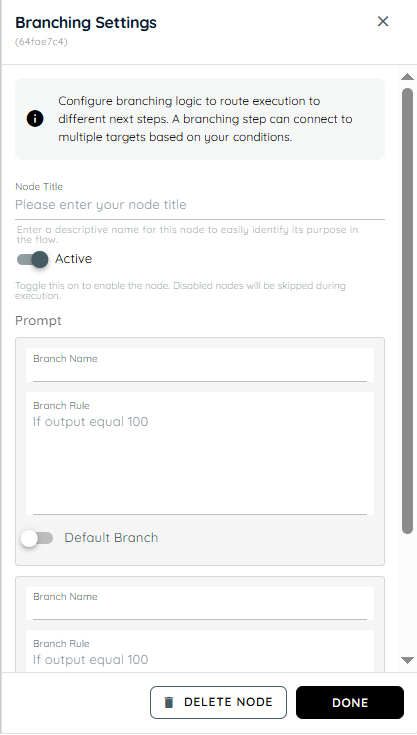
Branching
Branching is used to create decision-based paths in the workflow depending on conditions or user responses. It helps the agent decide which step to follow next based on specific logic. This action makes workflows dynamic and flexible instead of following a single fixed path. It improves process accuracy by handling different scenarios automatically.
- Node Title : A node title is a clear and descriptive name assigned to a node that identifies its role or purpose within a workflow.
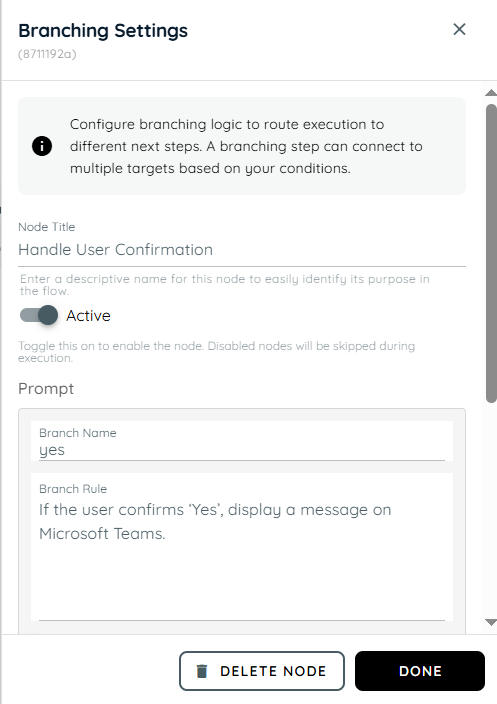
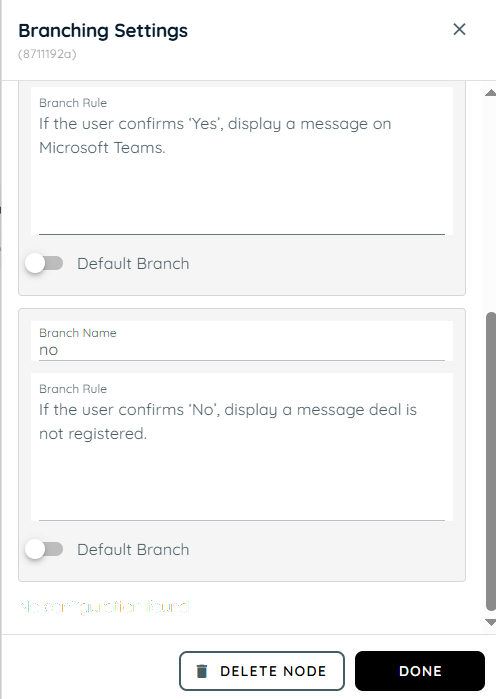
- Branch Name: Branch Name is used to name a specific branch in branching logic. t helps distinguish different branches in a clear and organized way.
- Branch Rule: Branch Rule specifies the logic that determines when a branch is executed. If the defined condition matches the output, the workflow proceeds through that branch.
- Default Branch: The Default Branch is the fallback path in the workflow. If no conditions are satisfied, the flow automatically proceeds through this branch.
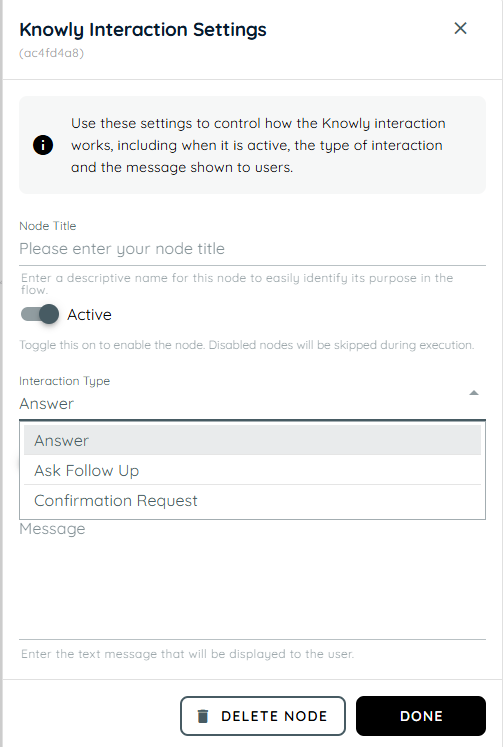
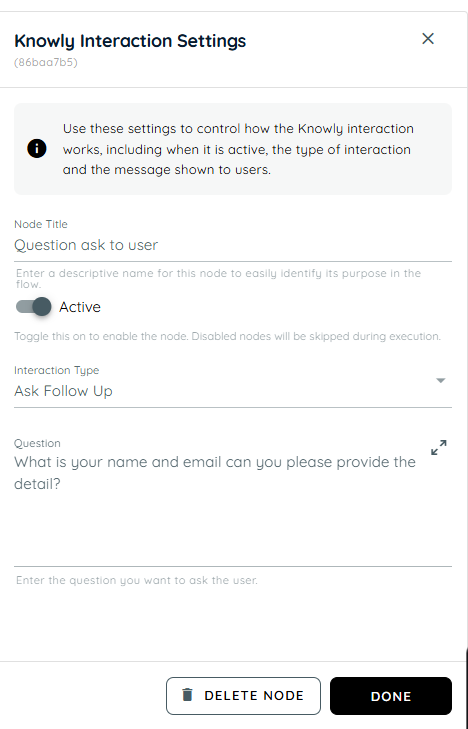
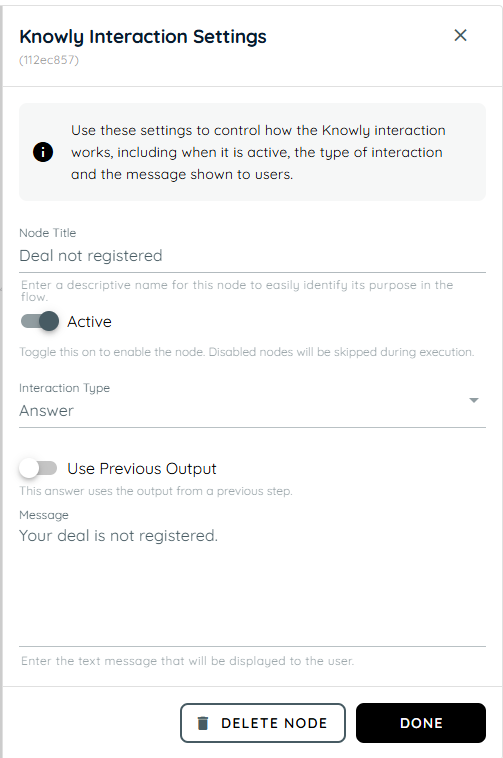
Knowly Interaction
Knowly Interaction is used to create meaningful communication between the agent and the user throughout the workflow. It helps the system guide users, provide relevant information, and handle interactions in a clear and efficient way. This action improves the overall user experience by making the process more interactive and responsive. It ensures the workflow progresses smoothly while keeping the user informed at each step.
- Node Title : A node title is a clear and descriptive name assigned to a node that identifies its role or purpose within a workflow.
- Answer: The Answer type is used when we provide a direct response to the user’s query. It can also be used to display the previous output or already generated information. This interaction focuses on delivering information clearly without requiring additional input from the user.
- Use Previous Output: This answer uses the output from a previous step.
- Message: In this field, the text you enter will be displayed directly to the user as the response.
- Ask Follow Up: This type is used when additional information is needed from the user. In this interaction, we write a question to collect more details, clarify the request, or continue the conversation flow before proceeding to the next step.
- Question: This field is used to enter the question that will be displayed to the user for further input or details.
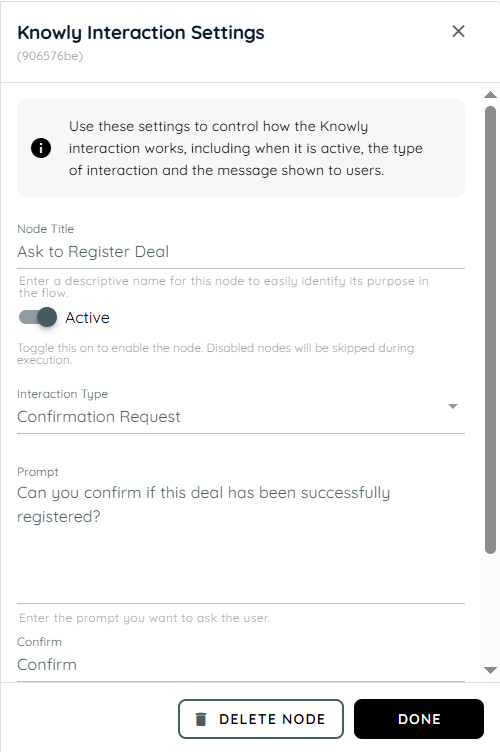
- Confirmation Request: The Confirmation Request type is used when user confirmation is required before moving forward. In this interaction, we provide a prompt based on the action or decision, and two buttons are displayed for the user: Confirm and Cancel. This is used to ask the user for final confirmation before continuing with an action or decision, using Confirm and Cancel buttons.
- Prompt: This field contains the message that asks the user to confirm or cancel the requested action.
- Confirm: The Confirm button is used when the user agrees to proceed with the action or approves the request.
- Cancel: The Cancel button is used when the user wants to stop the process or does not approve the requested action.
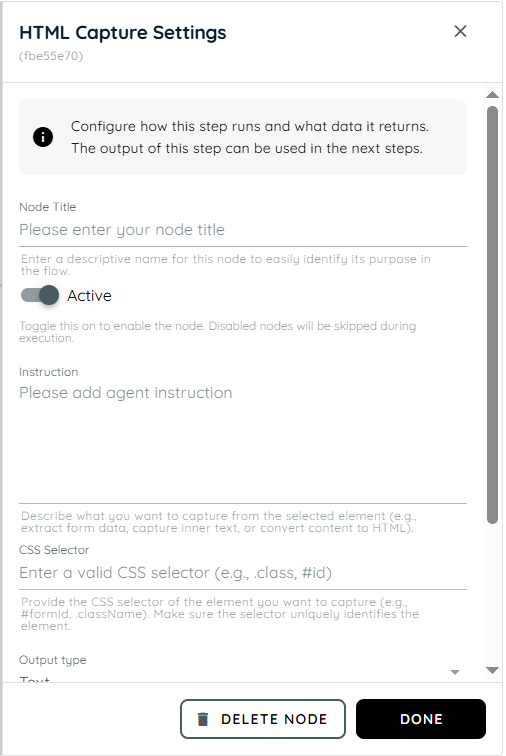
HTML Capture
HTML Capture is used to capture specific page elements, values, or content directly from the application interface. It helps extract UI information for validation, tracking, or automation purposes. This action is useful when the workflow needs to read data from the screen dynamically. It improves accuracy by using real-time page information.
- Node Title : A node title is a clear and descriptive name assigned to a node that identifies its role or purpose within a workflow.
- Instruction: This field is used to define instructions for the agent about what should be captured. You can guide the system to extract specific content such as form data, inner text, or full HTML structure. It helps clarify the purpose of extraction, such as retrieving visible text, structured data, or converting content into HTML format.
- CSS Selector: This field is used to define the target HTML element using a valid CSS selector. It supports selectors like class names, IDs, or combinations that uniquely identify an element on the page. A correct selector ensures accurate data extraction.
- Output Type:This option defines the format of the extracted data. You can choose between Text, or JSON depending on how you want the output to be structured. The selected format determines how the captured content will be stored and used later in the flow.
- Text: Output is written in natural human-readable language for users, without any structured format, keys, or brackets, and presented as plain sentences or descriptions.
- JSON: Output is structured for machine processing, designed for system use, and represented using key-value pairs.
- Enable Fallback: This toggle provides an alternative extraction method when the primary selector fails. If enabled and the element is not found or returns empty, the system will capture the full page content instead to avoid data loss.
- Use raw HTML: This option controls whether the system captures raw HTML or processed content. When enabled, it returns the complete unprocessed HTML of the selected element. When disabled, it returns cleaned or formatted content instead.
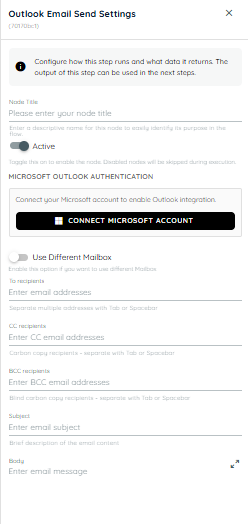
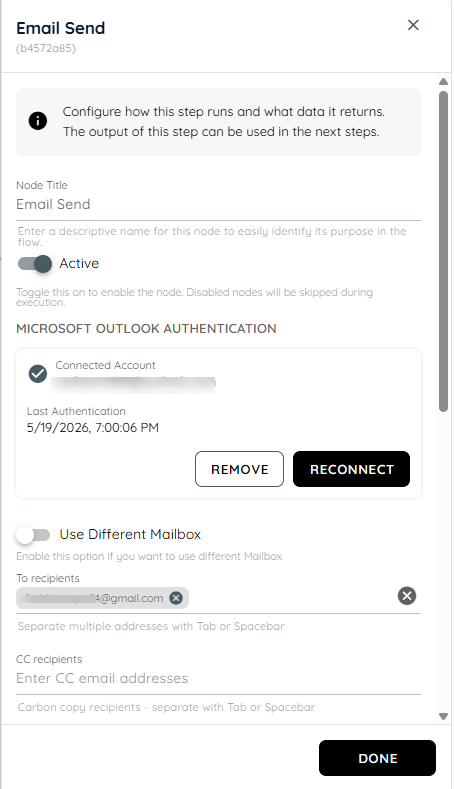
Outlook Email Send
Outlook Email send is used to send emails using an agent in any scenario where it is required. Users can connect their Microsoft accounts to integrate their desired emails and send to any user just like a normal email sender. It help reduce manual work and automatically handles scenarios where emails are to be sent.
-
Node Title : A node title is a clear and descriptive name assigned to a node that identifies its role or purpose within a workflow.
-
Connect Microsoft Account: On clicking this button a popup appears from Microsoft to select an existing account or add a new account to use for sending emails.
-
To Recipients: Specify the primary recipient email address(es) for the message. Multiple email addresses can be added by separating them with tabs or spaces.
-
CC Recipients: Enter the email address(es) of recipients who should receive a copy of the email for visibility purposes. Multiple addresses are supported.
-
BCC Recipients: Provide the email address(es) of recipients who should receive a blind copy of the email. These recipients will not be visible to other recipients.
-
Subject: Enter the title or subject line of the email. This helps recipients understand the purpose of the message before opening it.
-
Body: Compose the main content of the email message. This field supports detailed communication intended for the recipients.
Select the format in which the email body should be sent:
Plain: Sends the email as simple text without formatting.
HTML: Sends the email with rich formatting support such as styling, colors, links, tables, and images. -
Importance: Select the importance of the email to notify the receiver.
-
Upload Document: Add an attachment to the email.

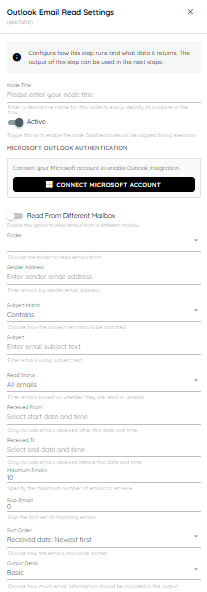
Outlook Email Read
Outlook Email Read is used to retrieve and process emails through an agent in scenarios where email data needs to be accessed automatically. Users can connect their Microsoft accounts to integrate their desired mailboxes and read incoming emails just as they would through a standard email client. This helps reduce manual effort by automatically monitoring, retrieving, and handling email-based workflows, enabling agents to react to incoming messages and extract relevant information when needed.
-
Node Title : A node title is a clear and descriptive name assigned to a node that identifies its role or purpose within a workflow.
-
Connect Microsoft Account: On clicking this button a popup appears from Microsoft to select an existing account or add a new account to use for sending emails.
-
Folder: Select the Outlook mailbox folder from which emails should be retrieved, such as Inbox, Sent Items, Drafts, or a custom folder.
-
Sender Address: Filter emails by the sender's email address. Only emails received from the specified address will be included.
-
Subject Match: Defines how the subject filter should be applied. For example, you can check whether the subject contains, equals, starts with, or search with the specified text.
-
Subject: Enter the subject text to use when filtering emails. The matching behavior is determined by the Subject Match setting.
-
Read Status: Filter emails based on whether they have been read or remain unread. You can choose to retrieve all emails, only read emails, or only unread emails.
-
Received From: Specify the earliest date and time from which emails should be included. Emails received before this date and time will be ignored
-
Received To: Specify the latest date and time up to which emails should be included. Emails received after this date and time will be ignored.
-
Maximum Emails: Specifies the maximum number of matching emails to retrieve. Use this setting to limit the volume of emails processed by the agent in a single execution.
-
Skip Emails: Specifies the number of matching emails to skip before retrieval begins. This can be useful for pagination or when you want to ignore the first set of results.
-
Sort Order: Determines the order in which matching emails are returned. For example, emails can be sorted by received date, with the newest or oldest emails appearing first.
-
Output Detail: Controls how much email information is returned. Basic includes key email properties, Standard adds message content and additional metadata, and Full returns all available email data, including headers, attachments, and complete message details.
Shared Mailboxes
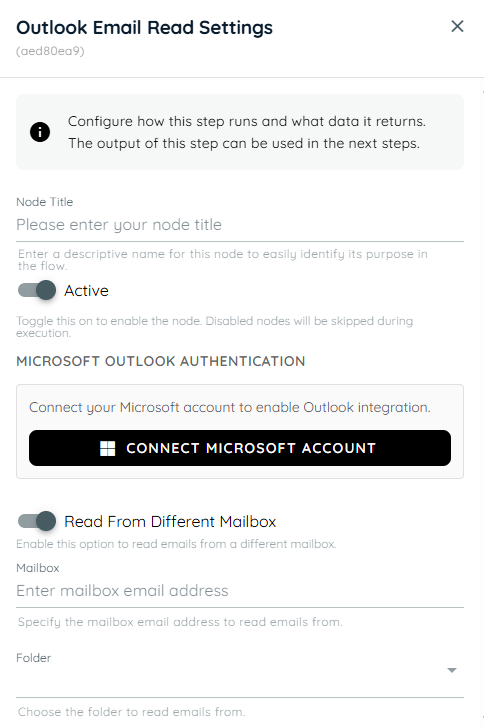
-
Read From Different Mailbox: Enables the agent to retrieve emails from a mailbox other than the currently connected account. Specify the target mailbox to access and read emails from that mailbox.
-
Mailbox: Specifies the email address of the mailbox to access or retrieve data from. This can be the primary user mailbox or a shared mailbox, depending on the configured permissions. The system will use this address as the target source for reading emails or performing mailbox-related operations.
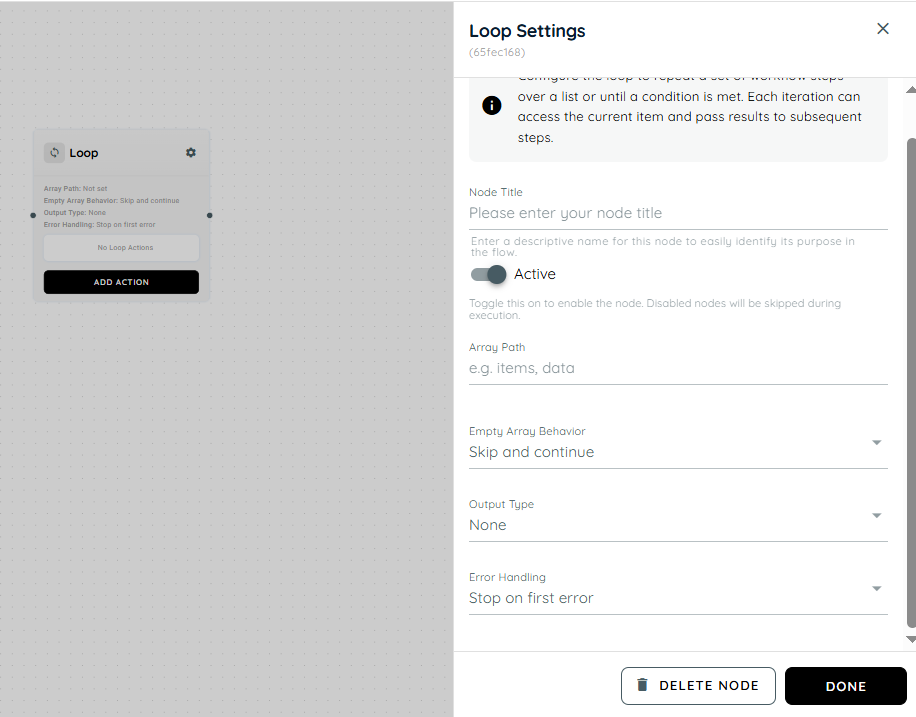
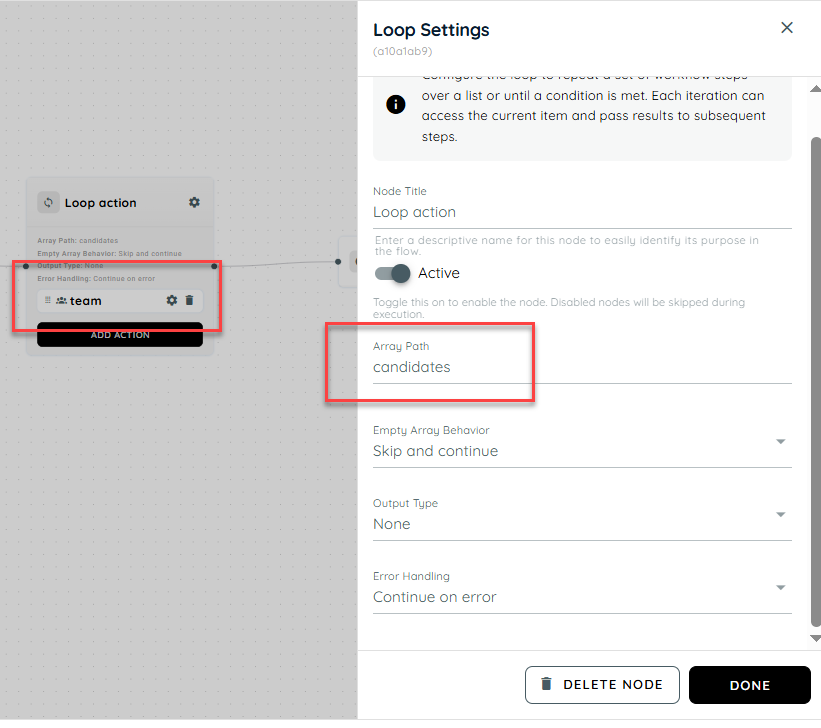
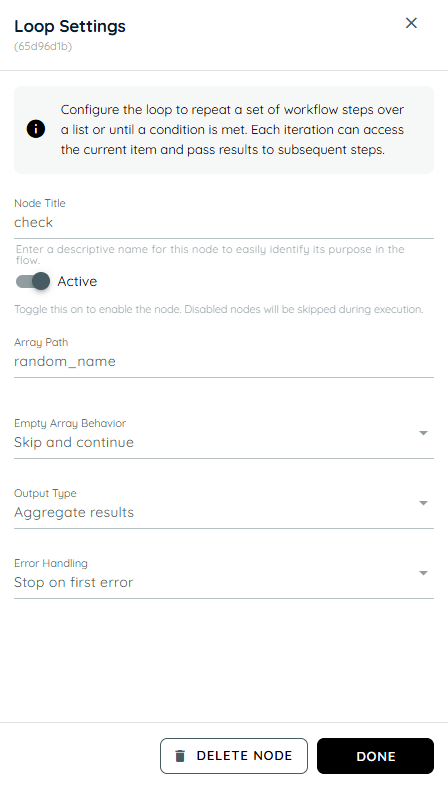
Loop
The Loop Activity in the Agentic Engine is designed to automate repetitive workflow execution by iterating through structured JSON arrays within a flow. It allows the system to process each item in an iterable JSON collection individually and execute one or more child activities for every iteration. This enables flow builders to efficiently handle bulk operations, repeated actions, and data-driven processes without manually duplicating activities. Once all items in the array have been processed, the workflow automatically continues through the normal downstream flow.
Array Path: The Array Path allows users to configure and specify the exact JSON path from which the loop should extract the iterable collection for processing. The system validates the provided array path to ensure it exists within the JSON structure and contains a valid array before loop execution begins. This ensures that the Loop Activity processes only correctly structured data and prevents failures caused by missing, invalid, or non-array inputs.
Empty Array Behavior:
- Skip And Continue: If the configured array is empty, the Loop Activity automatically skips the loop execution and proceeds to the next downstream action in the workflow.
- Fail Execution: In this mode, if an empty array is encountered during processing, an error message is displayed and the loop execution is immediately terminated, preventing any further steps from running.
Output Type:
- None: In this mode, no output is displayed from the actions executed inside the loop. Even if each iteration produces a result, nothing is returned or shown as the final output.
- Aggregated Result: In this mode, all outputs generated from each iteration of the loop actions are collected and combined into a single consolidated result. The final output represents the complete set of results from all iterations.
- Last Result: In this mode, only the output from the final iteration of the loop is displayed. All previous iteration results are ignored, and the system returns the last action’s output as the final result.
Error Handling:
- Stop on first error: In this mode, if an error occurs in any single iteration of the loop, the execution is immediately stopped. The loop does not continue further, and the error is displayed right away.
- Continue on error: In this mode, if an error occurs in an iteration, that error is recorded and shown, but the loop continues executing the remaining iterations without interruption.
- Collect Item status: In this mode, if an error occurs in any iteration, it is shown for that specific item, and the loop continues executing the remaining iterations. Along with continuing execution, the system collects the success or failure status of each item. In the end, it returns a complete report showing the result of every individual iteration, including both successful and failed items.
Add Action: In this option, all available agent actions can be added inside the loop. These actions can be selected and used based on different scenarios and workflow requirements within the loop.
Drag and Drop: Actions can be easily moved into the loop by dragging them from the designer view. Similarly, actions inside the loop can also be dragged out and placed back into the designer view for better workflow arrangement.
Sorting: Within the loop, actions can be rearranged and sorted according to the required execution order. This helps in organizing the workflow so that actions run in a sequence that matches the use case or business logic.
Scenario of Loop
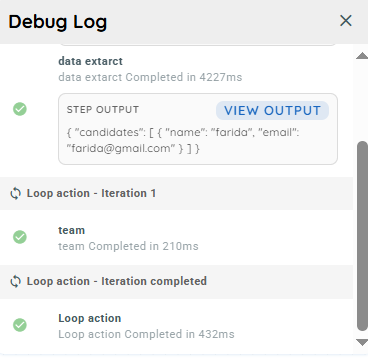
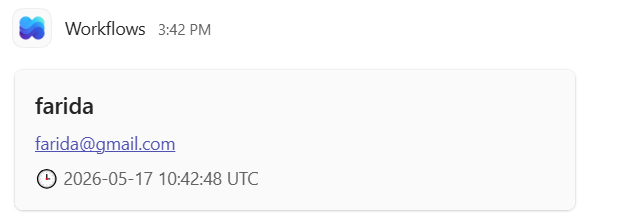
We collect the user’s name and email from the user and forward them to Microsoft Teams.
- In the Knowly interaction, we are prompting the user to provide their username and email address.
- In this action, we extract the output from the previous step and storing it in the specified array path, and return the result in a properly structured JSON format.
- In this action, we use the team activity within the loop and reference the candidates array path. The name and email from each item are passed into the team activity, where they are used to send the corresponding details.

Result
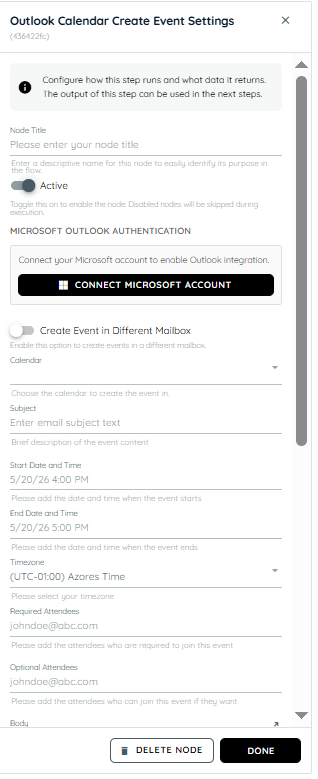
Outlook Calendar Create Event Settings
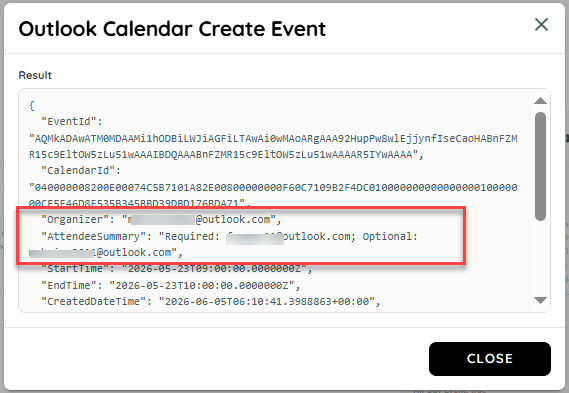
Outlook Create Event Activity enables flow builders to automatically create calendar events in Microsoft Outlook using a connected Microsoft account. It supports creating events in primary or shared calendars, adding required and optional attendees, setting locations, reminders, and time zones, and generating online meeting links such as Microsoft Teams meetings. The activity returns structured JSON output containing event details, making it easy to use in downstream workflow automation.
Microsoft Outlook Authentication: This refers to the login and authorization process with Microsoft Outlook services that verifies the user’s identity before allowing access. It ensures that only authenticated users can access mailbox and calendar data through secure protocols like OAuth or Microsoft Graph. Without successful authentication, actions such as creating or editing events are not permitted.
Create Event in Different Mailbox: This allows users to create calendar events in a mailbox other than their primary one, such as shared or delegated mailboxes.
Mailbox: It can be a personal mailbox or a shared one depending on the configuration. When creating events, selecting the correct mailbox ensures the event is stored in the intended account.
Calendar: The calendar is a scheduling component within a mailbox where events are created and managed. A mailbox can include multiple calendars such as primary, shared, or group calendars, and selecting the correct one ensures the event is placed in the appropriate context. The email entered in the mailbox determines the corresponding available calendars, which are then shown in the dropdown. The user can choose from these options and create an event in the selected calendar.
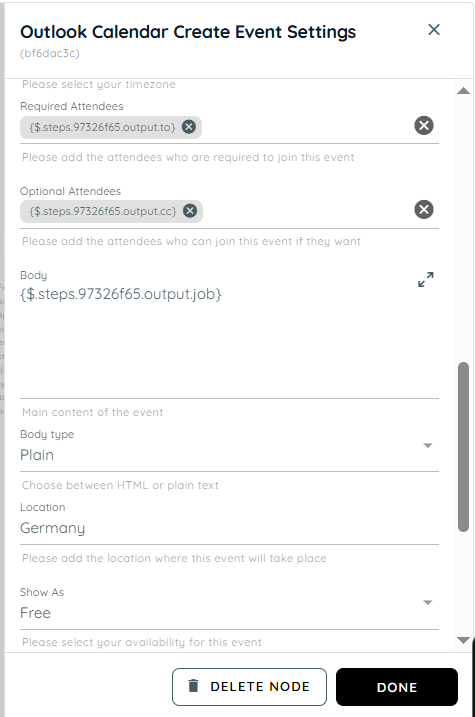
Subject: The subject is the title or heading of a calendar event that briefly describes its purpose. It is displayed in calendar views and invitations sent to attendees.
Start Date and Time: This defines when the event begins, including both the date and specific time. It is a mandatory field that determines the starting point of the scheduled meeting.
End Date and Time: This specifies when the event ends and must always be later than the start time. It defines the total duration of the meeting or appointment.
Timezone: The timezone determines the regional time context in which the event is scheduled. It ensures that meeting times are correctly converted for attendees in different locations. Outlook uses this setting to maintain consistency across global calendars.
Required Attendees: These are the participants who must attend the meeting and are sent mandatory invitations. They are expected to respond with acceptance or rejection of the invite.
Optional Attendees: Optional attendees are invited to the meeting but are not required to attend. They receive the same invitation but have the flexibility to join based on availability. This is useful for stakeholders who need awareness but not mandatory participation
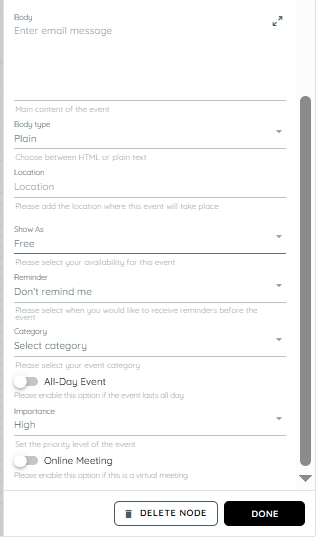
Body: The body contains detailed information about the event such as agenda, notes, and instructions. It supports additional context beyond the subject line.
Body Type: Body type defines the format in which the event description is displayed, such as plain text or HTML. It controls how formatting like links, colors, and structure appear in the event body. Choosing the correct type ensures proper rendering across clients.
Location: Location specifies where the meeting will take place, either physically or virtually. It can include an address, room name etc.
Show as: This setting defines the availability status during the event such as Busy, Free, or Tentative. It affects how the time slot appears on calendars for other users. It helps indicate whether the user is available during the scheduled period.
Reminder: Reminder is a notification set before the event starts to alert participants. It can be configured in minutes, hours, or days depending on requirements. Outlook triggers alerts based on this setting to ensure timely awareness. It helps prevent missed meetings.
Category: Categories are labels used to organize and group calendar events, often shown in different colors. They help users classify meetings based on type, project, or priority. Multiple categories can be assigned depending on configuration.:
All Day Event: An all-day event is scheduled without specific start or end times and typically spans an entire day. Such events appear at the top of the calendar view.
Importance: Importance indicates the priority level of an event such as Low, Normal, or High. High importance events are visually highlighted in Outlook to draw attention. It helps recipients understand the urgency or critical nature of the meeting.
Online Meeting: This setting determines whether the event includes a virtual meeting option. When enabled, it automatically generates a link for platforms like Microsoft Teams. Attendees can join remotely using the provided link.
Scenario of Outlook Calendar Create Event
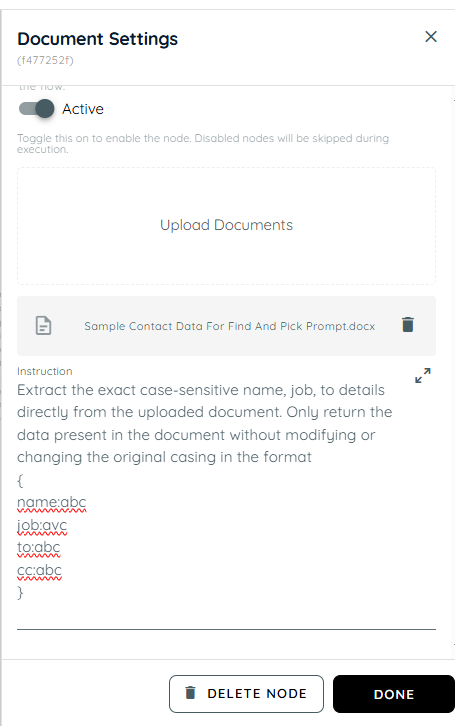
- In the first action, a document is uploaded containing details such as the recipient's name, job information, and the email addresses to be used in the To and CC fields and we are extracting these details from the document.
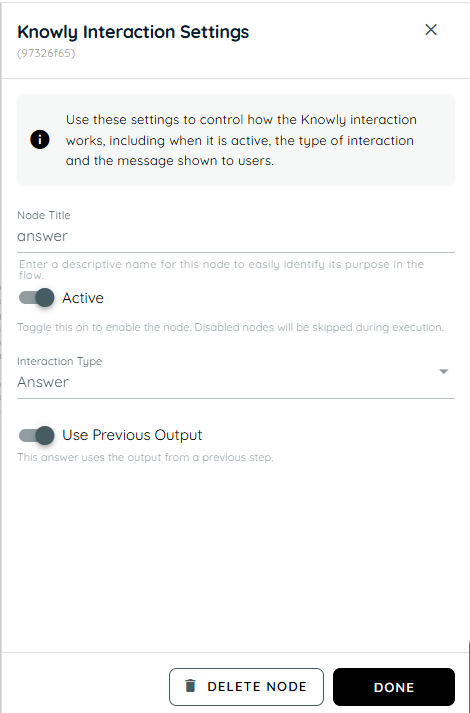
- In the second action, the extracted details from the uploaded document are processed and the resulting information is stored in the Answer
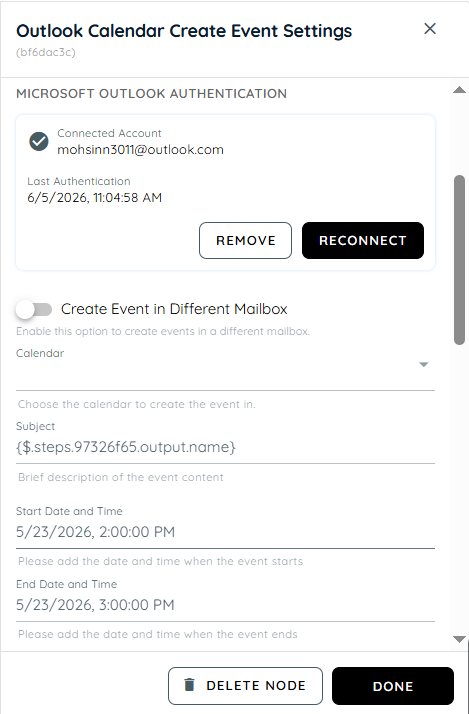
- In the third action, the extracted data is mapped to the event fields: the Name is passed into the Subject, the To email addresses are added as Required Attendees, the CC email addresses are added as Optional Attendees, and the Job information is populated in the Body of the event.
Result
Scenario of Outlook
Scenario of Outlook
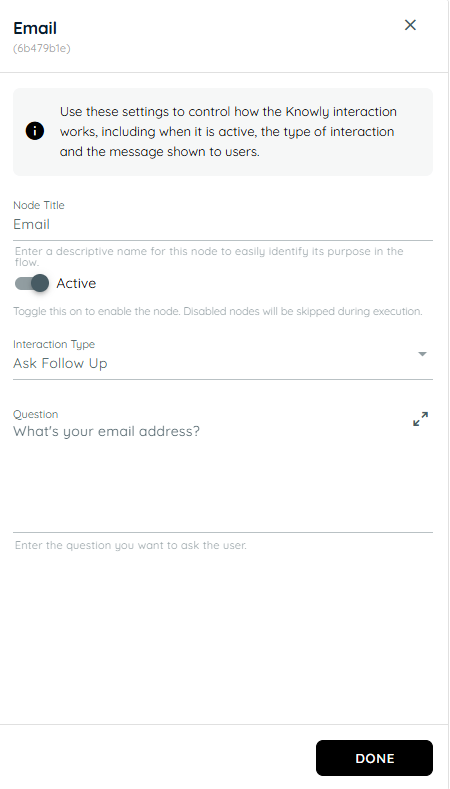
- In the first action we are generating a random object containing 2 random human names.
- In the second action a loop is running in which in the first action of the loop it shows a random name and in the second action it confirms if the user likes these names or not.
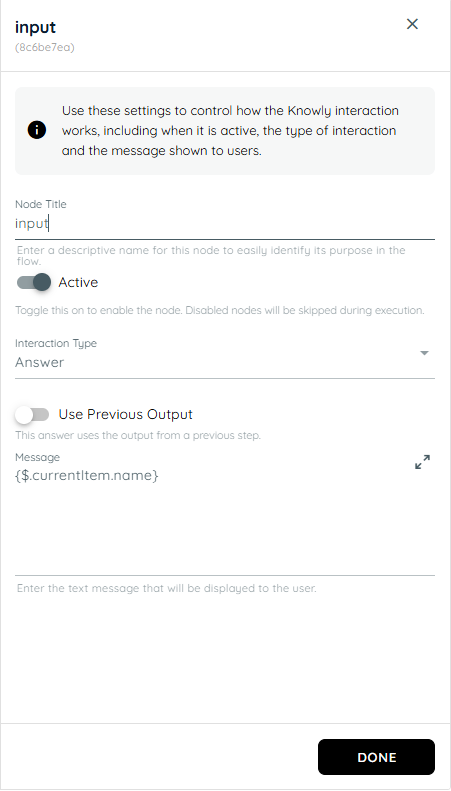
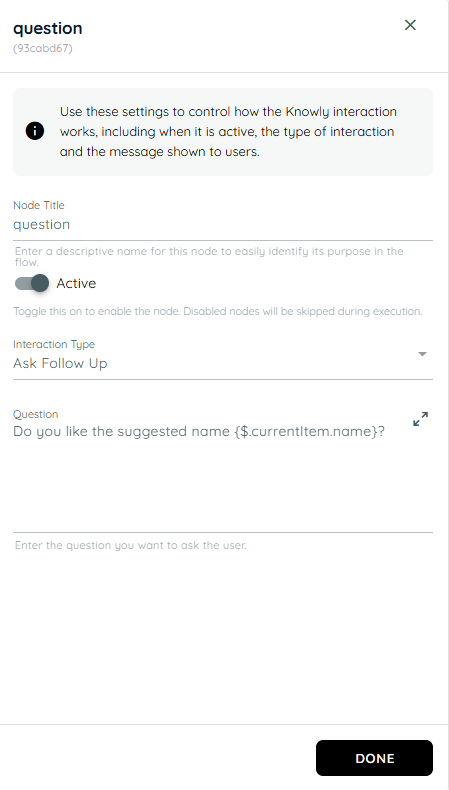
- In the third action the stored name and result taken from user is stored in an object.
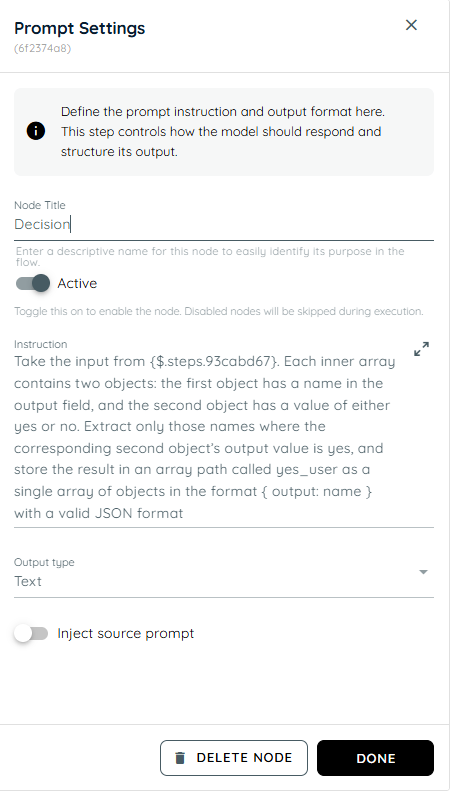
- In the fourth action the all actions are in a loop and knowly interaction asks from the user about their email address then stores the value from the previous input and passes it to the teams card and sends an team informative card and also sends an email to the selected user id of that stored object names.
n8n Connector
The n8n Connector allows user to connect their agent flows with external workflows created in n8n. Using this connector, flow can send structured JSON data to an n8n webhook and optionally wait for a response or callback before continuing execution.
The connector is designed for flexible automation scenarios such as:
- Triggering external workflows.
- Sending data to third party systems.
- Processing AI-generated outputs.
- Running background automations.
- Receiving asynchronous updates from external services.
Activity Flow
The n8n Connector is an activity available inside the Flow Builder.
It allows your agent flow to:
- Send JSON payloads to an n8n webhook URL.
- Choose how execution should behave.
- Optionally receive a response from n8n.
- Continue downstream execution using returned data.
How the Connection Works
The connector communicates with n8n using a webhook URL.
Flow Execution Process
Agent Flow
   ↓
n8n Connector
   ↓
Webhook Request Sent to n8n
   ↓
n8n Workflow Executes
   ↓
(Optional Response or Callback)
   ↓
Flow Continues
Adding the n8n Connector
To add the connector:
- Open the Flow Builder.
- Click Add Activity.
- Search for n8n Connector
- Select the connector
- Configure the required settings
The connector appears in the activity catalog alongside other available integrations.
Connector Configuration
- Webhook URL
The Webhook URL is the endpoint exposed by your n8n workflow.
Example:
https://your-n8n-instance/webhook/register-userThe connector sends JSON payloads to this endpoint during execution.
Requirements
- Must be a valid HTTPS URL
- Must point to an active n8n webhook
- Must accept JSON requests
Supported Execution Modes
The connector supports two execution modes.
Each mode controls how the flow waits for and processes responses from n8n.
- Fire-and-Forget Mode
The flow sends data to n8n and immediately continues execution without waiting for a response
Best For
- Notifications
- Logging
- Background automation
- Synchronous Mode How It Works
The flow waits for n8n to finish processing and return a response.
Best For
- Real-time processing.
- Data enrichment
- Validation workflows
Authentication Configuration
The connector supports optional authentication settings.
User can configure authentication details required by your n8n webhook.
Supported approaches may include:
- API Key headers.
- JWT tokens.
- Custom authentication headers.
JSON Input Requirements
The n8n Connector accepts only valid JSON input.
Important
The upstream activity connected to the n8n Connector must produce structured JSON output.
Supported example:
{
  "taskTitle": "Create Report",
  "assignedTo": "John"
}
Unsupported example:
This is plain textValidation Rules
The UI validates configuration before saving or execution.
Validation includes:
- Missing webhook URL
- Invalid URL format
- Unsupported execution mode
- Invalid JSON structure
- Missing required authentication fields
- Contradictory configuration settings
Warnings may also appear if the connector is attached to a non-JSON-producing upstream step.
Timeout and Retry Settings
Depending on platform configuration, users may configure:
- Request timeout duration
- Retry attempts
These settings help improve reliability for temporary failures or slow external systems.
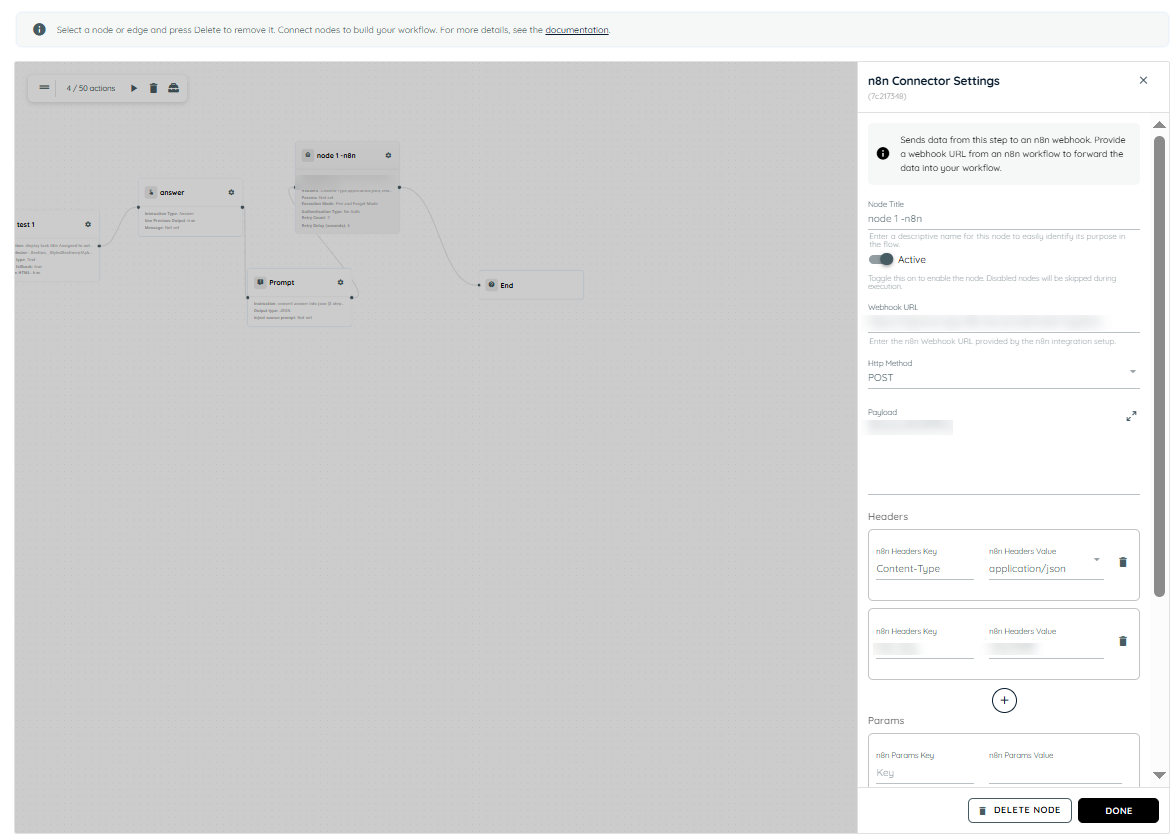
n8n connector settings
Scenario of n8n
The following agent is created using the n8n Connector. The agent collects data from HTML fields and checks the email entered in the Notes field to determine whether it belongs to Outlook or Gmail. Based on the email type, a different action is performed.
Agent Configuration on the Portal
The agent is created with the following actions:
- HTML Capture
Captures user input from website fields.
- Interaction Type: Answer
Displays the captured field data on the UI.
- Prompt
The prompt converts the captured data into JSON format and sends it to n8n through a webhook.
- n8n connector
This action type connects with n8n via webhook URL and then run the n8n process.
n8n Workflow
The n8n workflow performs the following actions:
- Receives data from the webhook.
- Captures and processes the received fields.
- Sends an email using the captured information.
- Checks conditions based on the email domain.
Conditional Actions
- If the email belongs to Outlook:
A folder is created in Google Drive - If the email belongs to Gmail:
An Excel sheet is created in Google Sheets
Workflow Execution
- The HTML Capture action collects field data from the website.
- The Answer interaction displays the captured data on the UI.
- The prompt converts the data into JSON format.
- The JSON payload is sent to n8n via webhook.
- n8n processes the workflow and evaluates the email condition.
- Based on the email type:
- A Google Drive folder is created for Outlook emails, or
- A Google Sheet is created for Gmail emails.
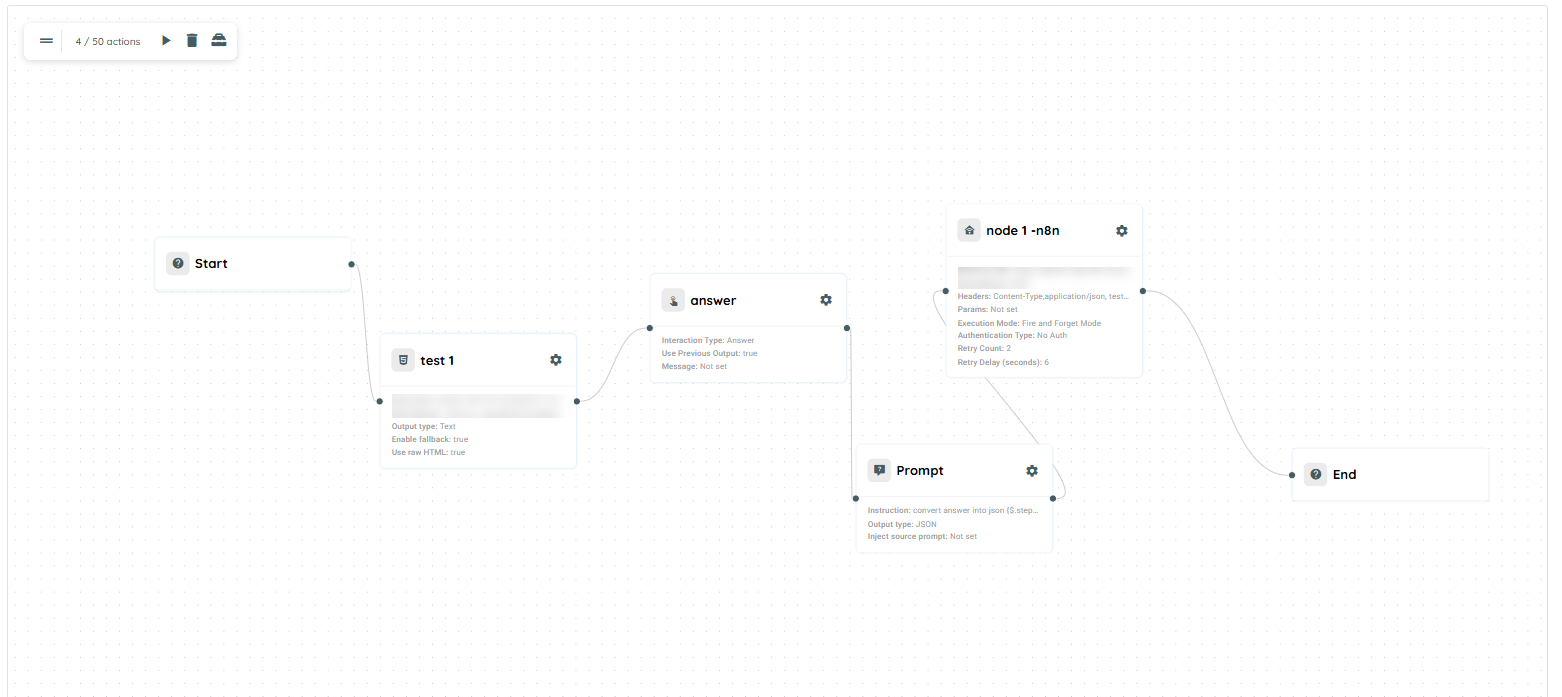
n8n scenario
Zapier Connector
The Zapier Connector allows user to connect your workflows with Zapier automations. It sends structured JSON data from user's flow to a Zapier webhook, enabling integration with thousands of applications and services supported by Zapier.
The connector supports Fire and Forget execution modes : Sends data to Zapier and immediately continues the flow.
When to Use the Zapier Connector
Use the Zapier Connector when you want to:
- Trigger Zapier workflows from your process.
- Send data to external applications connected through Zapier.
- Automate notifications, CRM updates, ticket creation, document generation and more.
- Receive processed results from Zapier before continuing your workflow.
Before using the Zapier Connector:
- Create a Zapier automation that starts with a Webhook Trigger.
- Copy the webhook URL provided by Zapier.
- Ensure the previous step in your flow produces valid JSON data.
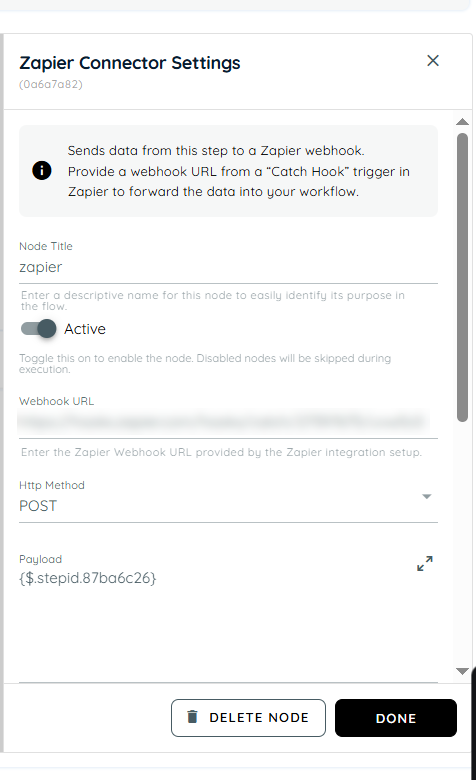
Configuration
Webhook URL
Enter the Zapier webhook URL that will receive data from the flow.
Payload
The connector accepts only valid JSON payloads.
Headers
Users can add custom HTTP headers if required by your integration.
Authentication (Optional)
If Zapier setup requires authentication, user can configure additional authorization headers or credentials as needed.
Timeout and Retry Settings
Depending on platform configuration, users may configure:
- Request timeout duration
- Retry attempts
These settings help improve reliability for temporary failures or slow external systems.
Scenario of Zapier
The following agent is created using the Zapier Connector. The agent collects a user's age, sends the information to Zapier for processing, and triggers different email notifications based on whether the user qualifies as a senior citizen.
Agent Flow Configuration
- Knowly Interaction – Follow-up Question
A Follow up interaction is used to ask the user:
"What is your age?"
The user's response is collected for further processing.
- Prompt
A Prompt activity converts the user's response into a valid JSON structure that can be sent to Zapier.
- Knowly Interaction – Answer
An Answer interaction displays the captured age on the UI.
- Zapier Connector
The Zapier Connector sends the JSON payload to a configured Zapier webhook URL.
The payload uses dynamic data received from the user during the conversation.
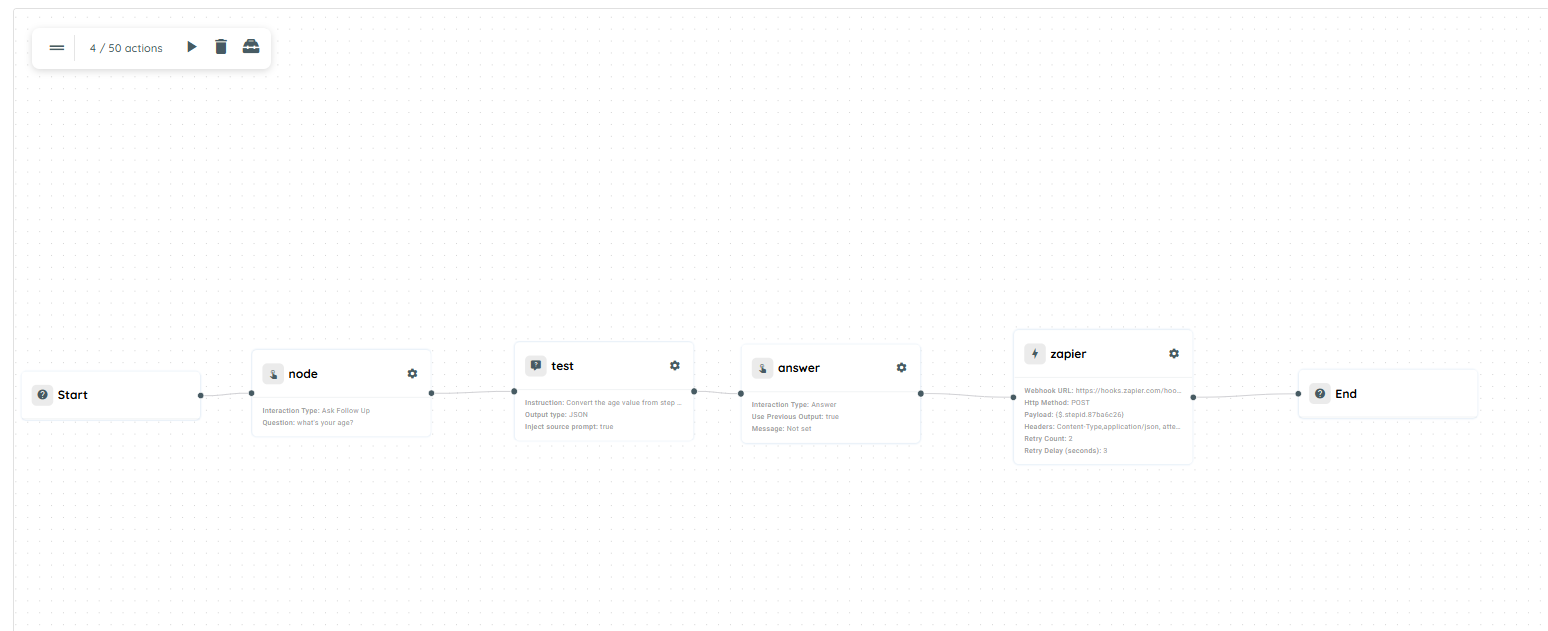
scenario of zapier
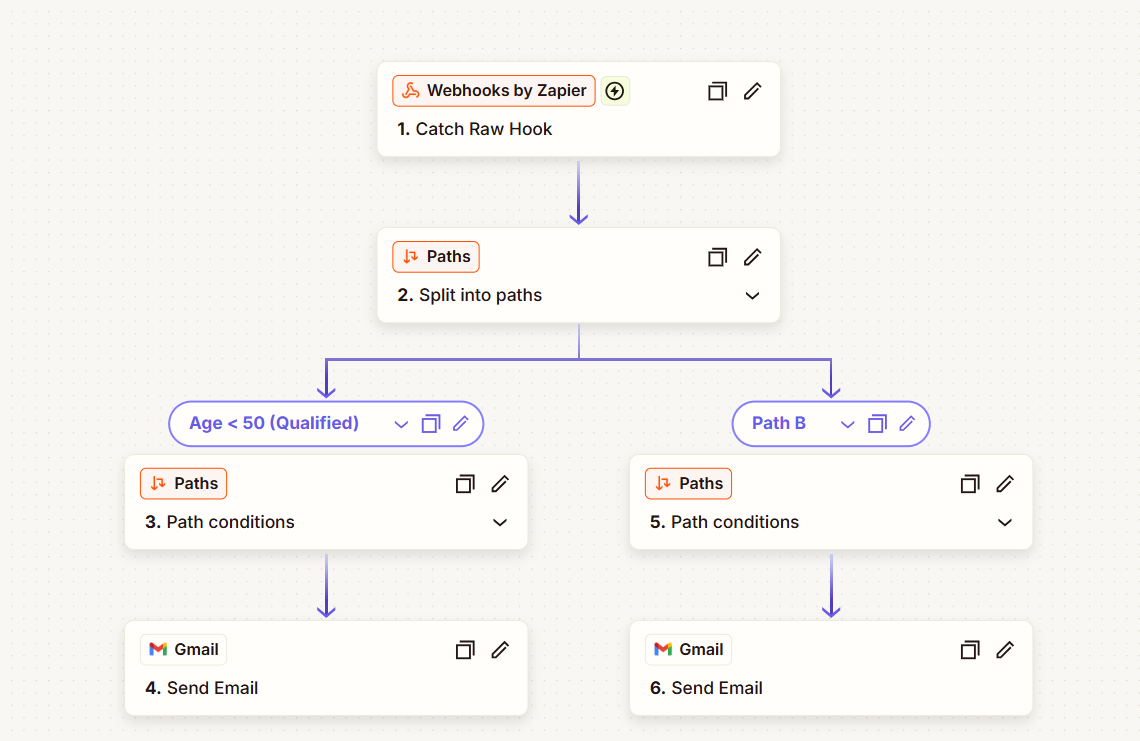
Zapier Workflow Configuration
- Webhook Trigger
The Zapier workflow starts with a Webhook Trigger that receives the age data sent by the agent.
- Conditional Branching
Zapier evaluates the received age and routes the workflow through one of two paths:
Condition 1: Age is less than 50
If the user's age is below 50, Zapier sends an email with the message:
"Your age is less than 50."
Condition 2: Age is 50 or greater
If the user's age is 50 or above, Zapier sends an email with the message:
"You are classified as a senior citizen."
- Email Notification
Based on the evaluated condition, Zapier automatically sends the appropriate email to the user.
Dynamic Data Referencing in Agent Workflow
In the Agent workflow, dynamic data referencing allows values from previous steps or initial inputs to be reused across different actions. These references can be used in any configurable field within the agent (e.g., payload, headers, message body, prompts, URLs, or documents).
The agent executes multiple actions such as knowly interaction, prompt, document processing, loop, and webservices. Each action generates output data that can be reused in subsequent steps.
To enable this, we use dynamic variables to reference:
- Initial input data
- Outputs from previous steps
This ensures seamless data flow across the entire workflow without hardcoding values.
How Data is Accessed
- $.input
- Refers to the initial data provided at the start of the agent execution.
- Can be used in any field where input data is required.
- The syntax used to access data from the initial input data in the agent workflow is
{$.input}.
Example Use Cases:
- Displaying user input in interaction responses
- Sending input data in API requests
- Using input values inside prompts

- $.steps.stepId
- Refers to the output of a specific step using its Step ID.
- Enables accessing processed or transformed data from earlier steps.
- The syntax used to access data from previous steps in the agent workflow is
{$.steps.stepId}.
Example Use Cases:
- Using prompt output in a webservice request
- Passing document data into another step
- Displaying processed results in interaction responses
- Using loop results in notifications
Scenarios
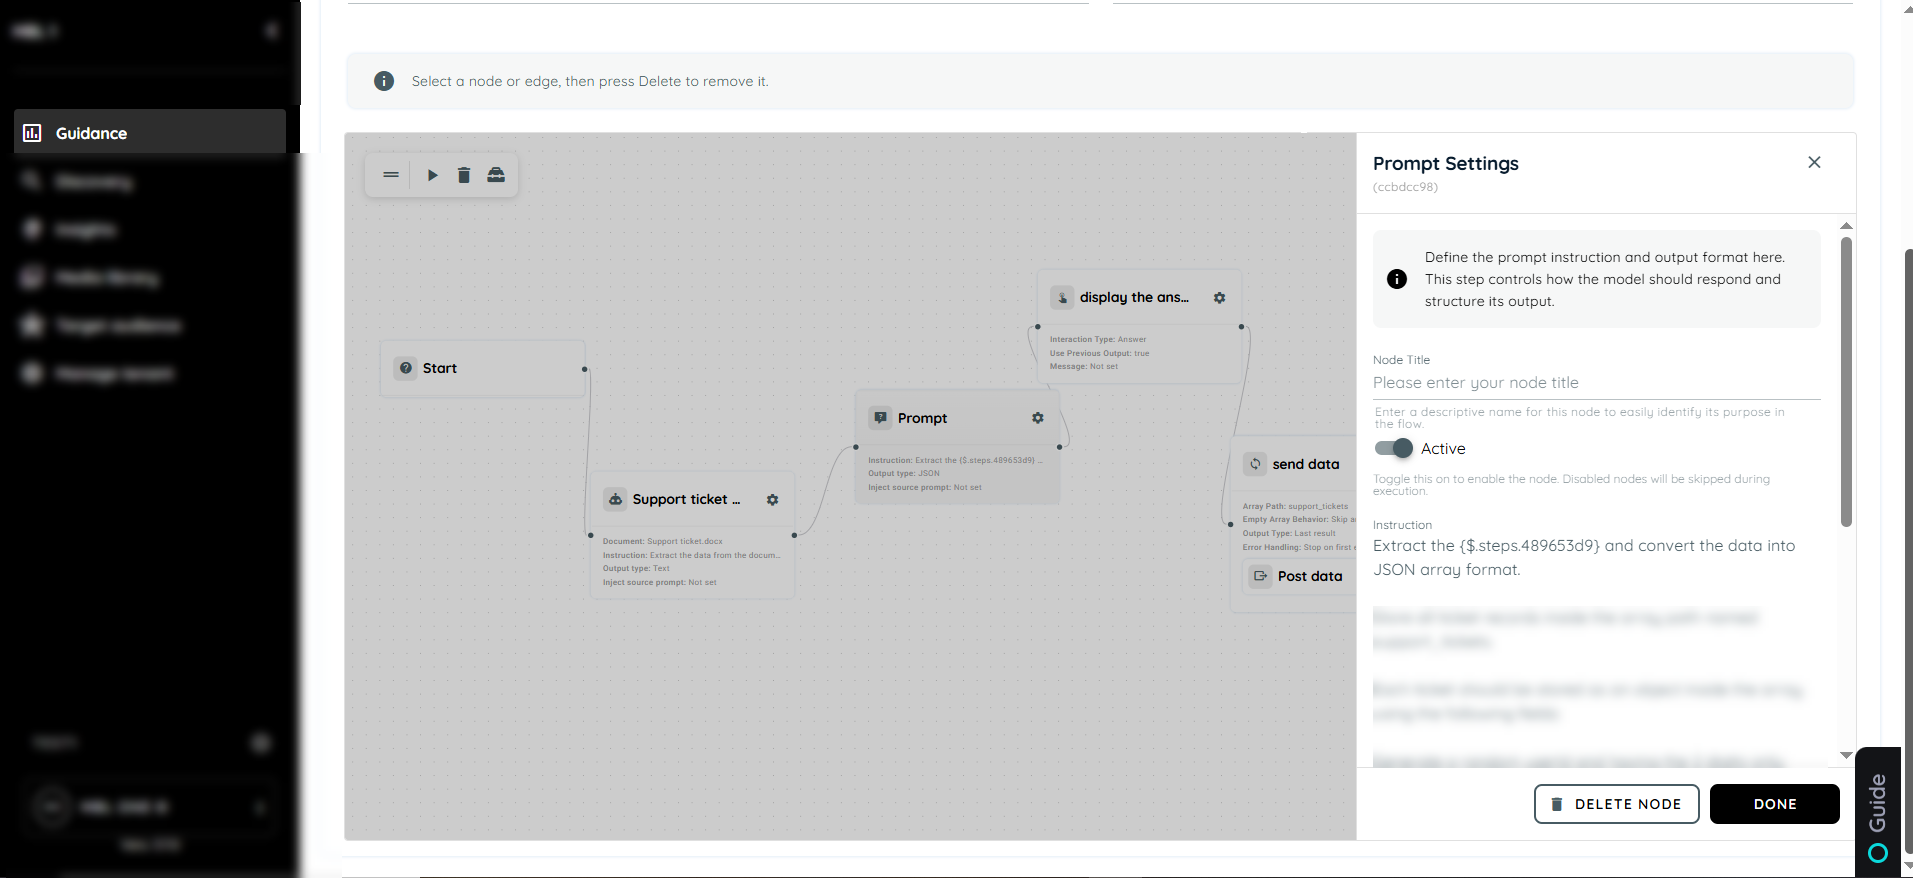
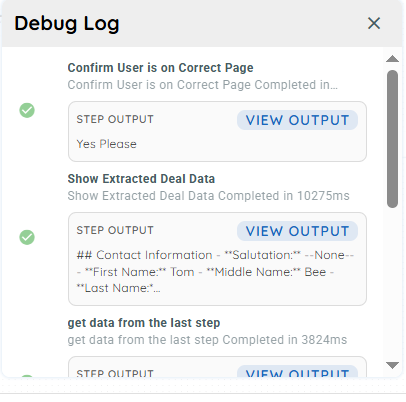
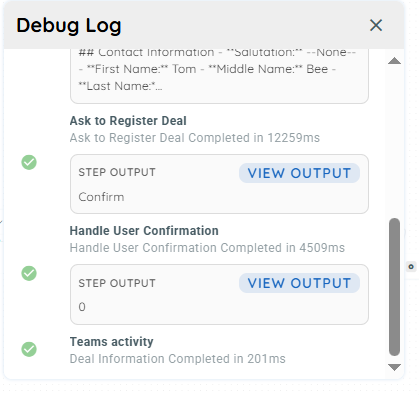
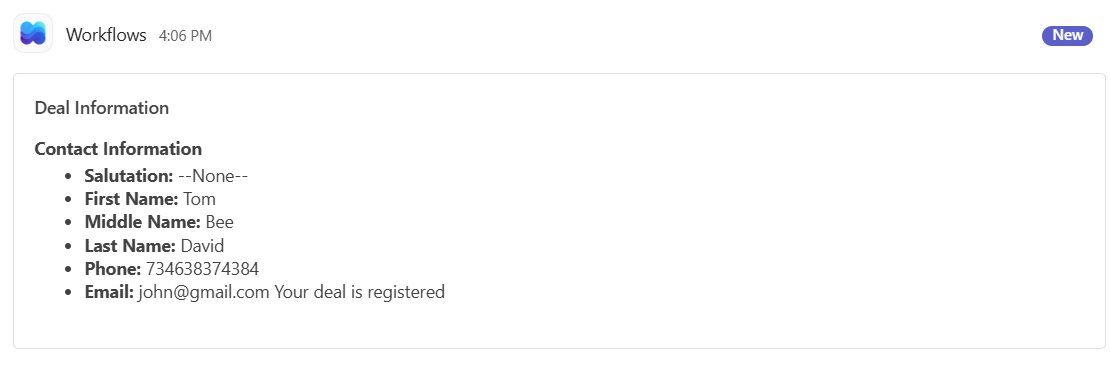
The user is on the correct deal creation page and checks if a valid deal has been successfully detected. Once the deal is identified, the agent extracts the relevant deal information and displays it in Knowly in a clean, user-friendly format instead of raw JSON. The agent then asks the user whether the deal should be registered. If the user confirms, the deal information is automatically posted to Microsoft Teams, completing the registration workflow successfully.
Agent Workflow Example
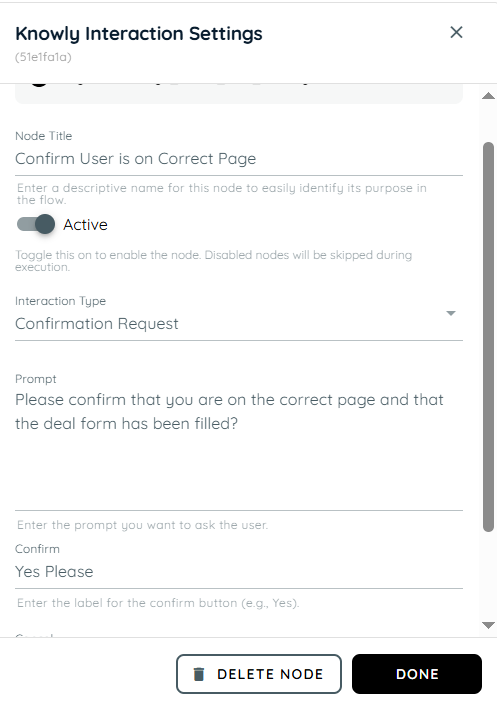
- The first action is a Knowly interaction using the Confirmation Request type. It is used to verify that the user is on the correct page and to confirm them to proceed with filling in the required form data.
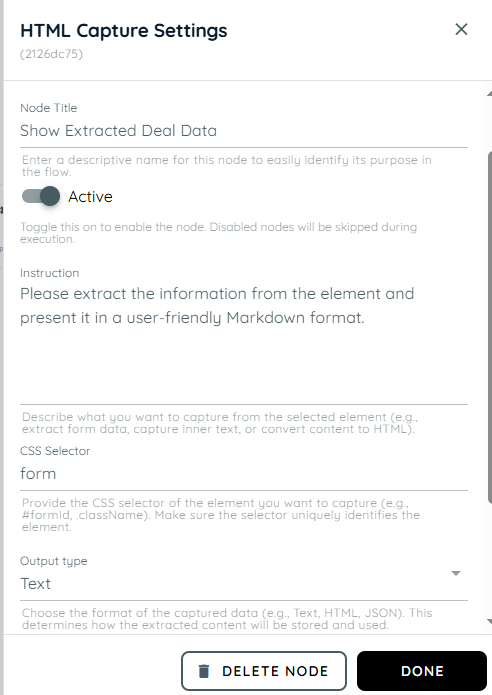
- In the second action, the HTML Capture is used with a prompt to extract information from the form element. The extracted data is then formatted and presented in a user-friendly Markdown structure for better readability and clarity.
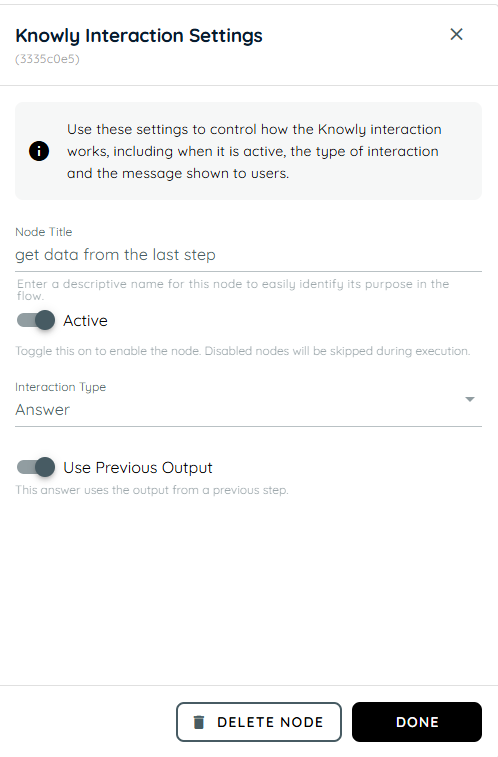
- In the third action we are using the knowly interaction where we take the output from the previous action and present it as the answer.
- The fourth action is a Knowly interaction using the Confirmation Request type. It is used to verify that the user successfully registered the deal.
- In the fifth action, branching is used to handle the user’s response from the confirmation message. If the user selects “Yes,” a message is displayed on the team indicating successful confirmation. If the user selects “No,” the system responds that the deal has not been registered.
- In this action, Team Activity is used to send updates based on the user’s confirmation. When the response is “Yes,” the result from Step 2 is shared with the team along with a message confirming that the deal has been successfully registered.
- In this action, a Knowly Interaction Answer is used to handle the negative confirmation. If the user selects “No,” a message is displayed indicating that the deal has not been registered.
Once all actions are configured, connect the complete agent flow by linking each step in sequence. Then, use the debug mode to execute and test the agent’s workflow.
Output of the Agent Workflow Example
Complete Workflow Overview

Agent Logging
This feature enables portal users to view agent execution history and inspect execution details when available. It provides a structured UI for monitoring agent activity and supports troubleshooting by exposing detailed execution data in a controlled and user-friendly manner.
The Agent Execution Logs module displays a list of execution records associated with a specific agent. Each record includes essential metadata such as execution start time, duration, and the triggering application.
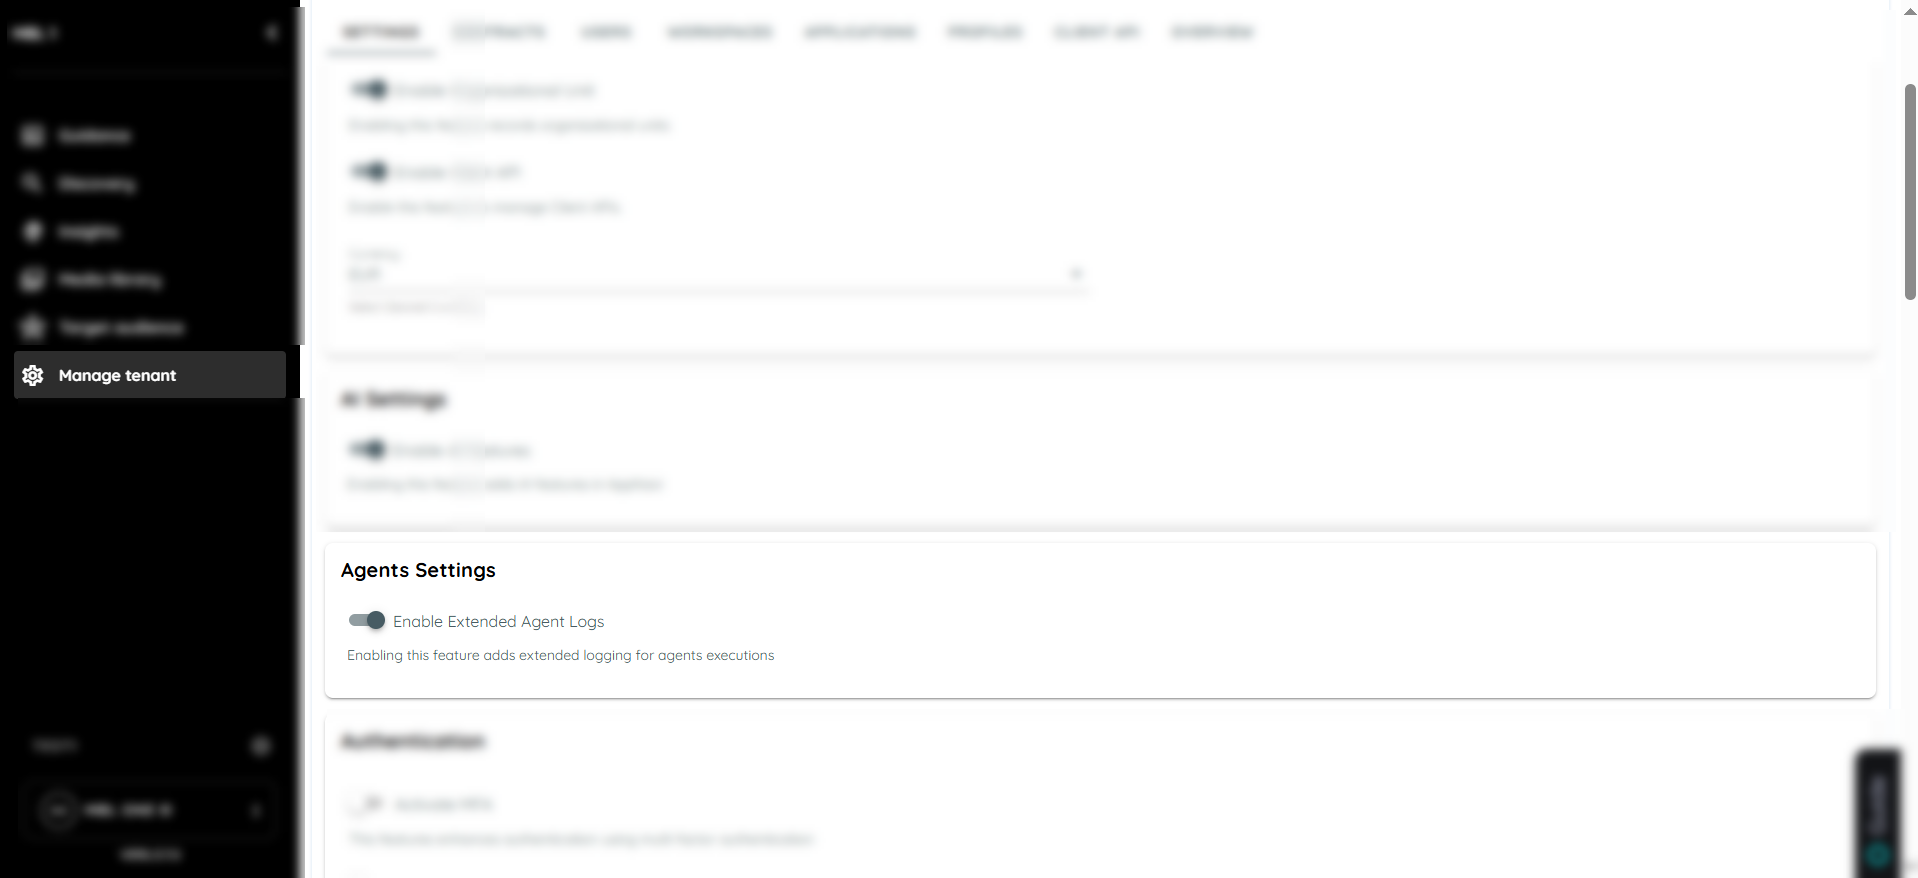
Extended Agent Logs Setting
Within the Manage Tenant → Agent Settings, an option “Enable Extended Agent Logs” is available to control the level of execution logging.
When Enabled:
- Agent execution logs are captured at an extended level.
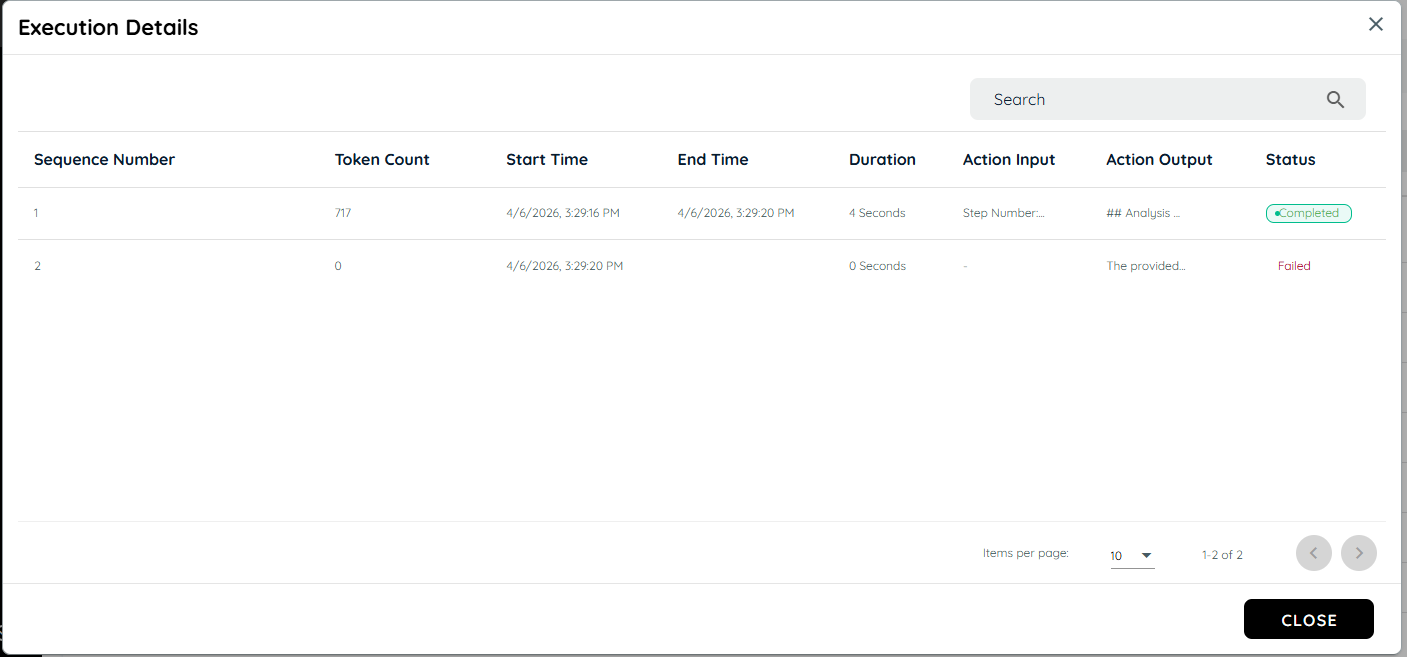
- The “View Execution Details” action becomes available input and output data of the agent is displayed.
- Users can access structured and formatted execution stack Readable representation of extended execution data and detailed information is displayed in a modal/dialog for better clarity and troubleshooting.
When Disabled:
- Only basic execution metadata is available in the logs table.
- Extended execution data is not captured or displayed.
- The “View Execution Details” action is hidden.
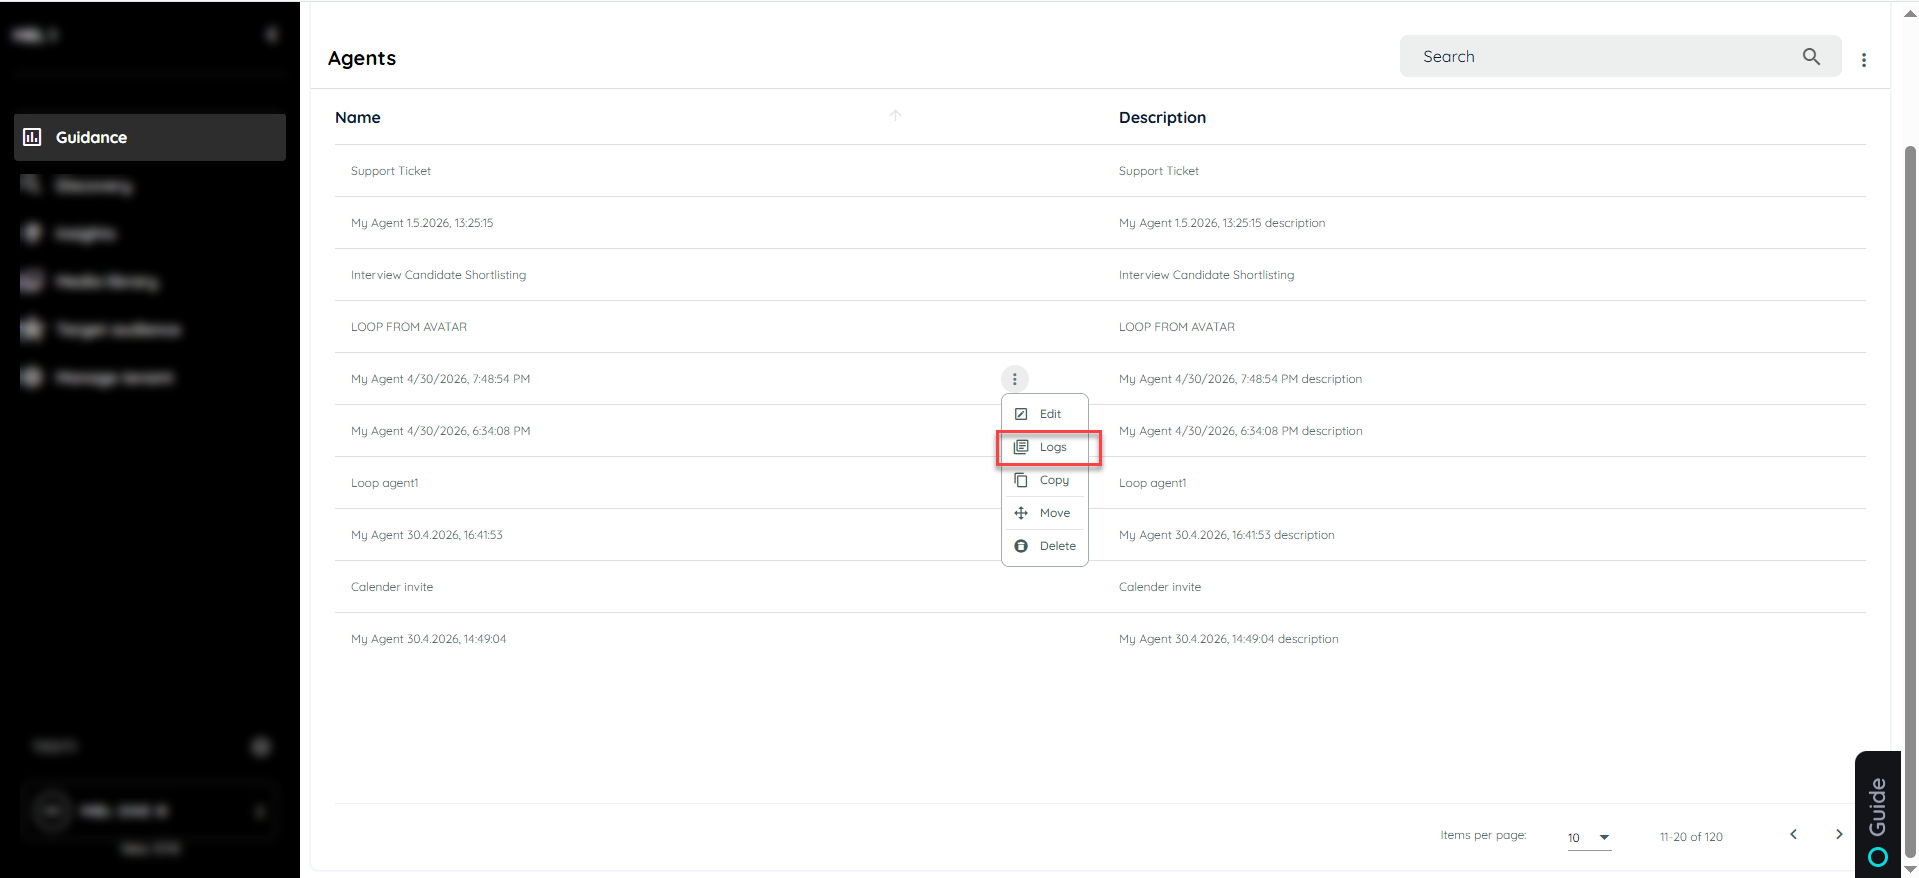
To access agent logs, go to the Agent tab in the portal and identify the specific agent whose execution history you want to review. Open the context menu (three-dot menu) for that agent, and from the list of available options, select Logs to proceed to the execution logs view.
After selecting the Logs option, the execution logs page is displayed, providing a comprehensive view of all log entries related to the selected agent. This section allows users to review key execution details, including start time, duration, and the triggering application.
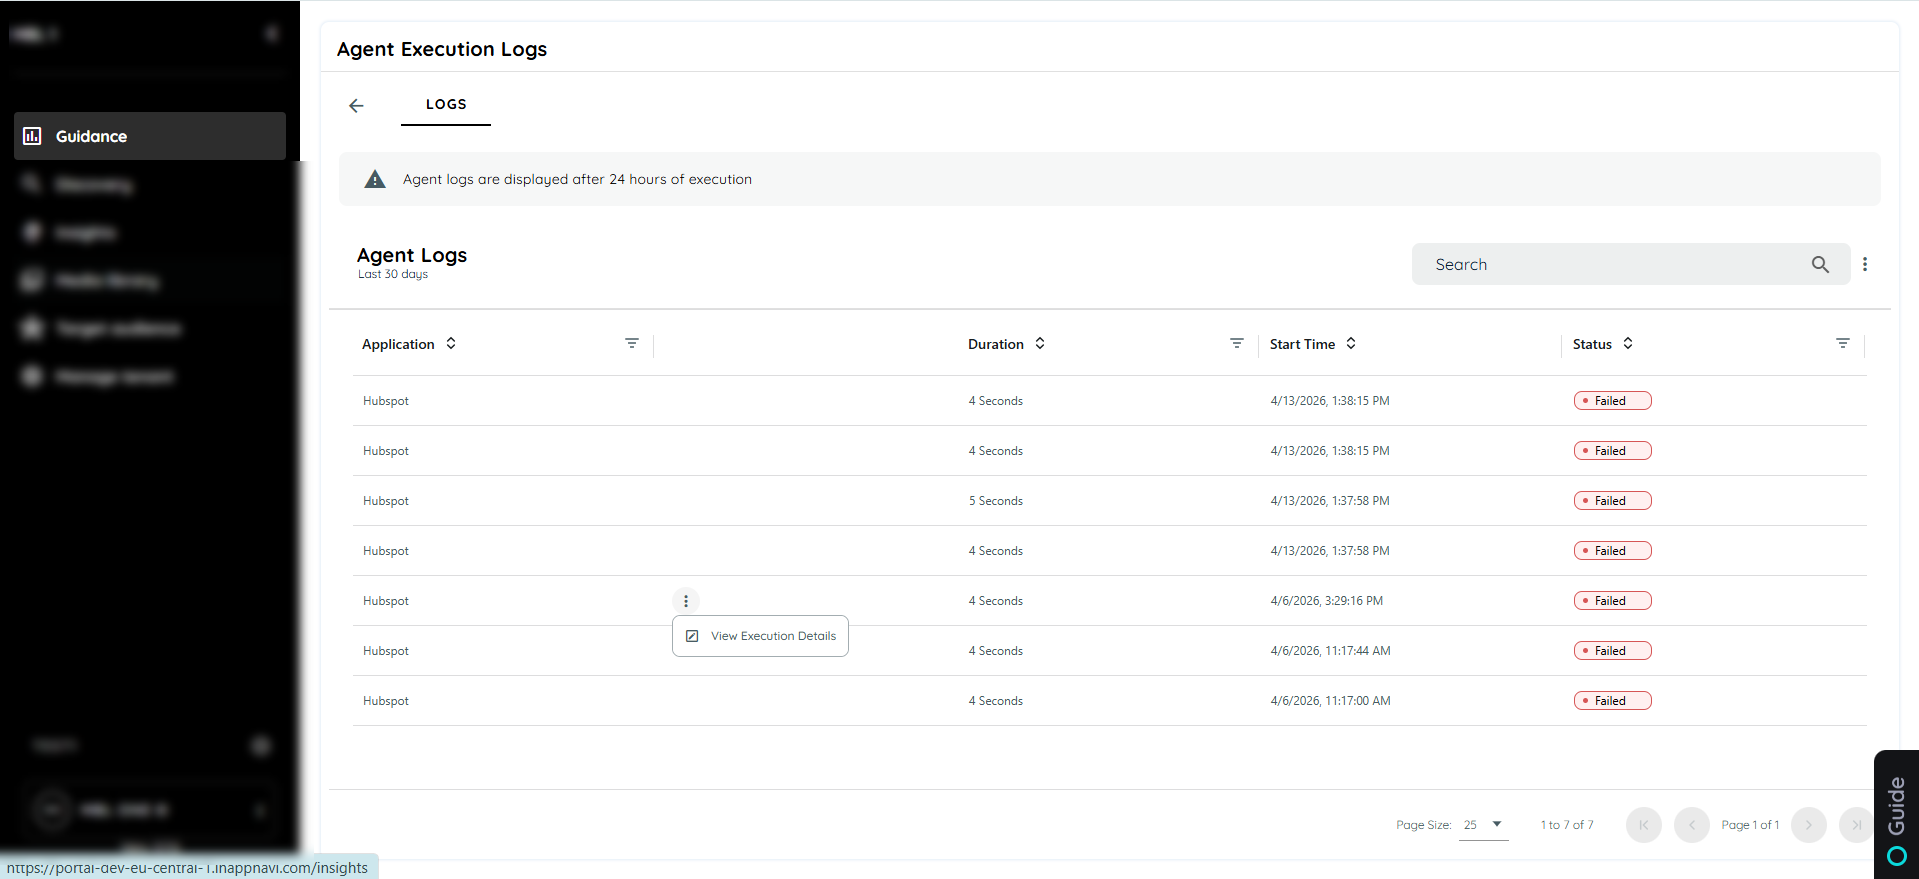
Within the logs interface, an Extended Logging option is available to access more detailed execution information. When selected, it opens a comprehensive view of the agent execution logs, including a structured and well-formatted execution stack.
Updated about 2 months ago